Reviews

Hardware review: LaCie 500 GB external hard drive

Updated 11/3/08: I’ve seen renewed traffic to this post, and wanted to let you know that at this point the drive retails for $99. I think that price point is a little high given that 1TB drives have become affordable, and bare 1TB drives only cost $110-130. This means that if you’re looking for an external 500 GB drive, it should cost you somewhere between $79-89. Keep in mind that the manufacturer has to strike a balance between the cost of the drive and the cost of the enclosure, and while 500GB drives are bargains now, it will soon become impractical to manufacture them at the large scale needed for low price points, because the 1TB drives will become the new commodity hard drive. My message is, get them while you can, or spring for the 1TB external drives. The original review continues below.

This unassuming little black drive is a great product and a great buy at only $120 for 500 GB. It seems that LaCie has discontinued it. Buy.com, where I purchased two of them, no longer has it in stock. Amazon still has it, thankfully. Read below to see why I like it.

500 GB LaCie USB hard drive

The price is right for all that space. C’mon, 500 GB for $120? Sign me up! On top of all that, it’s whisper quiet! My big complaint with a previous 500 GB LaCie drive that I owned was the noise it made. Boy, was it loud! Not this drive. It’s so quiet, I can’t even hear it, unless it’s being actively accessed, and even then, it’s pretty quiet.

What’s also REALLY nice about it is that it doesn’t have a power brick. You know what I’m talking about, right? It’s that big, heavy annoying power adapter that sits in the middle, between the part you plug in the outlet and the part that plugs into the drive. Not on this drive! I love that! It only has a simple, unassuming cable, and that does wonders when it comes to cable management and keeping the underside of my desk neat. These are all the cables you’ll need with the drive.

500 GB LaCie USB hard drive with cables

Here’s what the back of it looks like. Again, no annoying and loud cooling vents, just the adapter and USB ports.

500 GB LaCie USB hard drive (back view)

I love the simple, unassuming, but very efficient design. Instead of a cooling fan, the drive cools via a grille built into its bottom.

500 GB LaCie USB hard drive (bottom view)

The only other drive that compares to it in terms of how little noise it makes is the LaCie 250 GB external hard drive, which I also own. But I don’t think this drive can be found on the market any more, and besides, why go for 250 GB when you can get 500 GB for $120?

250 GB LaCie external hard drive

If you want a great little drive to store your files, jump for the LaCie 500 GB USB drive before it’s gone. It’s hard to get 500 GB drives by themselves at this price point nowadays, much less already packaged up in a neat little enclosure and with cables. I’m not sorry at all I bought two of them, and I might get one more in the very near future — if there’ll be any left on the market after the Christmas season, that is.

Standard
Reviews

Hardware review: Dell Optiplex 745 desktop

I ordered the Dell OptiPlex 745 computer for use at work, where we’re in a full Windows environment. As much as I don’t like it, I’m stuck doing my development work on PCs for now. My reaction after using it for about 6 months is mixed.

On the one hand, the form factor is nice. On the other hand, the performance is sluggish, and some of the design aspects of the hardware leave a lot to be desired. I suppose I should take it all in stride, since one can’t expect something outstanding or superior from Dell — only something adequate.

Front view of Dell OptiPlex 745

I got an Energy Star-rated 745 in the Desktop form factor, which can be stood upright or laid on its side, like I have it here in the photo. I ordered it with a 24″ wide screen LCD, which I like except for its cumbersome controls. The keyboard and mouse are standard Dell hardware. Actually, the mouse is supposed to be a “premium” 5-button mouse, but it’s pretty inferior in real-world use.

Here’s what I like about the computer:

  • Lots of USB ports in the back
  • Multi-card reader built into front panel
  • USB ports on front panel
  • Small form factor
  • Easy to service
  • Pretty good deal, hardware-wise
  • The screen was a really good deal when bundled with the computer. (By itself, it’s still pretty expensive.)

Now here’s what I don’t like:

  • Cheap hard drive with tiny buffer size (8 MB)
  • Sluggish performance: it should do a LOT better given the specs, which I’ll outline below.
  • Bad design for monitor speaker panel
  • Cumbersome controls on monitor
  • Loud noise from hard drive
  • Cheap, plasticky, loud mouse that doesn’t feel right in my hand

The computer came with an Intel Dual Core 2.66GHz processor, 250 GB SATA 8 MB Buffer hard drive, 4 GB RAM, 256 MB ATI PCI Express video card, and a few other goodies, including a Firewire card. I installed Vista Ultimate 32-bit edition on it. You’d think with these specs, it’d zip right through the applications and start up really fast. Well, it doesn’t. I’m not sure whether it’s Vista’s or Dell’s fault — or maybe they’re both to blame — but it takes about 10 minutes for a full restart cycle. That’s ten agonizing minutes while I watch it slowly grind through its tasks. Blech.

As if that’s not enough, when I start applications, the performance is once again nothing special. I even use a 1 GB USB flash drive as a ReadyBoost drive, and while it does somewhat minimize the hard drive seek operations, the performance is still nothing special. That’s pretty sad when you think of it. New hardware, new operating system, loaded with goodies, using the equivalent of a nitrous oxide addition to the carburetor in the form of a ReadyBoost drive, and still, it only jogs along at a comfortable pace. Speaking from personal experience, that’s the sad story of Windows and PC hardware in general…

What’s more, and I have a feeling Microsoft is to blame for this, even though I installed 4 GB of RAM in the machine, and the computer sees all 4 GB when it boots up, Windows has chosen to see only 3069 MB out of the 4096 MB. Why, I don’t know. Did it reserve 1 GB for itself without telling me? It would be nice if it said that somewhere, but it doesn’t. Is it because 4 GB is the upper limit on x86 computing platforms? Possibly, but then shouldn’t it still see the whole 4 GB? I don’t know. If one of you can clarify this, I’d really appreciate it.

The OptiPlex 745 wouldn’t be a Dell if it didn’t have a few points of contention, a few things that make you smack your head out of frustration and ask WHY. Here they are:

  • The hard drive has an 8 MB buffer. I tried ordering a drive with a 16 MB buffer, but Dell didn’t offer one at the time of purchase. That’s got to be a pretty stupid thing. Now, just a few months after I bought this, there are drives out there with 32 MB buffers. I have two of them at home, and they’re great. But Dell shot this computer in the foot because they stuck it with a tiny buffer. I sit there all day long and hear the hard drive churning and seeking because there isn’t enough space in the buffer to store transient data. It’s pathetic but hey, it’s a Dell.
  • They stuck a stinking blue LED light right on the LCD’s speaker panel. You can see it below. What were they thinking?! I could understand sticking blue LEDs on external hard drives that aren’t directly in the line of sight, or on the back panel, or side panels, or anywhere else but directly in front of my eyes! It’s not as if the word hasn’t gotten out that the human eye can’t focus blue LED light properly, and people get headaches because of them. Did Dell bother to think about the design? Apparently not. What I had to do was to stick a web cam right in front of the blue LED, in order to hide it. I suppose I could also take some electrical tape and mask it. Either way, this was a stupid design decision.
  • The mouse has to be one of the worst mice I’ve ever used. It’s right up there with old trackball mice at the local public libraries, the ones with gunk built up on the tracking controls… You know the ones I’m talking about… the ones that use to drive us crazy while we looked up citations for our college papers. While this mouse tracks fine, it feels terrible in my hand. As if that’s not enough, it’s so cheap and plasticky, and it clicks so loudly every time I use it, that people down the hall can hear me clicking. It’s horribly annoying. I’m trying to think of creative ways to do away with it. But hey, it’s a Dell mouse…
  • Last but not least, even though the OptiPlex 745 can be stood upright, it has no rubber there. Not even some non-skid backing. So if you stand it upright on a desk with a smooth, hard surface (that’s most desks, in case Dell is reading this) and smack it only slightly, it’ll fly right off the desk. Oh, that wonderful Dell design…

Top view of the Dell OptiPlex

Would I recommend this desktop to someone else? Well, it depends. Do you want a Dell? If you do, and you know what to expect, I suppose it’ll do the job. Otherwise, do yourself a favor and stay away from it, unless you can get it with a better hard drive.

I would recommend the 24-inch display though. In spite of the crappy blue LED on the sound panel, I like the display’s vibrant colors, and I love its size. I also like the fact that it has a built-in USB hub, a built-in multi-card reader on the side, and many inputs (DVI, VGA, component, S-video) on the back. If you can get it at a good price, get it.

And for goodness’ sake, if you do end up getting one, DO NOT get the Dell mouse, or you’ll soon regret your days…

More information

Standard
Reviews

Upgraded to Leopard

Mac OS X LeopardAlmost two weeks ago, on 11/16/07, I upgraded to Leopard, the new version of Mac OS X. In spite of some negative experiences I’d read about, my upgrade went smoothly and I didn’t lose any data. All of my applications worked afterwards. A couple of them, like 3D Home Architect, required Leopard updates to make them stable again. My version of EyeTV needed to have its most recent upgrade re-applied.

There were a couple of hiccups that I wanted to mention. One occurred during the upgrade process itself, and the other afterwards.

  1. I started the upgrade process and booted from the DVD. Went through the various steps, but when it came time for the Leopard installer to find our iMac’s boot disk, it couldn’t see it. I waited for about 5 minutes, then I clicked the Back button a couple of times, went through those screens again, and after I waited for about 2 minutes, it finally saw the boot disk and allowed me to go on to the next step. I have a feeling this might not have been a hiccup, but that the installer was busy calculating the free disk space on the drive. I thought I’d mention this just case some of you have the same problem.
  2. After the upgrade completed, I configured Time Machine to back up to one of my external drives, and it started the initial backup. It kept going through the evening and overnight, then it crashed in the morning, and the iMac required a hard reboot. In other words, everything was frozen and I had to power it off manually. After I started it back up and restarted Time Machine, it finished the initial backup and it picked things up exactly at the point where it crashed. In other words, it didn’t start backing up the entire drive once more, which I thought was a nice touch.

One thing I did before starting to upgrade was to disconnect ALL peripherals. I figured there was no reason to complicate the upgrade process by having extra USB and Firewire drives, printers and other gadgets connected during that time. When the upgrade process completed, I re-connected them, and found, to my delight, that a new driver for my printer had been packaged with the OS. I didn’t have to run HP’s crummy, old drivers from 2005. Very nice!

I’m very happy with Leopard since we installed it. Our iMac runs a little faster now, thanks to the better memory management and pre-fetching features in Leopard. I love Time Machine and the Remote Desktop features included with the new iChat. These two features were my reasons to upgrade to Leopard, and I’m very glad to see that Apple delivered the goods.

Another feature I love is Spaces. I love being able to separate my applications so easily, and I love being able to assign them to different screens. I know that when I start up a certain app, it’ll run in a certain space and won’t clutter up my primary space. That’s awesome.

One thing I didn’t like about the previous version of OS X (Tiger), was the fact that when I used a key shortcut to access my home folder (Command + Shift + H) or the apps folder (Command + Shift + A), it would commandeer any existing open window and go to that location. I wanted to keep the existing location and open a new window, but Tiger wouldn’t let me do it. The same thing still happens in Leopard, and what’s more, when I use Spaces and I’m in screen 2, for example, pressing a key shortcut to access the apps folder will open it up in Screen 1, defeating the purpose of using separate screens. This is one piece of interaction that should be changed.

Mac OS X Leopard Guided Tour I’m otherwise a very happy customer, and I think Leopard is a worthwhile upgrade from Tiger. The new features are awesome.

If you’re thinking about upgrading, I would highly recommend watching the guided tour so you know what to expect. If you can’t watch the video, the booklet included with the Leopard DVD disc is another great resource.

More information

Standard
How To

Do not allow websites to resize your browser window

Websites that resize my browser’s window or maximize it are completely annoying. When someone does that to me, no matter how interesting their content may be, I go somewhere else instantly. Fortunately, there’s a way to block anyone from messing with my browser windows or tabs in Firefox. Here’s how to do it:

First, go to Tools >> Options, then click on the Content icon in that dialog box. It should look like this:

Firefox content options

Now click on the Advanced button next to the “Enable JavaScript” checkbox. You’ll get the following dialog box:

Firefox advanced javascript settings

Make sure to uncheck the following options:

  • Move or resize existing windows
  • Raise or lower windows

Click on the OK button twice to save the changes, and then you’re done. This will disallow any website to adjust the size of your browser window. It’s a great way to make sure your browsing experience stays yours.

Standard
Reviews

Camera review: Canon Rebel XTi DSLR

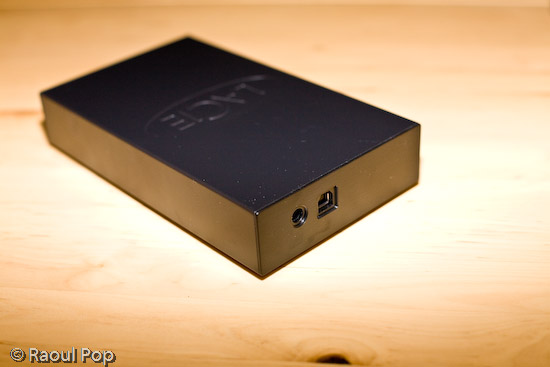
Released on August 24, 2006, the Rebel XTi is Canon’s newest entry-level prosumer DSLR. It’s an update on the popular Rebel XT, and it’s different from it as follows:

  • Slightly thinner body, heavier (2.56in vs. 2.63in and 510g vs. 485g)
  • Newer, re-designed sensor with higher resolution (10 megapixels vs. 8.2 megapixels)
  • Sensor cleaning technology (dust shaken off the sensor with ultrasonic waves)
  • Bigger display (2.5in vs. 1.8in)

I only listed the significant differences above. You’re welcome to compare the detailed specs if you’d like, right on Canon’s website. Go to the More Information section at the end of this post and use the links listed there to get the full specs.

Canon Rebel XTi (front)

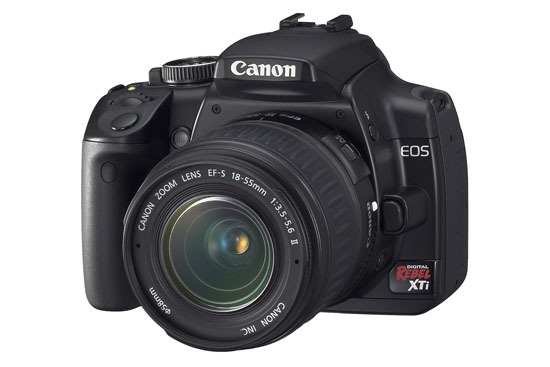
In my reviews of other DSLRs, like the Canon 30D, the Olympus E-510, or the Olympus E-500, I criticized the Rebel XTi’s small grip, and I still think I’m right. It’s much too small to be held comfortably in a man’s hand, and that’s unfortunate, because the camera is great in every other aspect.

In spite of the camera’s small grip, I was pleasantly surprised by the quality of the photos it produced, and I wanted to share my findings with you. I avoided reviewing it until now on purpose — as I said, I was displeased with its body design — but after using it, I’m happy to say I would recommend it.

I made a video review of the XTi, which should help you get a better idea of the its dimensions. I discussed the camera at length in the video, and also did a side-by-side comparison between it and my Canon 5D. You can watch it below, or scroll past it to read the rest of my review. You can also watch it here, or download it if you like.

I should also mention I goofed in the video. I talked about the XTi having the DIGIC III processor, but it turns out it still has the DIGIC II processor. What I said about the differences between it and the 5D and 30D with respect to exposure value settings is still correct, so don’t disregard that. You may or may not be aware that when you do not adjust the EV settings on a 5D or 30D, and you shoot outside in bright light, the processor will overexpose the shot. The quick fix is to dial down the EV by 1/3rd, and that usually does the trick. But that’s not right. Shots shouldn’t be overexposed, and I’m glad to see the XTi doesn’t suffer from that bug. It exposes shots beautifully, and you’ll see what I mean when you look at my sample photographs below.

Even though the overall design of the camera is similar to that of the larger DSLRs that Canon makes, certain differences are there, and they are caused both by the price and size of the camera. For example, being used to the 5D, I missed the small at-a-glance display on top of the camera. On the 5D, it lets me know what my settings are without having to consult the LCD screen. I also missed the large settings dial next to the LCD that’s a staple on every other Canon prosumer and pro DSLR. I love that dial/wheel, and I miss it on every non-Canon camera I use.

The exposure value adjustment button, along with the drive settings button, are located next to the display instead of the top of the camera. There is no jog controller for the focus point selection, either. But you can’t have everything. The Rebel XTi is an entry-level DSLR, so you can’t have features that are normally found on the more expensive DSLRs. Plus, its body size makes it impossible to have the same button arrangement.

Canon Rebel XTi (back)

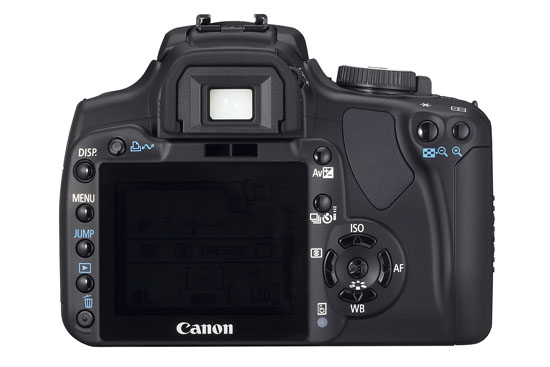
Despite my gripes, I liked the size of the body, and I liked the feel of the buttons. They had a soft, glossy surface that made it a joy to press them. The small body of the camera makes it possible to hold it very comfortably in the palm of your hand, and that’s a huge plus, because you can stabilize shots a lot better that way.

I really liked the quality of the photos from the XTi. I shot in RAW format, and I was very pleasantly surprised to see how well exposed the photos were, and how accurate the color reproduction was. I’ll show you some photos very shortly where I made no adjustments in post-processing other than adding meta-data, and I think you, too, will find it hard to believe that those were RAW shots straight from the camera.

I can tell you this: the RAW files made by the XTi have better exposure and color, right out of the camera, than the RAW files made by my 5D. It’s a shocker, yes, but it’s true. I suppose that’s to be expected. The 5D uses technology developed in 2005, while the XTi uses technology developed in 2006. But still, I had to see it with my own eyes to believe it, and being a 5D owner who’s shot tens of thousands of photos with the 5D, this was a hard pill to swallow. Having said this, would I give up my 5D for a Rebel XTi? I’m tempted, but no. 🙂

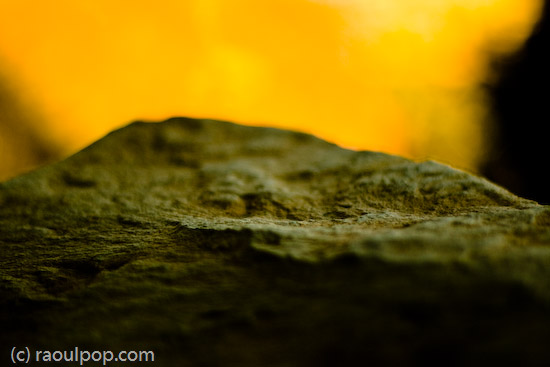
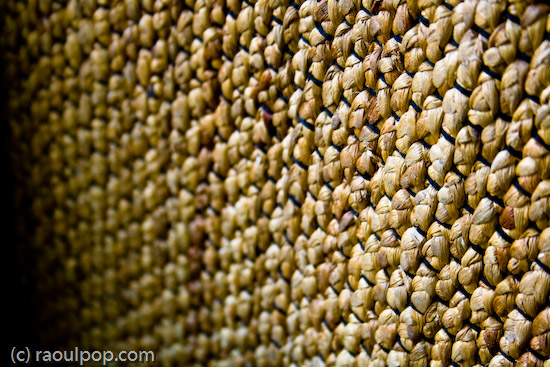
On to the photos. These are two that I took in early afternoon light, which was bright and unforgiving. I shot in RAW and developed the photos in Lightroom. I had to do very little exposure adjustment. Can you believe how well the XTi exposed the photos and reproduced the colors? Can you believe the dynamic range of the sensor? I didn’t expect this from the XTi.

November afternoon

Light and shadow

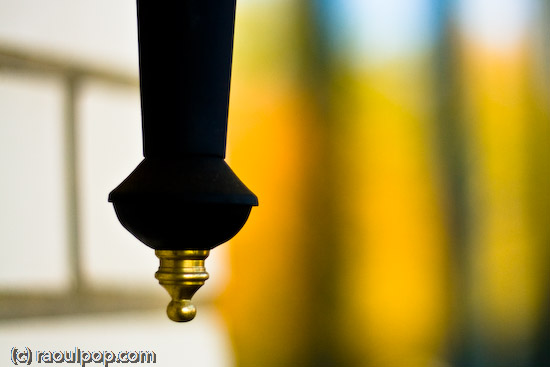
Here’s another photo that shows off the dynamic range of the camera. I shot this with the wonderful 18-55mm kit lens. If you’re confused by my characterization of that lens, watch the XTi’s video review, and I think you’ll understand.

Go to the mat

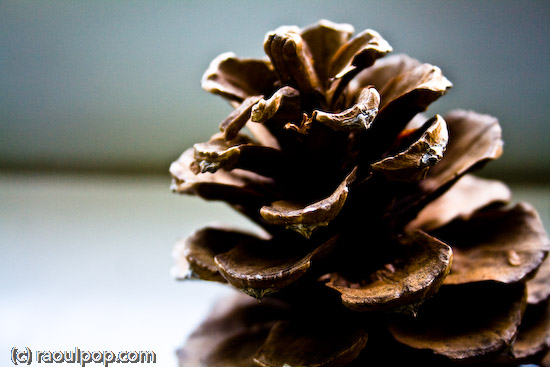
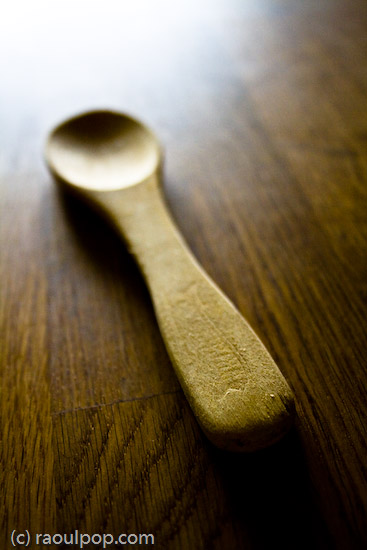
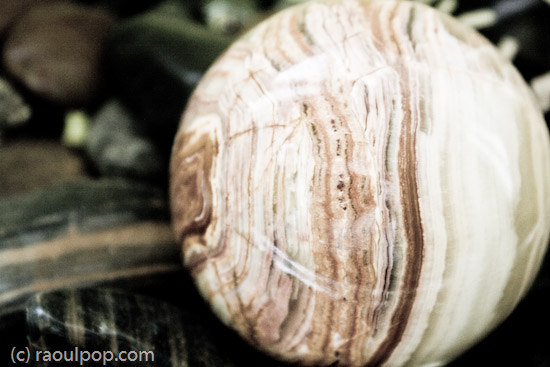
Here’s a macro shot I took with the same 18-55mm kit lens. I was pleasantly surprised with the low noise at 800 ISO.

Cone job

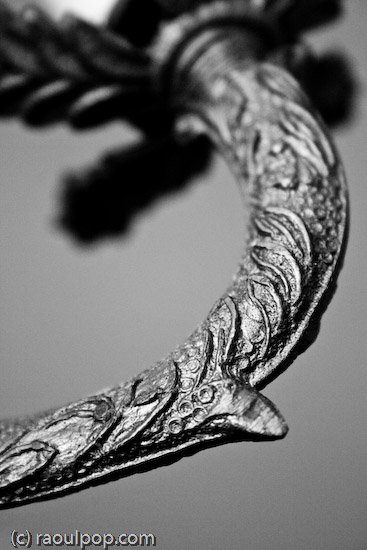
I said it before, and I’ll say it again. I love the colors that I get out of this camera! Have a look at these two photos to see what I mean.

Knobular

Spoon!

I thought I’d put in a dog photo for good measure. This happy pooch posed for me in downtown Alexandria this past summer. I used Keith McCammon‘s XTi for the shot.

Smile for the camera

What else can I say? If I’ve missed anything, let me know in the comments. The Canon Rebel XTi is a great prosumer DSLR. You won’t have to try very hard to get wonderful photos with it, and its affordable price will help make your decision a little easier.

Gilded

Pastels

Buy the XTi

Troglodyte

Bohio’s


World at your feet

Etched in stone

Hand that feeds

Standard