
Ligia and I have recently downsized our living room desk. We used to have a big, bulky desk, and now we’ve got a secretary desk. It’s very beautiful, but it also has much less space than the previous desk, and no integrated cable management whatsoever. What to do? With about $8 of stuff from Home Depot (including plastic ties), I’ve modified the desk to allow us to manage our computer cables in a practical way. The end result and the steps are described below, with photos (click on the thumbnails to enlarge). It took about 45 minutes, but it’s worth it!
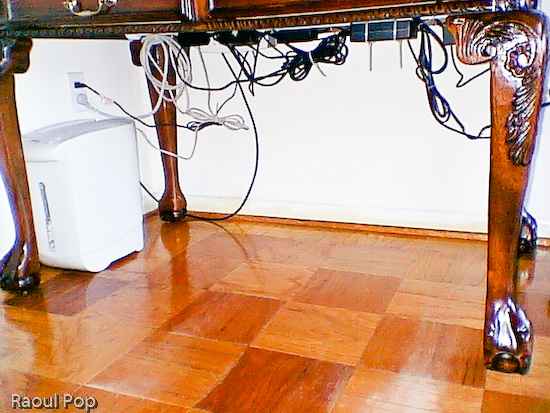
This is how our desk looks after the modifications. Notice how there are no annoying cables and wires on the floor. We can move the desk if needed, and we can easily vacuum underneath. It’s a joy!

So, what did I need to be able to do? First, I needed to fit the following pieces of hardware on that desk:
- iMac G5 plus keyboard/mouse
- Two stackable backup hard drives
- Our PVR (we love it!)
- The mixing board for our podcasts
- Lamp
- Various other paperwork and things
- Printer (I know it sits beside the desk, but I include it since the cables still have to be managed under the desk)


First, I needed to drill a hole for the iMac cable. I debated its location for a while, but decided on the left hand side, for various reasons:
- There’s a bookshelf behind the computer
- There are drawers which couldn’t have opened because of the wire
- If I put it in an easily accessible location, I can use that to route other cables up, like the one for my cellphone charger.
Here is a photo of that cable hole, which I drilled using a readily available drillbit. I stained it at its inside edge so it would match the color of the desk.

The next step was to cut a piece of white painted pipe (which I bought for something like $2) to the width of the desk, and mount it to the inner sides with two plastic pieces that cost me about $2 each. I used some wood screws I already had. Then I took some assorted cable ties which I’d bought in bulk, and secured the cables to the bar, as shown in the photo below. You can probably get a package that’ll suffice for a job like this for under $2.
Notice how I mounted the surge protector to the inner side of the desk. Again, I used wood screws that I left half-screwed. The surge protector had holes just for this purpose on its back, and it was a matter of measuring the space between them and putting the screws in the wood at the right length. It hooked right on.
I secured the cables to the pipe with the plastic ties after folding the cables nicely, so they wouldn’t dangle needlessly. Notice I left a bit of slack for those cables I’d need to pull. There are few things more annoying that setting everything up perfectly then discovering you need to move a piece but can’t because the cable’s too tight.
A couple of additional things: I also needed to put a paper shredder underneath the desk. I was able to accommodate it just fine. I also routed the coaxial cable along the wall, and to the PVR with the aid of a little cable tie that I screwed into the wall with a drywall screw.
Here’s the end result. Notice that none of those cables are trailing on the floor. I can’t stress the convenience of such a setup enough. It’s a real pleasure to work at that desk now, and it’s also very easy to keep the floor clean.
Discover more from Raoul Pop
Subscribe to get the latest posts sent to your email.

Pingback: Photography, take two, part two