We were twisting madly in the teacups at Walt Disney World, in Orlando, FL.
Yearly Archives: 2007
Bran Castle up for sale
The UK Telegraph reports that Bran Castle, the temporary residence of Vlad Tepes (aka Vlad the Impaler and Dracula) is up for sale. Its current owner, a descendant of the von Hapsburg family, lives in the US and isn’t interested in keeping it. I remember visiting the castle in 1991, before I came to the States. It was still winter up there, and all of the rooms were freezing cold. Although the castle looks imposing from afar, the interior courtyard is smaller than you might imagine. That’s because the rooms and halls are built right into the walls, which are also very thick.
It’s all beautiful, very beautiful. The location is wonderful, and the building, although old and in need of restoration, is beautiful as well. The place has a melancholy feel about it that puts you in the mood to read old novels. I’d love to photograph it. Maybe I’ll get the chance to visit it once more sometime, and I’ll have a good camera with me. About 500-750 shots of the place would make me very happy.
Apparently the castle draws in about 450,000 visitors a year, so any potential owner would make back (in time) the hefty asking price of $78 million. But still, as a native Romanian, I have mixed feelings about seeing a piece of our history up for sale to anyone. [Found out about this via Neatorama]
Minuscule equals great animation
The Minuscule series of animated shorts are fantastic. Not only are they very well-animated and combine live-action and CG animation seamlessly, but their plots are well-written and overall, they’re very funny. To me, they prove that animation can still be wonderful, not depressing and disgusting, like much of the so-called animation we see on TV these days, or for that matter, in recent years. Enjoy these fantastic cartoons, and spread the word!
10 tips for taking better photos
In a recent post about winnowing my own photos, I mentioned briefly that I’m tired of wading through mediocre photos on online sharing sites in order to arrive at the good ones. While that’s true, it’s not nice to criticize without offering a solution. This quick tutorial is my proposed solution. I really hope it helps people take better photos.
This advice is meant for the 80% of people out there who own a camera and pick it up once in a while to take photos at an event or during a trip, without much thought about composition, aperture, shutter speed, lighting and other such things, but merely with the desire to capture the moment. I know from personal experience that many of these same people are disappointed when they get home and download the photos to their computers. Why? Because their photos are out of focus, or too bright, too dark, colors are too light or off, etc. These people end up thinking that’s just the way things are, and they shouldn’t expect better photos. But they’re wrong! By doing a few simple things, the appearance of their photos (and your photos) can improve dramatically.
So what makes me qualified to offer photography advice? I’ve been photographing places, nature and people for more than 15 years. I too was a casual photographer for a large portion of that time, and when I couldn’t stand my own terrible photos any more, I decided it was time to improve. What I know, I learned on my own and from various books and many articles that I’ve read over the years. I practice the advice I give below, and know it works. My photos improved dramatically when I started to shoot digital, because I could shoot a ton of photos and learn much faster what worked and didn’t work.
Here’s what you can do (and this applies in particular to the smaller digital cameras):
- Hold the camera steady. I know it’s difficult to do with a tiny little camera, but use both hands. Grab the corners of the camera, or put your palm or side of the hand underneath the camera to support it as you take the shot. If you hold the camera casually, you risk moving it up and down as you press the shutter button. I know you are tempted to take shots with one hand when you use your camera, but if you don’t hold your hand rock-steady, you’ll likely get a blurry shot. (Yes, some of the cameras nowadays have image stabilization, but it’s a good idea not to rely on it entirely. You’ll find its effect is limited.)
- Don’t stick your fingers in front of the camera. Your camera has a lens. It uses that lens to look at the world, and capture the images it sees when you tell it. If you stick your finger in front of that lens, or worse, keep it right over the lens, don’t be surprised with the results. And if you’ve been wondering just why your photos always come out blurry, you might want to check how you hold the camera. There might be an autofocus sensor under that finger of yours. That sensor needs to have an unobstructed view of the subject, so it can measure the distance properly and tell the camera how to focus. Some cameras also have a separate light sensor that measures ambient light. When your finger’s on it, it’s in the dark, and so is your camera. Daylight shots will come out completely washed out, because the camera thinks it’s dark and exposes the sensor/film too much.
- Clean that lens. I know you like to hold your compact camera in your hand or in your pocket. And if you have kids, they like to play with the camera as well. Have you ever looked at your lens? It’s probably full of muck and fingerprints. Clean it. Use a damp soft cloth, or even better, a lens cleaning kit, which comes with cloth and special solution. It’s inexpensive, and does wonders!
- Set your camera’s mode dial to P. That is, if your camera has a mode dial. Don’t set it to A, which you might think stands for Automatic, but actually stands for Aperture Priority, and don’t set it to S or M, which stand for Shutter Priority and Manual, respectively. Set it to P, which stands for Point and Shoot. That way, the camera does its thing and you only need to worry about pressing the shutter button.
- Get familiar with your camera’s scene modes. I know most of you are used to just turning the camera on and pressing the shutter button, and you might or might not have wondered what certain icons on your mode dial or in the camera menu meant. Well, if they look like people, or flowers, or mountains, they’re scene modes. They adjust the camera’s settings so you can take better photos in those situations. It’s kinda like shifting into a lower gear when you descend a mountain. You know, you’re used to putting your car in D, and you never think about those other numbers, like 2 and 1, that you also find on your automatic drive. But you find out really fast that if you shift your car into 2 or 1 as you go down a hill, you have to use the brake a lot less. It’s the same with your camera. It’ll work without the scene modes, but it’s a lot easier when you use them. So take out the manual if you can find it, or download it from the camera’s website, and look up the instructions for scene modes. Learn how to switch to Landscape mode when you’re shooting mountains, or into Portrait mode when you take photos of people, and into Macro mode when you photograph flowers or other objects at close ranges. Other cameras have scene modes for cloudy days, for the beach, for snow, etc. Use them, they’ll make your photos much better!
- Walk, don’t zoom. When you can, try walking closer to the person or object that you want to photograph. When you use the zoom, any little shake of the camera affects the sharpness of the photo. Oftentimes, the photo will come out blurry if you take a tele shot with a handheld camera. Getting closer to your subject really, really helps! And for goodness’ sake, don’t use the digital zoom feature, it’ll suck the quality right out of your photographs.
- Frame the shot. Don’t just take that camera out of your pocket and snap away at everything you see, hoping you’ll get some decent shots. Plan those shots if you want them to be good. It only takes a few seconds to frame the subject on your camera’s screen or viewfinder. Look at the screen. Do you like what you see? If you don’t like it, don’t take the photo, try a different angle/position. If you’re taking a photo of a person, it’s really boring to have them in the center of the shot. Move the camera slightly so they’re off-center. You’ll be surprised at how much better the photo will look. While I’m on the subject, I can’t tell you how tired I am of seeing photos of grinning people in front of buildings or monuments. Have your subjects do something interesting, like look at the building. Take the photo from the side. Or take a candid shot, while they’re looking at something else, with the object of your desire (building, monument, statue) in the background. It’s much more interesting that way. If you’re taking a photo of a well defined subject like a flower, a car or a person, don’t cut them off in ways that make them look strange. It’s usually better to get all of that object in the photo and crop later. As you get more experienced, you can start to experiment, but as they say, you must know your ABC’s before you can read…
- Know your camera’s limitations. I don’t mean you should be able to quote the specs back to me, but know the basics. Does it take good shots in the dark? If it does, great. If it doesn’t, don’t expect to get good shots in the dark, particularly as you get farther from your subject(s). Realize that the built-in flash can only do so much, and in the dark, even at twilight, your shots aren’t going to be all that great. They’re either going to be too dark (if you’re far) or too washed out (if you’re too close,) or they’ll be blurry because someone in that shot moved, or your hand moved, etc. How long does it take from the time you press the shutter button to the moment your camera takes the shot? Realize you need to account for the focus time as well, and different cameras have different focus times. With some cameras, there’s a delay of over a second until they take the shot. They have to focus, then they take additional time to activate the shutter and store the shot. You can’t just press the button and expect a great shot unless you have a good DSLR. Know what your camera can do, and realize that you won’t be able to get some shots when you only have a few moments. Also be aware of how many photos you can get on a battery charge, and plan your photo taking around that number. You don’t want to be left with an empty battery when there are plenty of opportunities for great shots all around you.
- Do some basic post-processing. No, you don’t need Photoshop for this. You can do it for free with Picasa on Windows and iPhoto on the Mac. They’re both great at letting you do basic tasks such as adjusting exposure, lighting, boosting color, adding sharpness, removing red eyes and cropping. You won’t believe your eyes when you see the difference in your photos! Trust me on this one, take a half hour to learn how to manipulate the controls in Picasa or iPhoto, and you’ll be thanking yourself again and again. So many mediocre photos can be helped by a little post-processing that it’s staggering! Really, I can’t emphasize this enough.
- Use my favorite fix for bad photos: the Delete button. This works wonders! You can declutter your photo library in minutes, and end up with decent photos you’ll actually want to show people! You’ll no longer want to avoid looking at your photographs! Have no mercy, just delete that horrid shot. If you followed steps 1-9 and you still couldn’t help a particular photo, put it out of its misery. Delete it for good!
If you want to get a few more tips, read the post I wrote about photographing Walt Disney World.
Hope this helps you, really!
The Exakta EXA Ia analog camera
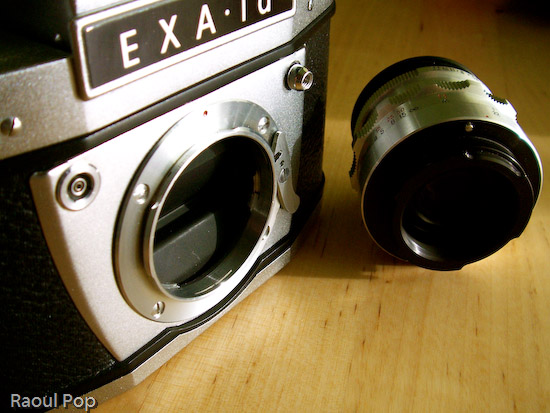
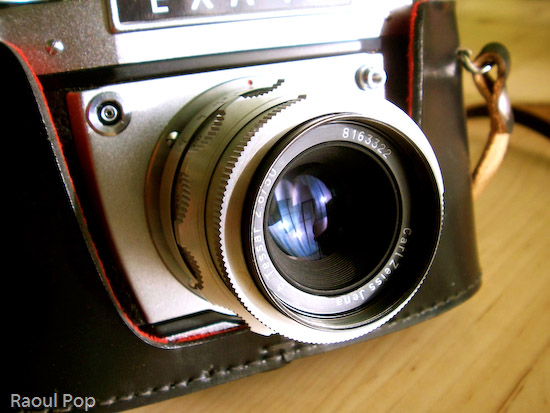
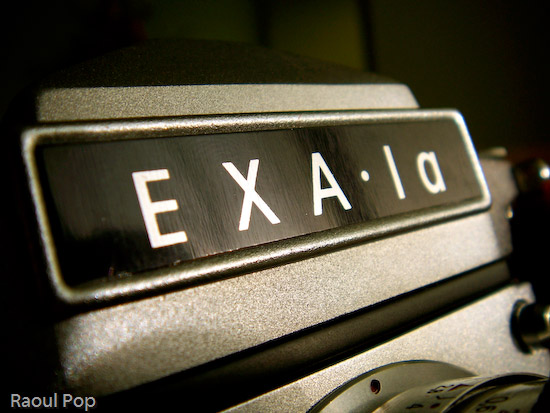
I got a fantastic present for Christmas from close friends of ours: an Ihagee Exakta EXA Ia analog camera.
It apparently sat unused in a shop in Mexico since its factory production days back in the late 60s, still in the original box, waiting for someone to purchase it. It came with a whole kit which included a plastic/leather camera case, camera, lens, lens extension kit (for macro shots), two prisms/viewfinders (one normal, one 90-degree), a mechanical timer, a light meter and a ton of lens filters.
You can watch a video review below or here, or scroll past it to see the photos and read my review.
The camera kit also included the original instruction manual (in Spanish). Since I don’t speak Spanish, I had to figure out the camera on my own. Here are the specs as best I can figure them out:
- Exakta EXA Ia body, fully manual, 1964-1968 production (approximated the year based on the serial number)
- Analog flash sync for bulbs or electronic speedlights
- Shutter speeds from 1/175 to 1/30 s and Bulb mode
- DIN sensitivity from 12-30 and ASA from 50-800, including b&w negatives; the list goes as follows: 12, 15, 18, 21, 24, 27, 30 (DIN) and 50, 100, 200, 400, 800 (ASA/ISO), plus C and NC.
- Exposure counter can accommodate films of up to 36 exposures
- Shutter release features threads for attachment of mechanical timer (included)
- Shutter lock
- Rewind release button and pop-up rewind knob
- Carl Zeiss Jena lens, f2.8/22 50mm, focusing distance 0.6m to infinity
- Lens extension barrel for macro shots; barrel disassembles into multiple sections to allow for varying focusing distances and macro apertures
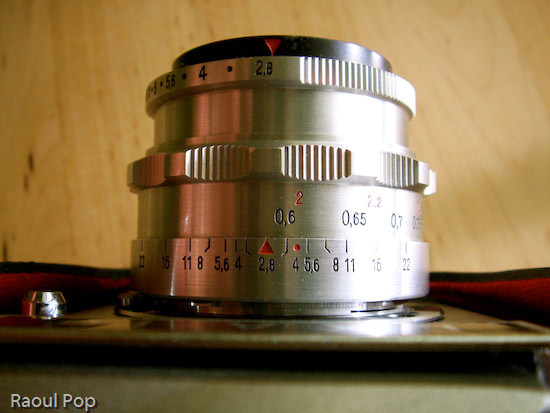
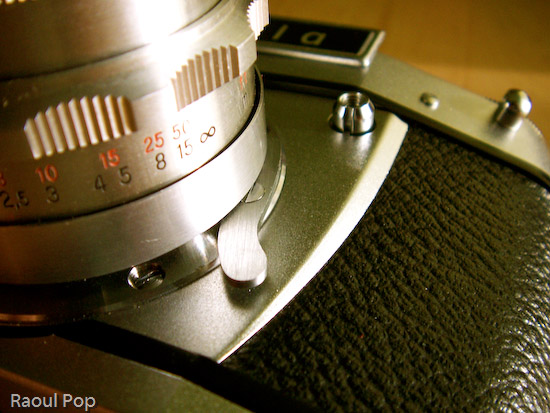
If there’s one expression I could use to describe this camera, it’s ease of use. Once I figured out the controls, it turned out to be a joy to play with them. The focus control is so well made, that at close distances, it turns slower, allowing for some real precise focusing. The aperture adjustment clicks, letting me know when I’ve reached a proper setting. The film advancement lever’s travel is short and also clicks reassuringly. The exposure countdown dial clicks as well. I guess I like controls that click, but it’s the sort of feedback that encourages good use. It also gives the impression of something that’s very well-made.
It’s quite easy to take the lens off, and I love the fact that the extension barrel breaks down into multiple sections. It lets me vary the focusing length and also changes the perceived aperture of the lens, allowing me to get closer or further away from the object.
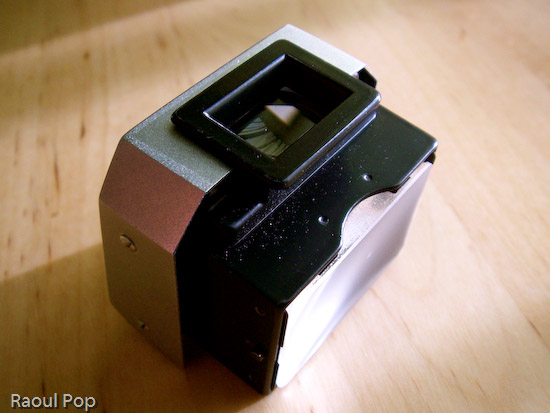
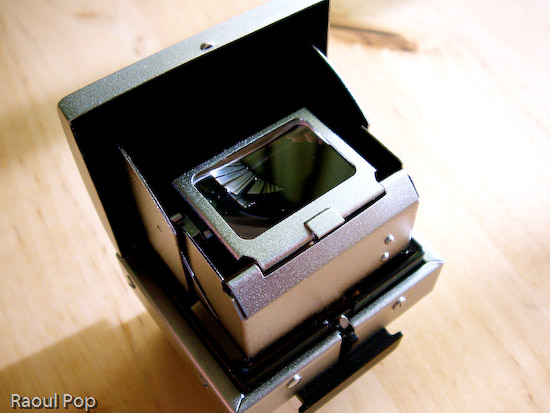
The interchangeable viewfinders are so much fun! I can just slide them out and use a different one, allowing me to customize the way I look at my photographic subjects. Both viewfinders allow me to see right through the lens (TTL), so I get a direct preview of the lighting conditions. When I adjust the aperture, the aperture ring closes or opens, and I can see right through the viewfinder how much light comes through the lens. Of course, as I found out with my first roll of film, you’d better know exactly what shutter speed you’re using, or else the photos aren’t going to come out as you saw them through the lens!
Judging from the instruction manual, this camera could be had with some pretty cool accessories when it came out: a lens hood to reduce glare, a tele lens, and a Stereflex Jena viewfinder and lens, that took 3D shots. It could also use a vertical grip and electronic flash, powered by a strap-held, external Braun battery. Pretty nifty! Just goes to show that a great gift doesn’t have to be new!
I need to point out (for those of you that have only used digital cameras) that working with a manual analog camera (especially one as old as this) is a _______ experience. It’s up to you to fill in that blank. Depending on your skill level and willingness to learn new things, it may be an amazing experience, or a completely frustrating one. If you’re only used to point and shoot, there is no such thing on a manual camera. Instead, you have what you see below.
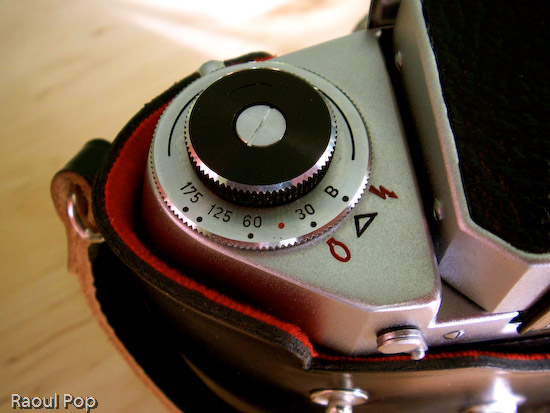
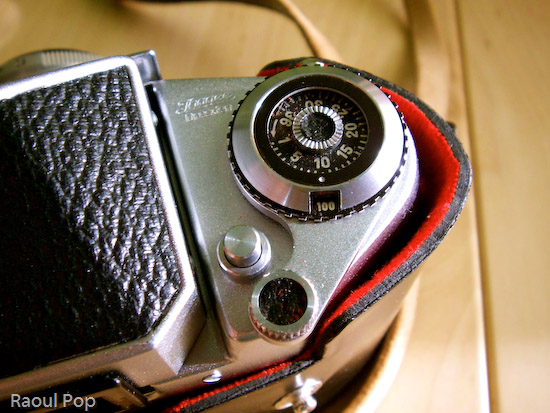
You have to manually adjust the camera settings like aperture and shutter speed based on ambient light. You can guesstimate and live with the results, or use a light meter like this one. If you enjoy using burst mode (where you can shoot 3 or more photos in rapid sequence), you can forget it about it. You have to manually advance the film by cranking on a lever after each photo. Autofocus? Forget about it! Auto-flash? No such thing. You’ll need to manually adjust the power of the flash/strobe based on GN (Guide Number) calculations.
This may sound discouraging to novices, but believe me, it’s a fantastic learning experience. If you master the use of a manual analog camera, you’ll approach photography with a brand new perspective. The quality of your photos will improve tremendously, and you’ll get real joy out of using your camera, be it analog or digital. Plus, there are other fringe benefits, such as not needing to use batteries (manual cameras don’t need them) and of course, my favorite, the opportunity to pool with a really, really cool gadget. Once you hold one of these cameras in your hand and get to appreciate the fine engineering and craftmanship that went into making it, you’ll know you’ve got something pretty unique, something you don’t see these days, when cameras are made by robots. There’s something captivating about using metal levers and gears and getting real tactile feedback from your camera. I get a really nice feeling when I press the shutter and a mechanical part actually moves inside. It’s not a circuit, it’s not a sensor — it’s a real piece of metal. Now that’s nice!
Updated 12/25/12: I no longer have the camera, please stop asking for the user manual. Thanks!


