Reviews

Camera review: Kodak EasyShare v610 Dual Lens

I have owned the Kodak EasyShare v610 Dual Lens digital camera for the past year and a half, and I’ve meant to write about it for some time. This will be a nostalgic review, since the camera is no longer being made.

Last weekend, I put together an 8-minute video review, and also took some photographs of the camera. I’ll accompany those two offerings with my insights, gathered after a LOT of use in just about any weather and light conditions. At the end of the review, I’ll also post selected photos taken with the camera.

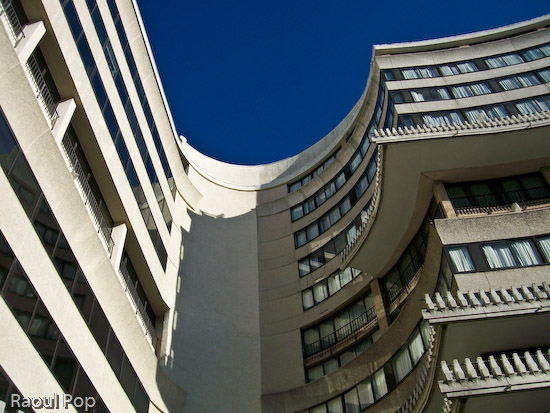
There’s what the camera looks like at first glance. I purchased a matching leather case for it, and I’m not sorry I did it. It protected the LCD screen from scratches, and it helped protect the camera itself when I threw it about from bag to bag. Back when I was in college, in the mid 90s, my parents gave me a first generation Canon Elph. It used APS film, and it was a small, beautiful and elegantly designed little camera for its time. I’m talking about this because I got a leather case for that camera as well, and it helped keep that camera running in good condition for several years. My advice to you if you get a small camera is to get a good case for it as well. Make it sturdy, so it can withstand abuse, and make it stylish, so you won’t be ashamed to be seen with it in public. Leather fits that bill quite nicely, doesn’t it?

Video review

The video I recorded is enclosed below. You can also view it here, or download it if you like. If you’ve seen some of my other video reviews, you’ll have to excuse the lower overall quality of this one. I shot it this past Sunday, informally, during a very hectic weekend. I had a limited amount of time at my disposal, I was rushed, and it shows. But I managed to get my points across, and I’m happy about that, so it is worth watching.

Kodak EasyShare v610 from Raoul Pop on Vimeo and on YouTube

Dual lenses

One of the striking features of the camera is its dual lens setup. Back when it came out, a 10x zoom on a camera this compact was virtually unheard of. It’s still fairly uncommon. The only way this could be accomplished, while still keeping things looking great and with no external zoom extending outwards from the camera body, was with two lenses, one for closer distances, and one for what could be called tele. The first lens — the bottom one — is for 1-5x, and the second lens — the top, larger one — is for 5-10x, as you can see below.

Kodak v610 dual lens setup

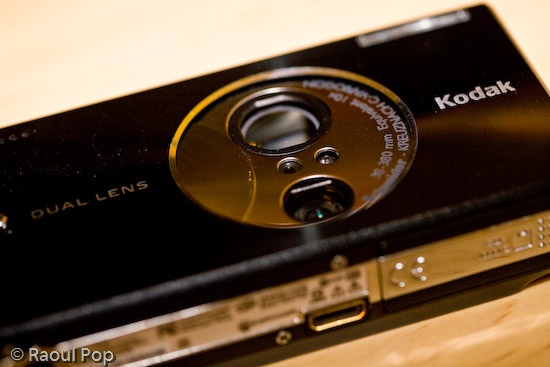
The two lenses together have an astounding range of 38-380 equivalent focal millimeters. The first lens goes from 38-114mm, and the second goes from 130-380mm. I have good things to say about the quality of the optics. The images were sharp when in focus, and there was little fringing and chromatic aberration. There were two drawbacks to the lenses.

  • One, they were fairly slow. What I mean by that is that they didn’t open up quite enough, and that tended to make the camera pretty hard to use in low light situations without a tripod. The smaller lens (1-5x) is rated from f/3.9 to f/4.4, and the large lens (5-10x) is rated to f/4.8.
  • Two, there was a pause when zooming out past the 5x mark. The camera’s zoom would stop when it reached the end of the focusing range of the first lens, and I would have to press the tele button again to pick up the next lens and focus further than that. Over long periods of use, that tended to be pretty annoying.

But I didn’t let these things bother me too much. After all, I got 10x zoom in a very compact package.

Kodak v610 mode and on/off buttons

Controls and ease of use

What I liked most about the camera was its ease of use for basic photo taking. That proved to be both good and bad. Anything more advanced (such as long exposures, a change in ISO, or White Balance) required some menu surfing, and any custom settings were erased when the camera was turned off. Even something as simple as delayed exposures (2 or 10 seconds, for example) needed to be set for every single photo where they were needed. One couldn’t just turn on that setting and keep it on. It would reset after every exposure.

Even though I didn’t like this, I can understand the rationale for it very well. After all, this camera is a compact point and shoot meant for people who just want to pull it out and take photos, not for more serious tasks. And let me tell you, if someone that doesn’t know much about cameras picks up a Kodak v610, messes with the settings, and doesn’t know how to get it back to normal, they’ll be VERY much relieved when they find out all they have to do is turn it off, then back on.

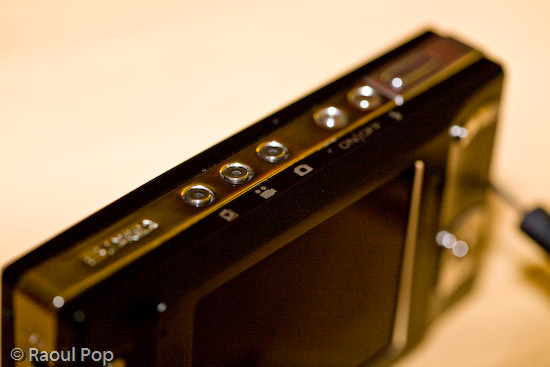
The controls on the camera are wonderfully designed. The buttons are either metal or very hard plastic, and I am not about to scratch them to find out what they’re made of. At any rate, they’re the right shape and texture, and it’s fun to press them.

They’re intuitive, they fit well within the camera’s interface, and there aren’t too many of them, which is the right decision for a compact camera such as this.

Kodak v610 zoom and selection controls

I loved the easy way to switch between normal, macro and tele mode. See the big, square button above? Turn the camera on, and you’re in normal mode, where the camera can focus from 2 feet to infinity. Take photos as would normally do. Press the bottom part of the button once, and you’re in macro mode, where the camera can focus from 2 inches to 2.3 feet. Press it again, and you’re in tele mode, where you can take photos of things very far away and not have to worry about focus. The camera focuses to infinity automatically and picks a higher aperture, which means you’ll get a larger depth of field.

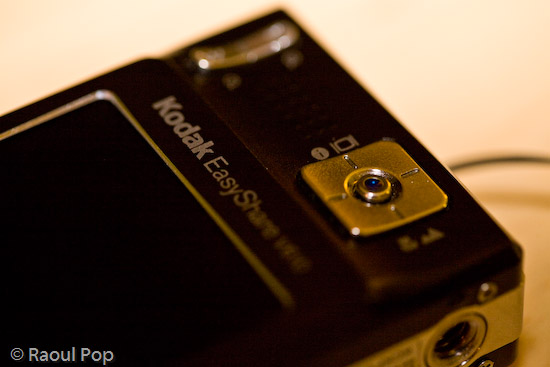
The build quality of the camera was evident everywhere. The tripod mount is a great example of this. It was pre-planned and integrated into the silver metal border that lines the camera’s sides. Not only that, but the mount itself is metal, not plastic. Given the camera’s light weight and compact size, one wouldn’t think it’d need a metal tripod mount, but there it is, and I love it!

One point of contention with the camera is the USB connector, which is a custom one. I would have loved to see Kodak put a standard USB mini connector on the camera, but they didn’t. That’s probably because they wanted it to integrate with their camera stands and plug right into their photo printers, but come on, there are volumes to be said about standardization… It’s really important when it comes to good design.

Capabilities

The camera includes a movie mode which records Quicktime movies using MPEG-4 compression at 30fps. I found the quality of the movies (640×480 pixels) to be plenty for my on-the-go needs, and often used it as my primary video camera. I have a confession to make: it was also my only video camera. 🙂 Remember my video review of the Canon Rebel XTi? It was done with the Kodak v610 mounted to a tripod. Came out great, didn’t it?

With a 2GB SD card in the camera, it could record over 1,100 photos or 1 hour of video, which is more than plenty for such a compact camera. The only problem was, the camera’s battery would only last for about 125 photos. I’m not sure how many minutes of video the camera could do on a fully charged battery, so I can’t speak for that. But I did find myself frustrated by the low battery life when taking photos, and ended up purchasing a second battery. With judicious use of the zoom and LCD screen, I found I could extend the battery life to 135-150 photos, but that was still not quite enough for me, and it was pretty frustrating to be out in the city, taking photos, only to have the camera die on me.

Again, I think this is a design issue, and I wouldn’t necessarily call it a flaw. This is a small, stylish camera meant for the person who would pull it out every once in a while and take a few photos, not for someone who wants to take lots of photos. That person should opt for a bigger camera with more battery life.

One other point I wanted to mention was the sensor’s light sensitivity. It was capable of 64-800 ISO on paper. In real life, I found 400 ISO to be barely acceptable, and 800 ISO unusable. 64, 100 and 200 worked out great. If I left it on Auto ISO, it varied it between 64-200 automatically to get the optimal exposure. The camera changed the ISO settings in increments of 10 between 70-200 ISO, and I’d always get a chuckle out of seeing all sorts of ISO speeds show up in my photos’ meta-data.

Overall, I was pretty happy with the camera. I say “was” because I recently gave it to my parents. They had a more complicated digital camera, and they often couldn’t understand the settings and were frustrated because they couldn’t get the photos they wanted. The Kodak v610 will work out much better for them since it’s more compact, it’s fully automatic, and it resets its settings with every “reboot”.

The camera also has a blurry photo indicator that can be turned on. If a photo is good, a little green hand will appear. If the photo is marginally acceptable, the little hand will turn orange. And if the photo’s not good at all, the little hand will turn red. That’s easy enough for anyone to understand. I told them to re-take any photos where the little hand will turn red, and if they can’t get anything orange or green to seek more light or give up. I think they’ll finally be able to get more decent photos now.

Let me show you a few photos I took with the camera to illustrate what it could do. I can’t emphasize enough how useful that 10x zoom proved to be, and you’ll see what I mean as you look at the photos.

Sample photos

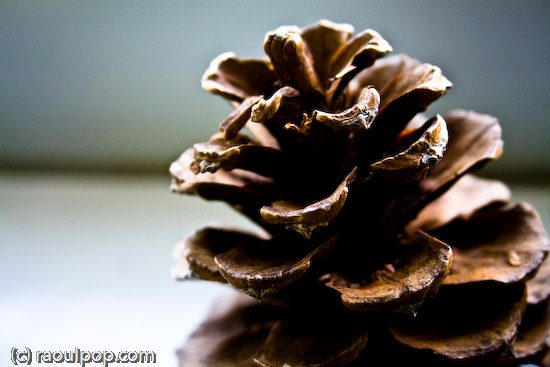
This first photo is quite appropriate for this time of the year, as it represents a group of merry carolers on a sled.

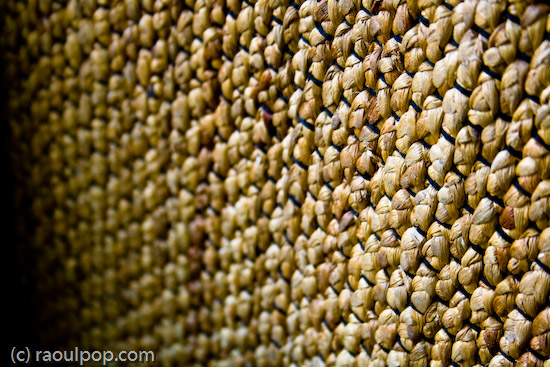
This is another macro shot, this time of colorful beads in a public market.

The wide focal range allowed me to get photos of entire valleys from mountain tops. This is a photo of a portion of the Shenandoah Valley, as seen from Skyline Drive. Here you can see the typical bluish tinge caused by UV haze. This gets exacerbated by the CCD sensors of smaller cameras. I’ve seen it on many small cameras. For example, the iPhone’s built-in camera suffers from this defect to what I consider an unacceptable degree.

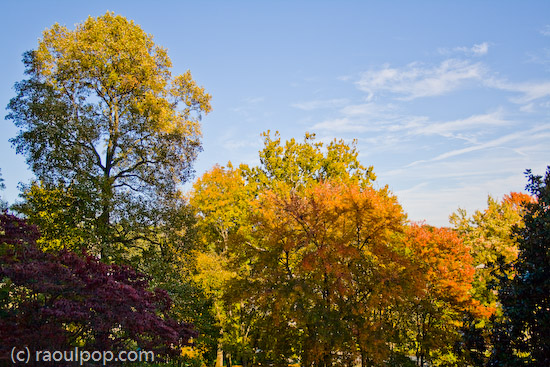
The camera’s CCD sensor was fairly adept at capturing color.

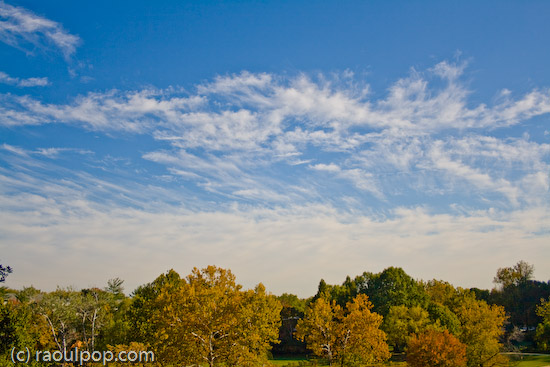
These very red and vibrant fall foliage was captured last year at our local Audubon Naturalist Society in Bethesda, MD.

During one weekend morning, I decided to set up the camera on a tripod and play around with water drops on petals. I got some really nice photos out of that session. This is one of them.

Waterdrops on petals

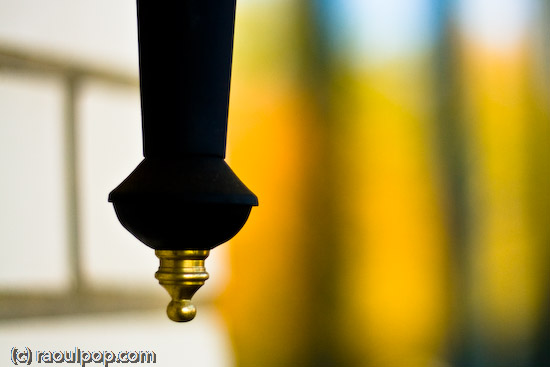
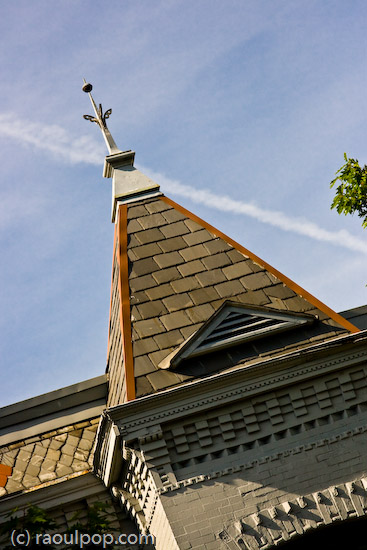
There’s a WWI memorial in downtown DC, and the crowning piece is this golden statue.

Liberty points the way

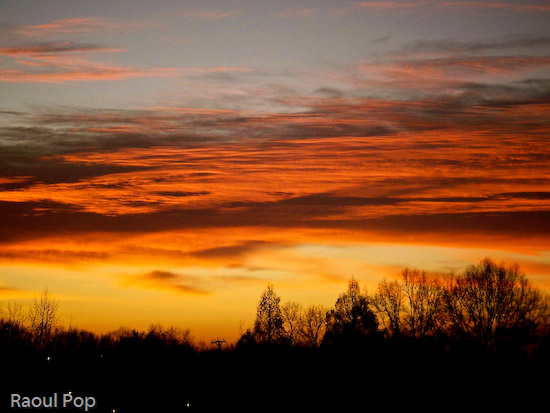
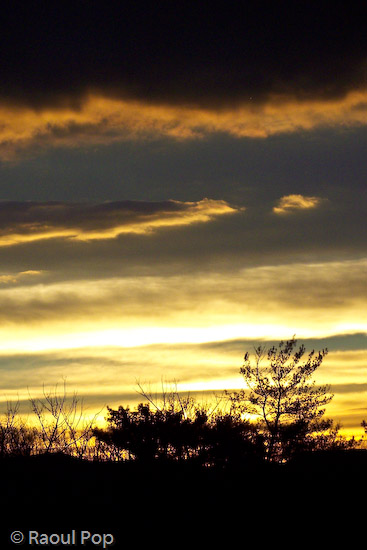
I love great sunrises, and I captured many of them with the Kodak v610. This is one of those photos.

Passionate sunrise

The inside courtyard of the Watergate Hotel in Washington, DC is shown below. The camera always managed to expose photos decently when confronted with situations like this: a wall in shade and the bright sky above. A LOT of cameras have problem with this kind of a setup, including my 5D, which tends to overexpose the sky.

Watergate

Taken during a fierce snowstorm (we get one of those every year around here). It’s too bad the snow melts away so quickly afterwards.

During the snowfall

The next day, snow began to melt, as expected. I rushed to get a few photos before it would all be gone. This photo was post-processed to emphasize the frozen atmosphere — wishful thinking on my part, since the temperature was above 32 degrees Fahrenheit.

Frozen

We were walking along the C&O Canal this past spring, and spotted a fox walking around in the forest. It stopped to check us out as well. This is where the camera’s 10x zoom was very useful. We were able to get up close even though we were separated by a body of water.

Fox in spring

The camera’s compact size made it a breeze to use when an opportune moment was spotted, like with this lone tulip outlined against a green wall.

Tulip

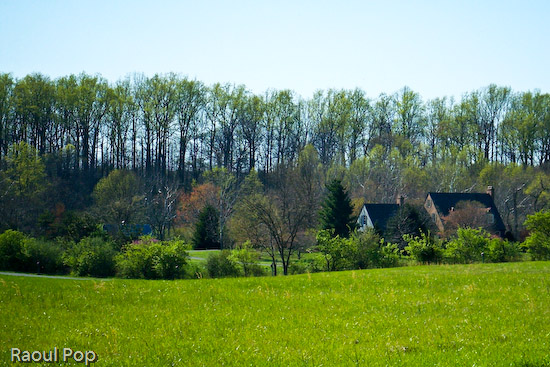
The zoom once again proved useful for getting closer to this lovely country house. In reality it was quite far from the road.

Lovely country house

Although there’s some lens flare in this photo, which could have been avoided with a lens hood (but the camera isn’t equipped with one) I love it. This is a portion of the C&O Canal where the water has pooled and is now stationary. Since the canal is no longer maintained, this portion has turned into a swamp. While I wouldn’t wade around in it, it makes for an interesting wildlife habitat, and the afternoon light is superb.

C&O Canal, now stationary

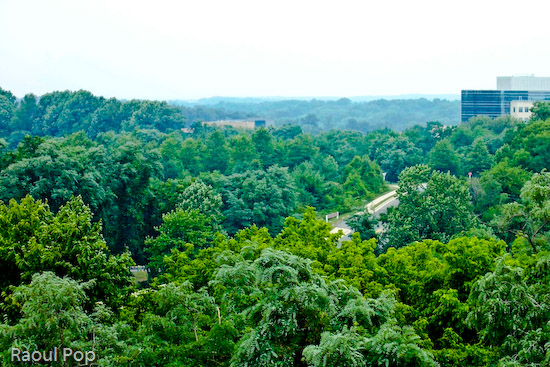
Guess where this photo was taken? It was at the top of the Tyson’s Corner Mall parking lot, looking toward DC. Summer was in full swing, and that’s the reason for the rich, deep green foliage of the trees.

Virginia forest from above

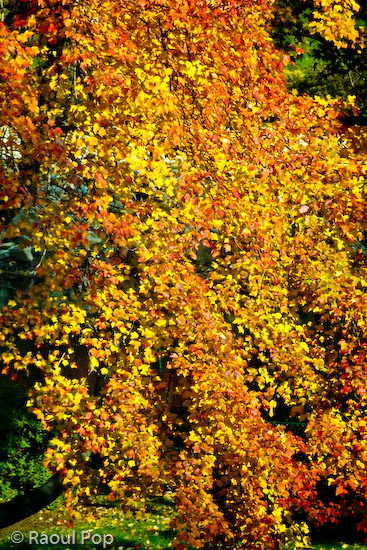
This was taken more recently, right in my community. Those beautiful golden hues can be seen every fall, but I won’t tell you where. I’ll keep it a secret for now. 🙂

Golden fall foliage

I leave you with another beautiful sunrise.

Golden sunrise

Summary

If you’re interested in a capable little point and shoot with a very powerful zoom for its size, try finding the Kodak v610. I checked and it’s out of stock even at Kodak’s own online store. It seems only Amazon still has a few units left. Though it’s no longer being made, if you can pick up a used one at a reasonable price and provided you understand its limitations, I think you’ll enjoy using it.

More information

Standard
Reviews

Camera review: Canon Rebel XTi DSLR

Released on August 24, 2006, the Rebel XTi is Canon’s newest entry-level prosumer DSLR. It’s an update on the popular Rebel XT, and it’s different from it as follows:

  • Slightly thinner body, heavier (2.56in vs. 2.63in and 510g vs. 485g)
  • Newer, re-designed sensor with higher resolution (10 megapixels vs. 8.2 megapixels)
  • Sensor cleaning technology (dust shaken off the sensor with ultrasonic waves)
  • Bigger display (2.5in vs. 1.8in)

I only listed the significant differences above. You’re welcome to compare the detailed specs if you’d like, right on Canon’s website. Go to the More Information section at the end of this post and use the links listed there to get the full specs.

Canon Rebel XTi (front)

In my reviews of other DSLRs, like the Canon 30D, the Olympus E-510, or the Olympus E-500, I criticized the Rebel XTi’s small grip, and I still think I’m right. It’s much too small to be held comfortably in a man’s hand, and that’s unfortunate, because the camera is great in every other aspect.

In spite of the camera’s small grip, I was pleasantly surprised by the quality of the photos it produced, and I wanted to share my findings with you. I avoided reviewing it until now on purpose — as I said, I was displeased with its body design — but after using it, I’m happy to say I would recommend it.

I made a video review of the XTi, which should help you get a better idea of the its dimensions. I discussed the camera at length in the video, and also did a side-by-side comparison between it and my Canon 5D. You can watch it below, or scroll past it to read the rest of my review. You can also watch it here, or download it if you like.

I should also mention I goofed in the video. I talked about the XTi having the DIGIC III processor, but it turns out it still has the DIGIC II processor. What I said about the differences between it and the 5D and 30D with respect to exposure value settings is still correct, so don’t disregard that. You may or may not be aware that when you do not adjust the EV settings on a 5D or 30D, and you shoot outside in bright light, the processor will overexpose the shot. The quick fix is to dial down the EV by 1/3rd, and that usually does the trick. But that’s not right. Shots shouldn’t be overexposed, and I’m glad to see the XTi doesn’t suffer from that bug. It exposes shots beautifully, and you’ll see what I mean when you look at my sample photographs below.

Even though the overall design of the camera is similar to that of the larger DSLRs that Canon makes, certain differences are there, and they are caused both by the price and size of the camera. For example, being used to the 5D, I missed the small at-a-glance display on top of the camera. On the 5D, it lets me know what my settings are without having to consult the LCD screen. I also missed the large settings dial next to the LCD that’s a staple on every other Canon prosumer and pro DSLR. I love that dial/wheel, and I miss it on every non-Canon camera I use.

The exposure value adjustment button, along with the drive settings button, are located next to the display instead of the top of the camera. There is no jog controller for the focus point selection, either. But you can’t have everything. The Rebel XTi is an entry-level DSLR, so you can’t have features that are normally found on the more expensive DSLRs. Plus, its body size makes it impossible to have the same button arrangement.

Canon Rebel XTi (back)

Despite my gripes, I liked the size of the body, and I liked the feel of the buttons. They had a soft, glossy surface that made it a joy to press them. The small body of the camera makes it possible to hold it very comfortably in the palm of your hand, and that’s a huge plus, because you can stabilize shots a lot better that way.

I really liked the quality of the photos from the XTi. I shot in RAW format, and I was very pleasantly surprised to see how well exposed the photos were, and how accurate the color reproduction was. I’ll show you some photos very shortly where I made no adjustments in post-processing other than adding meta-data, and I think you, too, will find it hard to believe that those were RAW shots straight from the camera.

I can tell you this: the RAW files made by the XTi have better exposure and color, right out of the camera, than the RAW files made by my 5D. It’s a shocker, yes, but it’s true. I suppose that’s to be expected. The 5D uses technology developed in 2005, while the XTi uses technology developed in 2006. But still, I had to see it with my own eyes to believe it, and being a 5D owner who’s shot tens of thousands of photos with the 5D, this was a hard pill to swallow. Having said this, would I give up my 5D for a Rebel XTi? I’m tempted, but no. 🙂

On to the photos. These are two that I took in early afternoon light, which was bright and unforgiving. I shot in RAW and developed the photos in Lightroom. I had to do very little exposure adjustment. Can you believe how well the XTi exposed the photos and reproduced the colors? Can you believe the dynamic range of the sensor? I didn’t expect this from the XTi.

November afternoon

Light and shadow

Here’s another photo that shows off the dynamic range of the camera. I shot this with the wonderful 18-55mm kit lens. If you’re confused by my characterization of that lens, watch the XTi’s video review, and I think you’ll understand.

Go to the mat

Here’s a macro shot I took with the same 18-55mm kit lens. I was pleasantly surprised with the low noise at 800 ISO.

Cone job

I said it before, and I’ll say it again. I love the colors that I get out of this camera! Have a look at these two photos to see what I mean.

Knobular

Spoon!

I thought I’d put in a dog photo for good measure. This happy pooch posed for me in downtown Alexandria this past summer. I used Keith McCammon‘s XTi for the shot.

Smile for the camera

What else can I say? If I’ve missed anything, let me know in the comments. The Canon Rebel XTi is a great prosumer DSLR. You won’t have to try very hard to get wonderful photos with it, and its affordable price will help make your decision a little easier.

Gilded

Pastels

Buy the XTi

Troglodyte

Bohio’s


World at your feet

Etched in stone

Hand that feeds

Standard
Reviews

Lens comparison: EF 24-70mm f/2.8L Zoom vs EF 24-105mm f/4L IS Zoom

Have you ever wondered how the EF 24-70mm f/2.8L and EF 24-105mm f/4L zoom lenses would do if compared side by side? Which one would come out as the winner in real-world use? Here’s my answer to that question.

First, some recommended reading:

Those two reviews of mine should give you a good idea of what each lens can do. Now let’s talk about how they do when they’re together. 🙂 Here’s a photo of the two lenses. As you can see right away, the 24-105mm is smaller in both height and girth — it’s shorter and a little narrower than the 24-70mm.

When we look at the rear lens elements, we can see some differences there as well. The 24-105mm lens is on the left. If you look carefully, you can see a baffle in place. The 24-70mm lens has no baffle.

It’s possible that the baffle is there in order to reduce possible flare effects, since the focal range is longer. It could also be there to baffle us — after all, it is a baffle. 🙂 It’s also possible that the optics aren’t as high quality as those in the 24-70mm lens — they’re both priced the same, but the 24-105mm has image stabilization and an extra 35mm of range. On the other hand, I’ve seen a very similar baffle on the EF 14mm f/2.8L prime lens, and no one can say that the 14mm lens is made with cheap glass. So the more likely explanation is that it’s there to reduce lens flare due to the increased focal range.

(By the way, the baffle can be seen even more clearly in this product advisory from Canon warning about unacceptable levels of lens flare in early builds (2005) of the 24-105mm lens.)

Here’s another look at the lenses side by side, this time with the lens controls visible. As you can see, the only thing that’s different on the 24-105mm lens is that it’s got the IS switch. The controls seemed a little thicker on the 24-70mm lens. As for their durability, I assume they’re both long-lasting since these are L series lenses.

Chances are you can already know that the 24-105mm lens is lighter than the 24-70mm lens. It’s no small difference, by the way. The 24-105mm lens is 670g, while the 24-70mm lens is 950g — that’s 280g of difference! While both lenses extend outward as you zoom, the 24-70mm lens is more top-heavy than the 24-105mm lens, and that makes a big difference in wrist fatigue — the 24-105mm lens is less punishing and can be held comfortably for longer periods of time.

The weight difference is remarkable to me because the 24-105mm lens has 18 elements, while the 24-70mm lens has 16 elements. Canon managed to keep the weight down even though they placed extra glass in there and added image stabilization.

There are some limitations to being lighter and smaller though. The 24-105mm lens’ closest focusing distance is 1.48ft or 0.45m, while the 24-70mm lens’ closest focusing distance is 1.25ft or 0.38m. It also looks like the general consensus is that images obtained with the 24-105mm lens are somewhat softer than those obtained with the 24-70mm lens.

Other than the difference in focal lengths, another obvious difference between them is the maximum aperture. The 24-70mm lens opens up to f/2.8, while the 24-105mm lens only opens up to f/4. That’s a full f-stop difference, or a 2x reduction in the amount of light that can enter the lens. This is where the baffle comes in again. Since the baffle itself limits the amount of light that can hit the sensor in order to reduce glare, it stands to reason that the aperture can’t open up any wider. Even if it did, we’d end up seeing the baffle contours in our photos.

What the 24-105mm lens has going for it is the built-in image stabilization, which, in my experience, more than compensates for the reduced maximum aperture. See the photo below. I took it completely handheld (I didn’t prop myself up against anything) at a shutter speed of 1/15th seconds.

I tried to get similar photos with the 24-70mm lens, and I couldn’t, not without leaning against something to stabilize the lens. The slowest shutter speed I could use was 1/30th seconds with that lens. As I concluded in my previous review of the 24-105mm lens, the image stabilization counts for a lot and makes the lens truly versatile and useful.

While I’m talking about versatility, let’s not forget that extra 35mm of focal range. At close distances (6-15 feet), you don’t notice how much it matters, but when you start focusing on things farther away (30-100 feet or more), you realize how valuable those extra millimeters really are!

Let’s not forget bokeh. Both lenses have gorgeous bokeh, but the 24-70mm produces a creamier bokeh. That’s because it opens up all the way to f/2.8, while the other only opens up to f/4. If you do a lot of close-range photography, in tighter spaces, and you really need that bokeh (portraits, etc.), the 24-70mm would probably be a better candidate. This next photo was taken with the 24-70mm lens.

If you’ve got a little wiggle room and can position your subjects further away from things (walls, trees, background), don’t discount the 24-105mm lens. Its bokeh is right up there with the best of them. Have a look below.

In the end, it really comes down to your own, precise needs. I’ve heard of some people who only carry two lenses in their bag: the 24-70mm and the 70-200mm (both of which I reviewed here). They’re both professional-grade, L series lenses. They’re heavy, but they deliver the goods, and they’re versatile.

For my needs, I’d go with the 24-105mm lens. It’s lighter, has extra range, and has built-in image stabilization. I really enjoyed using it, and I seemed to get better photos with it than with the 24-70mm zoom. While it may not be as sharp, I didn’t notice anything that would turn me away from using it. I thought it was a superb lens and couldn’t believe the quality of the optics when I looked at the photos I got with it.

At least one commenter here asked how these two lenses compare, and I hope that I’ve answered that question in as much detail as I could give. If you have any other questions, pose them in the comments on this post, and I’ll try to answer them.

More information:

Standard
Reviews

Camera review: Olympus EVOLT E-510 DSLR

Back in August 1st, Olympus PR invited me to attend the Legg Mason Tennis Classic here in DC and shoot with their new DSLR, the EVOLT E-510. I enjoyed myself thoroughly at that event, and my thanks go out to Michael Bourne from Mullen, the agency that handles the PR for Olympus.

When I arrived there, I was given a review kit for the E-510, containing the camera, the FL-36 speedlite, and the two-lens kit (14-42mm and 40-150mm). For my review, I did what I usually do: I used the review unit as my primary camera for a month, taking note of the experience. What you’ll get now are my impressions of the camera, after taking thousands of photographs with it in various light and weather conditions, indoors and outdoors. You can choose to watch it below or here, and to download it as well. My full written review is enclosed below as well.

The E-510 is a prosumer camera made to be portable, affordable and easy to use. The E-510, a 10-megapixel DSLR, is smaller and lighter than its predecessor, the E-500, which I reviewed this past January. Even though it’s smaller, the grip was designed so well that I could hold the camera comfortably, without missing the heft of the E-500 or that of my personal camera, the Canon 5D. (I like my cameras a little chunky, they’re easier to stabilize that way.) The E-510 was even lighter than I thought with a lens mounted on it. The two-lens kit includes two premium lenses designed for travel and portability. They’re incredibly light given their focal range. I expected the 14-42mm lens to be light, but I was blown away by how small and light the 40-150mm lens was. Olympus really did an amazing job with the lenses and the camera when it came to portability. The whole kit (camera, lenses, speedlite and charger) was so light I could carry it anywhere very easily. I could run with it and barely felt its weight — as a matter of fact, I did just that on a couple of hikes through the forest.

The thing to remember when looking at focal lengths with any Olympus DSLR is that they’ve got a 2x crop factor. It’s because they use the 4:3 standard, which specifies a sensor size of approximately half the dimensions of a full frame sensor (17.3 mm vs. 36 mm and 13 mm vs. 24 mm). This means the surface area of the sensor is 1/4th that of a full frame sensor. It also means you need to multiply the focal length listed on each lens by two in order to get the effective focal length. If the math is a bit confusing, just keep remember the crop factor and you’ll do fine.

To illustrate this, let’s look at the two kit lenses. The wide angle zoom, 14-42mm, yielded an effective focal range of 28-84mm. The tele zoom, with a 40-150mm range, yielded an effective focal range of 80-300mm. Now do you understand why I was amazed by how light and small the lenses were? Try finding an 80-300mm zoom lens from another DSLR manufacturer, and I guarantee you that it won’t be this small and light. Olympus can accomplish this because of their sensor’s form factor. It’s a small sensor, 1/4th the surface area of a full frame sensor. That means they need less glass in the lenses, because there’s less sensor to cover with the glass. Because there’s less glass, the lenses are easier to make. You get the same optical quality, but the lenses are cheaper, lighter and smaller.

As long as I’m talking about the sensor, I should mention that it’s a Live MOS, which gives it the ability to do Live View (it lets you compose photos on the LCD instead of the viewfinder). There is a slight delay between the time that you press the shutter button and the photo is taken when using Live View. The advantage is that you can zoom into the photo up to 10x, on screen, and make sure your focus is tack sharp. This is particularly useful for macro photography.

If you’re graduating to the E-510 from a point and shoot, you may say “Big deal, I’ve composed photos on the LCD screen all along. What’s the difference?” Well, the difference is huge. Until Olympus introduced Live View, no other prosumer DSLRs on the market offered it. The mechanisms were much too complicated. Because CCD sensors were in use on most DSLRs until recently, separate CMOS sensors would have needed to be installed in the camera, and light diverted to them with additional mirrors. As a matter of fact, Olympus’ first Live View DSLR, the E-330, functions through that mechanism. Things there are complicated, and the potential for breakdown is increased. But with the introduction of the E-410 and E-510, Olympus switched to CMOS sensors altogether. This allowed them to use the same sensor for both photographs and Live View, dramatically simplifying the mechanism involved. Other camera manufacturers soon followed suit, and now we have both Canon and Nikon DSLRs with the same capabilities. Nikon also switched from CCD to CMOS sensors in their recent DSLRs, the D300 and D3.

To get back to Point and Shoot cameras, they use CCD sensors. That means they have little rinky-dink CMOS sensors hidden away next to the CCD sensor, and they use those to let you compose on screen and record movies. But those tiny sensors have pathetic imaging capabilities, and understandably so. By and large, Point and Shoot cameras are small and inexpensive. Manufacturers can’t afford to cram expensive components in there. Not so in the E-510 and other DSLRs that have Live View or its equivalent. They use the same large, expensive sensor for everything. While they won’t let you record movies, they will allow you to see very accurately what your camera sees, directly through the lens, and will automatically compensate for aperture, shutter speed, ISO and white balance settings so you can see how a photo will look before you press the shutter button.

The camera also features Olympus’ SSWF (Super Sonic Wave Filter) technology, which shakes dust off the sensor. Olympus was the first company to introduce this feature, and other DSLR manufacturers only recently introduced similar technology on their cameras. The SSWF light is located next to the shutter button on top of the camera, and it flashes blue when it’s active. I can tell you that it does work. I did not have to sit there with the Heal tool, removing dust spots from the photos taken with my E-510, whereas I have to do that on a regular basis when I take photos with other DSLRs.

Another important feature built right into the camera is the sensor-shift image stabilization. It stabilizes the image by shifting the sensor on both the X and Y axis (horizontally and vertically). You can hear it working on longer exposures. It works pretty well. But don’t forget to switch it off when you mount the camera on a tripod, otherwise you’ll get blurry photos. This is a pretty common bug with image stabilization technologies, and it doesn’t matter when they’re built into the camera or the lenses. When the camera is kept very stable, they go nuts trying to stabilize what doesn’t need to be stabilized. The end result is a blurry photo. So switch off the IS.

The advantage of in-camera stabilization versus in-lens stabilization is that it’s cheaper over the long term. You can use any sort of compatible lens (older or newer) with that camera, and you’ll be able to take advantage of the image stabilization with every single lens. That’s not the case with in-lens stabilization, which, as its name implies, is located in the lens. That means each of those lenses will cost more, and their cost adds up as you buy more of them. To be fair, it seems that in-lens stabilization works over a greater range of f-stops in real-life use than in-camera stabilization. But you can’t argue with the price difference, and the results are pretty good, too.

The photo you see here was taken at a shutter speed of 1/13th of a second, as I was bent over a brook, looking at a crayfish. If you take photographs yourself, then you know that you can’t keep your body very stable when you’re bent over, unless you’ve stabilized yourself somehow, which was not the case here. Yet that photo came out clear and sharp, even at 100%. The water even managed to look a little oily, which only happens with longer exposures.

Other useful features of the camera are the many scene modes, and the ability to write to CF, Microdive and xD cards. To find two-card slots on other DSLR brands, you have to look to the professional models (over $4,000). Yet Olympus includes that option on the very affordable, prosumer-oriented E-510. That’s a really nice touch.

The E-510 uses the new TruePic III image processor, which gives better colors and more accurate skin tones. I found that to be true as I used the camera. Where I found this image processor similar to the TruePic II (used in the E-500) was in the auto white-balance, which tended to err on the side of colder color temperatures. Thankfully, I shot in RAW, so I was able to adjust the WB in post-processing, but those shooting in JPG mode may want to be aware of this and adjust the White Balance accordingly before using the camera. Personally, I prefer cameras that err on the side of warmer color temperatures (but not too warm, because that can get pretty ugly). My Canon 5D does a great job with the auto white balance. But I expect that from it. It cost three times as much as the E-510.

The autofocus still uses only three focus points, and yes, that makes a difference. I found it to be slower than autofocus on cameras that use more focus points. It tended to hunt sometimes, even in broad daylight. But overall, it worked pretty well, and the focusing delay wasn’t significant.

Battery life is advertised at 650 shots per charge. In practice, I found that I got about 800 shots per charge. Maybe that’s just me. I always seem to get more shots per charge than the specs.

I use Adobe Lightroom to post-process all my photos, regardless of what camera I use. I noticed that RAW files created by Olympus cameras (both the E-500 and E-510 are subject to this), take longer to load fully in Lightroom than RAW files created by Canon cameras. I’m not sure why this is, and whether it occurs with other workflow-oriented applications, like Aperture, but I thought it worth mentioning. Just in case you’re wondering, I did upgrade to the latest version of Lightroom as of this date, which is version 1.2.

Sensitivity to low light was a point of contention in my review of the E-500, where I noted the CCD sensor was prone to lots of chroma noise at higher ISO. Presumably, the Live MOS sensor of the E-510 has better low light performance and generates less noise. In terms of ISO speeds, it goes from 100-1600, like the E-500. I did find less chroma noise when I used it. Luminance noise was about the same, perhaps a little more, but that has to do with CMOS sensors in general.

Basically, I can’t give you a definitive opinion on the camera’s low light performance. The two kit lenses that shipped with my review unit were too slow to properly judge how this camera does in low light situations. The 14-42mm lens was f/3.5-5.6 and the 40-150mm lens was f/4.5-5.6. To judge a camera’s performance in low light, you’d need faster lenses, ones that can open up to at least f/2.0. Ideally, the lenses should open up to f/1.8, f/1.4 or f/1.2. I asked Olympus to send me such a faster lens, but they weren’t able to do that within the review period. As I told them, I’d be glad to test the camera with a fast lens if they can arrange it at some point in the future, and report on my findings.

It wouldn’t be fair if I didn’t also show you some more photos taken with the camera. They’re enclosed in the photo gallery above. You can also view all of my published photos from the Legg Mason Tennis Classic, which were all taken with the E-510.

The E-510 is a great all-around DSLR. It’s light, affordable, packed with features and options, and it will help you get great photos. I would definitely recommend it to someone who’s looking to purchase a DSLR and lens kit for well under $1,000.

More information:

Standard
Reviews

Camera preview: Nikon D3 and D300 DSLRs

On August 23, 2007, Nikon introduced two new DSLRs to the market: the full frame D3, and the D300, an upgrade to the D200. I’m late with this bit of news — I meant to publish the post sooner, but I was out of the country and I had less access to the internet that I’d hoped. Still, since I went to the trouble of getting nice studio pics for the two cameras, I thought I’d write about it anyway, late or not.

First, a few photos. There’s the D3 below, and the D300 is right after it.

These two cameras have gotten plenty of coverage already. What else is there to be said? Well, remember the big CCD vs. CMOS arguments that went on and on for years? Hmm, let’s see, who was it that argued for CCD? Why, it was Nikon, of course. What have they just done? They’ve switched to CMOS entirely for their new DSLRs.

There was another argument thrown around, also by Nikon and its supporters. Um, yes, I remember now, it had something to do with full-frame vs. cropped sensors. I’m paraphrasing here, but Nikon people were saying something along the lines of “full-frame isn’t needed for digital, it’s useless — we can accomplish everything we want with a cropped sensor.” So, what just happened? Nikon put out a full-frame DSLR.

Short of holding my brother’s D70s in my hand, changing the lens, cleaning its sensor and taking a few photos, I don’t have a lot of hands-on experience with Nikon cameras. I considered buying the D200 this past spring, but opted for the Canon 5D instead. I can tell you what my brother says about his D70s — and believe me, it’s not flattering… It turns out there was a ridiculously high rate of factory defects with that camera, particularly when it came to autofocus. His camera can’t autofocus to save its life. He’s had to use manual focus ever since he bought the camera. He’s finally going to pay to repair it, after more than one and a half years of use. He’d have sent it to Nikon for repair while the warranty was still good, but there are no official Nikon reps in Romania, which is where he lives and works.

We sat there comparing on-screen menus between his D70s and my Canon 5D. He couldn’t believe how easy it was to navigate the menus on my 5D, and to get the settings that he wanted, the first time, right away. He kept mumbling under his breath about how pathetic the D70s was, and how he could never find stuff when he was pressed for time. Heck, I tried to help him find the sensor cleaning mode and gave up after several minutes. We just couldn’t find it. We ended up putting the camera in mirror lock-up mode, pressing the shutter and cleaning the sensor that way. That’s pretty pathetic from a UI (User Interface) point of view.

On the other hand, I’ve heard some people praise Nikon’s controls. I don’t get it. Perhaps if you’ve been a Nikon guy for years, the stuff is just easier to find, but they sure don’t make it easy for someone who picks up the camera and wants to use it. Canon does make it easy, and that’s one of the reasons I like them.

There’s another thing I can say for Nikon in general. Their PR people gave me the run-around when I tried to get a D200 for review. On the other hand, Olympus and Canon were responsive and willing to send me review units. I’ve also heard of really bad customer support experiences from Nikon users.

Take these experiences for what they’re worth. They may have been isolated incidents — or not. I’m certainly willing to forget my bad experience with Nikon PR if they are interested in sending me a D300 or D3 for review. I’ll do what I usually do, which is to use it as my primary camera for one month, then write an honest, detailed review of the experience.

From a design point of view, these two new cameras look really nice. I can’t tell you how they feel in my hand, since I haven’t had the chance to hold them (yet).

I do want to point out that Nikon has more high-res photos for its cameras than Canon. That’s nice. It gives people a chance to get a closer look at them, and it’s an added convenience. You can see the rest of the photos below.

Here’s that troublesome CMOS that Nikon people used to badmouth in the past. It’s the sensor that does what a CCD cannot, which is to enable Nikon to go all the way to 6400 ISO natively on the D3 and 3200 ISO on the D300 (and even all the way up to 12,800 and 25,600 ISO in expanded mode on the D3).

Yes, ISO-wise, Nikon one-upped Canon, but they haven’t managed to get the same amount of resolution from the full-frame sensor that Canon can get. My 5D has roughly the same resolution as the D3 (12.8 vs. 12.1), while the Canon 1Ds Mark III has 21.1 megapixels — but only goes up to 1600 ISO natively. So there’s a certain give and take here that has to do with the physical limitations (at least to date) of the medium.

If you squeeze more pixels out of the same surface area, the pixel pitch decreases and you end up more prone to noise. If you keep the pixel pitch large, you can get more low-light sensitivity, but you don’t have the resolution. Nikon chose to go for low-light sensitivity with their two newest cameras, which I think is an interesting choice. Perhaps they did it to silence the Nikon critics who kept harping on their noise-prone CCD sensors. Whatever the reason, I’d love to see just how one of these two cameras does in low light with a nice fast lens like a 50mm f/1.4 or f/1.2.

Till then, I’ll leave you with more information:

Standard