How To

How to properly clean your keyboard

I found myself needing to clean our iMac’s keyboard a few days ago. I remembered watching a video recently that suggested we should simply stick the keyboard in the dishwasher. I wasn’t about to do that. I doubted the circuitry would have worked afterwards, particularly the Bluetooth link between the keyboard and the computer.

The safer route was to simply remove the keys, wash them separately with warm water and soap, then wash the keyboard base with a cloth moistened with water and a mild soap solution. Ligia also got some cotton swabs and rubbing alcohol ready, just to make sure we’d be able to get into all of the keyboard’s crevices.

This solution should work for all keyboards. A word of caution: before you start doing anything to your keyboard, take a couple of photos of the key layout! You don’t want to find yourself with a bunch of keys in your hand, clueless about where to stick them… Take photos of the keys and have them ready to display on your computer, or print them out ahead of time.

Removing the keys is quite simple. You take a quarter or any larger coin, put it under a key, and pry upwards. The key should pop right out. Be careful though, you don’t want to break them — that would render the keyboard quite useless afterwards.

After the keys are removed, the keyboard should look something like this:

Apple keyboard with keys taken off

Please excuse the distortion caused by the camera lens. I used my 24mm prime to make for fast work.

Once the keys are off, Ligia cleaned the keyboard, and I got to work cleaning the keys. I used a basin filled with warm water and I poured in some detergent, then gave each key a light scrubbing with a brush. You can also use the sink directly, but you’ve got to be very careful there. Sinks have drain holes under the top lip, and your keys might just run into them, since they’re plastic and they float. Once they go into the drain, good luck getting them out. You can open up the P-trap and see if they’re there, but chances are that they’re already gone. So be very, very careful as you wash the keys. You want to make sure that you don’t lose any of them.

After the keys were washed, I put them in an absorbent cotton towel and shook them around a bit to get drops of water dislodged from the keys’ undersides, then, while keeping them bunched up in the towel, I ran a hair dryer in there to make sure they got dry a little faster. Here you’ll need to make sure all of the corners of the towel are raised up, otherwise your keys will start flying around… You can also leave them on a towel overnight if you don’t want to bother with the hairdryer.
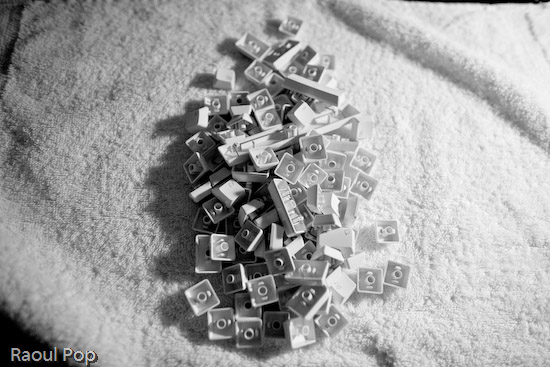
Keys from Apple keyboard

You also want to be careful that you don’t get excess liquid on the keyboard itself. The last thing you need after you go through the trouble of cleaning it is some problem with the circuits in there. Use a moistened cloth or paper towel, and clean it carefully, making sure you remove any debris or gunk or crumbs or whatever you find in there. Use cotton swabs moistened with rubbing alcohol to get into the tighter spots. When you think you’re done, examine it carefully under a strong light, to make sure you got everything off. Sometimes keys will stick because you or someone else in your house/office spilled sticky liquids on the keyboard, and if you don’t get that sticky gunk cleaned off, the keys will continue to stick even after you think you’ve cleaned them.

After Ligia got the keyboard base cleaned up, we stuck all of the keys back on the keyboard, and it looked quite beautiful when we got done. It was as if we’d gone out and bought a brand new keyboard. Just think of it! We did our part for the environment by re-using a piece of perfectly good hardware, and we also saved about $60. Pretty cool!

Apple keyboard after thorough cleaning

Standard
How To

Proper disposal of old electronic equipment

Frank Gruber of SomewhatFrank.com posted a neat video made by GOOD Magazine to his blog. The video’s enclosed below, and you can also view it directly on YouTube. It documents first hand just how electronic waste is “recycled” in countries like China or India. Besides unmitigated pollution to the air, ground and water, the workers themselves are exposed to serious damage from working at those places.

Please don’t contribute to the problem. Do the right thing. Recycle your electronic waste (old computers, stereos, iPods, printers, etc.) the right way by sending them to companies that will do it right here in the US, in environmentally-safe ways. The major computer manufacturers will either recycle them for free nowadays, or allow you to pre-purchase a shipping label so you can send the computer back to them at the end of its useful lifespan. The average cost to recycle a computer in the US is $30. That’s a small price to pay to ensure that you’re not causing even more damage to the environment that feeds you and keeps you alive.

Standard
How To

Get smart about money in 135 minutes

Two easy steps are involved with this:

  1. Take 90 minutes to watch Dave Ramsey’s video entitled “Dumping Debt“. It was posted to YouTube in 10-minute segments. Here they are: Part 1Part 2Part 3Part 4Part 5Part 6Part 7Part 8Part 9. This was possibly posted without Mr. Ramsey’s permission, so please consider purchasing the DVD from his web store. (via Get Rich Slowly)
  2. Take 45 minutes to watch Paul Grignon’s video entitled “Money as Debt” on Google Video. Trust me on this. You will be shocked. You will have your eyes opened, and then you’ll realize what makes the world go ’round. (Cristina, thanks for pointing this out to me!)

Since both of these resources were posted online at full length, and I’m not sure if they were posted with or without their authors’ permissions, you’d be smart to watch them now, while they’re still available. I do not endorse use of copyrighted materials without permission — and to be fair, I don’t know that’s the case here — but I did want to share this information with you. If the videos should become unavailable for some reason, then please consider purchasing them. They are worth your time and money.

Standard
How To

Automatic redirect from HTTP to HTTPS

IIS (Internet Information Server) doesn’t have a way to automatically redirect HTTP traffic to HTTPS if SSL encryption is enabled for a site. So if you’ve got a site that users are supposed to access by typing in https://www.example.com, but they type in http://www.example.com or http://www.example.com or just example.com, they’re going to get a pretty ugly error message that looks like this:

What can you do? Well, there are two ways of going about it, and both of them are hacks, but they do the job just fine. I prefer method 2 myself.

Method 1:

Make sure the original site (the one with SSL encryption) is listening only on port 443 for the IP address you’ve assigned to it. Now create a separate site using that same IP address, and make sure it only listens on port 80. Create a single file at the root level and call it default.htm or default.asp. If you want to use HTML, then use a meta refresh tag. If you want to use ASP, use a redirect. I’ll give you examples for both below.

<meta http-equiv="Refresh" content="0;URL=https://www.example.com" /> 

or

<% Response.Redirect("https://www.example.com") %>

Don’t forget to enclose each line in its proper brackets. This method works great, but it has one shortcoming. If the site visitor chooses to go to http://www.example.com/somepage.htm, they’re going to get forwarded to the root-level of the HTTPS site, because that’s the nature of the script. It doesn’t differentiate between the page addresses. So you may ask yourself, isn’t there some other way of doing this? Yes, there is.

Method 2:

This method doesn’t require the creation of an additional site. All that you need to do for this is to create an HTML file — I call mine SSLredirect.htm — then point IIS to it using a custom error capture. First, here’s the code that you need to paste in that HTML file:


<script language="JavaScript">
<!-- begin hide

function goElseWhere()
{
var oldURL = window.location.hostname + window.location.pathname;
var newURL = "https://" + oldURL;
window.location = newURL;
}
goElseWhere();

// end hide -->
</script>

Once you’re done editing the file, save it to the root level of your site, or to the root level of IIS (c:\inetpub\wwwroot\). Saving it to that general location lets you use that same file to fix the HTTPS redirection problem for all of the sites you host on a single server.

Now, in IIS 6, right-click on the site in question, go to Properties >> Custom Errors, and double-click on 403;4. Select File for Message Type, then browse for the file you’ve just created and click on OK. In IIS 7, click on your site, then double-click on Custom Errors, locate the Add link in the top right-corner, and add an error for 403;4, as shown in the image below.

IIS 7 Error Configuration

Once you’ve done this, your sites should automatically transfer HTTP traffic to HTTPS when it’s required, and the visitors won’t be forwarded to the root-level of the site. Instead, the URL will be remembered, and the page will simply be re-loaded using the HTTPS protocol. Come to think of it, you could write this in ASP as well, and avoid potential problems caused by browsers that have JavaScript turned off, but this code should work just fine for a lot of people.

Standard
How To

The best tomatoes are homegrown

You can go to Whole Foods, Trader Joe’s, MOM’s, Safeway, Giant, Publix — you name it — and buy the most expensive tomatoes, but they’ll still taste just as flat as the cheapest ones you’ll find. I don’t care if they’re organic, hydroponic, vine-ripened or whatever — they still have no taste.

It’s a fact of life in America. I don’t know what our farmers do to their fruits and vegetables, but nothing tastes good when you buy it from the store. Most stuff tastes like cardboard, and if you’re lucky, it might have a semblance, a sad little ghost of the taste of the real thing. I call it the great American taste theft. It doesn’t matter if the stuff is cheap or expensive, it still tastes like crap. While I expect the cheap stuff to taste like that, I find it offensive and downright thieving to charge $3-7 dollars for a pound of tomatoes that tastes just like the ones that cost $1-2 dollars. If you don’t know what I’m talking about, then you haven’t gotten around much.

Our families have always grown their own vegetables, even when they lived in cities. Now that Ligia and I are on our own, and we’ve only got a terrace, we still grow a few vegetables, mostly tomatoes, every year. Let me tell you that there’s a world of difference between the tomatoes you grow at home and the ones you buy at the store. The ones over there might look better, cosmetically-speaking, but the ones you grow with your own love and care, without pesticides or fertilizers, are the ones that will blow you away every time you taste them. They may have a few blemishes, they may not be as big or pretty as the ones in the store (you know, the ones full of hormones and all sorts of crap that’s not good for you) but when you bite into one, that fragrance and taste explosion you’ll feel is proof of their pedigree.

Homegrown cherry tomatoes

Trust me, there’s no substitute. You don’t know what you’re missing if you don’t try it out. You may lose a few tomatoes to disease, but if you let them fend for themselves, and only feed them water, till the ground once in a while and prune them carefully, you’ll come to find out what I mean.

Homegrown tomatoes
Standard