
While working on a project, I accidentally cut through the power cord of my Makita planer with its own blade. This is how I fixed it.
Tag Archives: carpentry
My bed frame comes to life in France
You may remember my post on the sturdy king-size bed frame a while back? It’s inspired many people to build their own frames at home, saving $$$, avoiding the purchase of cheaply made furniture and learning about carpentry in the process.
This time, Jérôme Tirolien from France wrote to thank me for the article and he also sent pictures, which he graciously agreed to let me post here:
“I want to tell you THANK YOU for your article ‘Making the custom bed frame’. I based on it to build mine. In March 2011 I asked which size of beam you used.
So for now I almost finished it. I have to build the drawers. In attached files, some pics.”


")

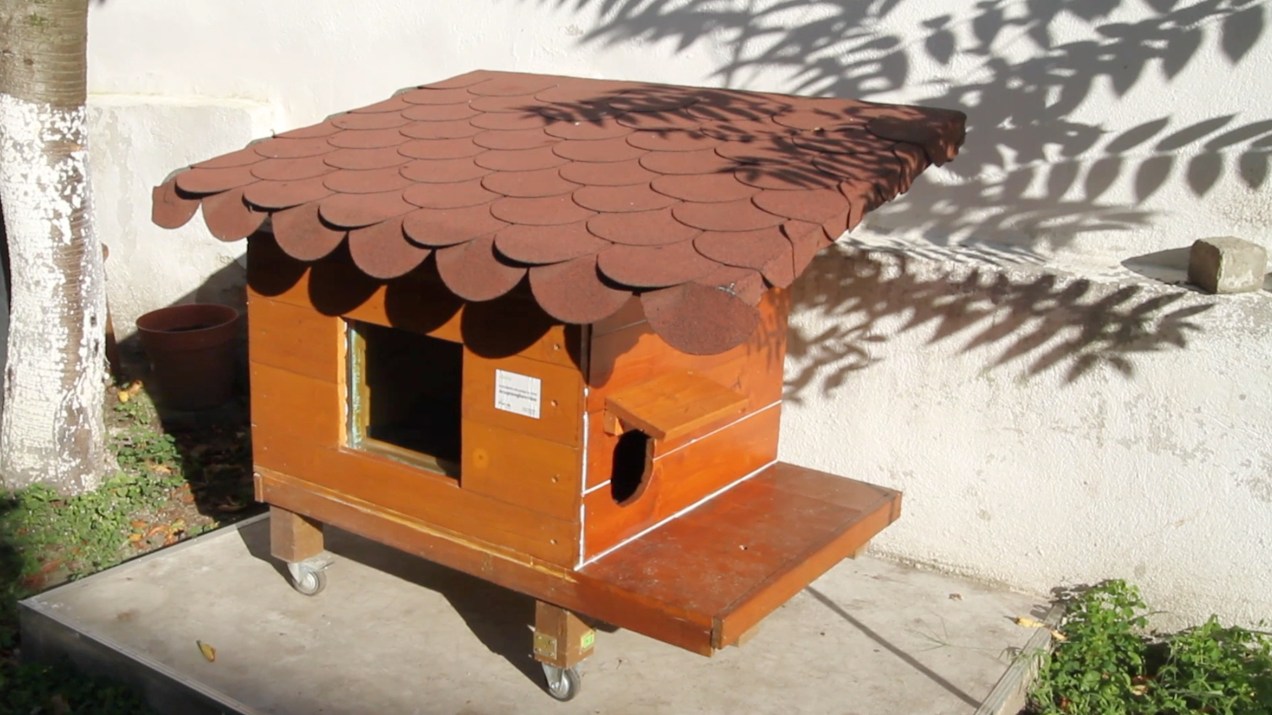
The cat house – part 9

More than two years after publishing parts 1-8, here’s the final installment in this series, which recaps the features of the cat house I’ve designed and built and describes some improvements that I’ve made to my original design, after testing it through two winters.
We now have four cats (Sasha, Zuzu, Tira and Bubu), as opposed to the original two kittens (Mitzi and Trixie) which you saw in the other videos. Mitzi and Trixie now live with my grandmother in Maramures.

So, what improvements have I made?
- Installed shingles on the roof
- Built an upper level so the cats can really stretch out while they’re inside
- Re-did the wall through which the cats enter the house
- Drilled some aeration holes in the walls
- Removed a pet door which I’d installed at the entrance, for the same reason I drilled the aeration holes, which is to introduce enough air flow in the house and eliminate the moisture that used to gather on the inside walls
- Built an add-on lobby which creates an ante-room on the porch and becomes useful during cold weather


Hope you enjoy this final video and it inspires you to build a nice cat house or dog house for your pets!

Here are the other eight videos in the series:
Custom-built bathroom shelves

This summer, I built a few custom shelves for our bathroom, and only now got around to writing about them.
There’s a certain quality, a character, to objects made by hand, that you just won’t find in mass-produced items. There’s also the fact that if you make something yourself, to the exact measurements of the place where you want to put it, you won’t be able to find a better fit anywhere else, no matter how many stores you visit. And there’s also the little matter of money — chances are, it’ll cost more to buy it than it will to make it yourself.

In my case, I already had the wood lying around from other projects, and I had the tools and other materials as well, so all I needed was some time. I’d estimate the total time used up for this project at around 10-12 hours, spread over several days.

There’s a quick video you can watch, where I talk about how I made the shelves. It’s going to be useful if you want to undertake this project yourself.
I hope this (along with some of my other projects) helps inspire you to create something instead of buying it. There’s nothing wrong with buying something that’s well-made, but most of the stuff you find in stores today is made in a third-world country, with third-world standards, out of cheap materials, and will likely break in a few months. That’s not good enough for me, and I hope it’s not good enough for you, either.

Making the custom bed frame
Last summer, I made a custom king size bed frame for our bedroom, out of solid wood. I held off on writing about it until now, nine months later, because I wanted to make sure the end result was solid and worth writing about. We’ve been sleeping on it ever since, and there’s nothing wrong with it, so yes, I can heartily recommend it.

I was fed up with the laminates and particle board garbage they call furniture these days, and I wanted to build something that would last, out of a quality, sustainable material like wood. I chose pine, because it was softer and easier for me to work with. Although I’ve also built a custom cat house for our three cats, I’m no expert carpenter. I just like to work with wood. It’s a wonderful material.
