Reviews

Hardware review: WD My Book World Edition II

After looking around for a storage solution to house my growing collection of photographs, I found the Western Digital My Book World Edition II. I’ve been storing my photos on single external hard drives so far, but data loss has always been a concern with that approach. All it takes is a hard drive failure, and I’m going to lose a good portion of my hard work. Naturally, I’ve been looking into various RAID or other failsafe solutions, since they’ve gotten to be fairly affordable.

Great design

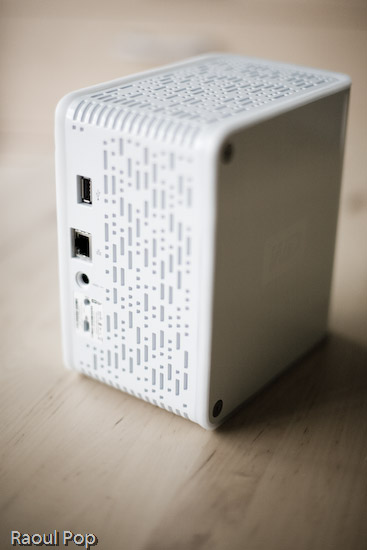
I was immediately drawn to the new WD My Book line because of their beautiful design, 1 TB capacity, and the ability to configure the device in RAID 1 format, which would mean my data would be mirrored across the two hard drives inside it. (This would also halve the amount of space available, but that was okay with me — I wanted data redundancy.)

WD My Book World Edition II (front)

For those of you not familiar with WD’s external drives, they have done a beautiful job with their enclosure design, and I raved about their Passport line several months ago. It turns out I now own one of them, a sleek black 160 GB 2.5″ drive just like the one pictured in that post. It’s perfect for data portability, and for a while, I even stored some of my photos on it. But it is just a single drive, and as I said, I’m worried about data loss.

Choosing the product

Back to the My Book line. There were two models I really liked: the My Book Pro and the My Book World. Because I have a mixed OS environment (both PC and Mac), I thought a NAS solution like the My Book World would work best for me, even though its specs said it would only work for Windows. I had a pretty good hunch that I would also be able to access it with my iMac. It runs on Java, it has Samba shares, and those are readily accessible from any Mac. But, this isn’t advertised, and that’s a pity.

By the way, if you’re thinking about getting the My Book Pro drive, make sure to read my review of that model. The takeaway message is to stay away from it, and I explained why in that article.

How it works

The drive itself is beautiful and fairly quiet, except when it boots up. WD has also made firmware upgrades available that make the drives even quieter, so that’s a good thing. I can tell you this right away. If you only plan to use the drive in a Windows environment, it’ll work great. Feel free to buy it, you’ll be happy. But, if you plan to use it in a mixed OS environment, and are looking to access it in more flexible ways, such as with custom drive mappings, and not through the software provided with the drive, you might be very frustrated.

Let me explain. The drive comes with a custom version of something called Mionet. I’ve never heard of it, but it’s software that installs on your machine and makes your files and computer remotely accessible from anywhere. When you run the installer, it’ll prompt you to create an account on the Mionet website, and it’ll register the WD drive, along with your computer, as devices that you can then access remotely. (There’s a monthly fee involved if you want to control your own PC remotely with the software, but you don’t need to pay it to use the WD drive fully.)

Once you install the software, you start up Mionet, and the WD My Book World drive gets mapped automatically to your machine. You also have the option to manage the drive through a browser interface. That’s actually where you configure its volumes (1 TB single volume, or RAID 1, still single volume, but mirrored data and only 500 GB) and other options. Basically, you have to remember that the only proper way to access the drive, whether you’re at home or you’re away, is to start up Mionet and get it mapped to your “My Computer”. If you do that, you’re good to go.

WD My Book World Edition II (back)

Potential problems

The problem with this approach (and this tends to be a problem only for geeks like me) is that the drive is readily accessible over the network without Mionet. I can simply browse my workgroup and find it, then log in with separate accounts I can set up by using the WD drive manager, which is accessible through my browser. So here’s where the frustrating part comes in. I can browse to my drive over the network, without Mionet, from any PC or Mac in my home, administer its options, add users and shares, etc. Then I can use Tools >> Map Drive on my PC or Command + K on my Mac to connect to the share name, and log in using those user accounts I’ve just set up. But, I can only read from those shares. I can’t write to them. The drive operating system assigns weird UNIX privileges to those shares, and they don’t correspond to the accounts I’ve just set up. It makes no sense to me and you’ll only fully know what I mean if you do this yourself. Suffice it to say that it’s really frustrating, and it’s not what I expected.

It would have been alright if Mionet made a version of their software for the Mac, but they don’t, and they don’t seem to have any plans to make any. It would have still been alright if the drive hadn’t been accessible through any Mac whatsoever. But the fact that they are accessible, and that I can log onto the drive with usernames and passwords that I can set up through the admin interface, yet I can only gain read-only access to those shares even though I’m supposed to have full access really gets me. Sometimes it’s a real pain to be a geek…

So, my verdict is that I really like the design and the RAID 1 capability, but I do not like the implementation. I ended up returning this and getting the My Book Pro Edition, which I love, and will review very soon. But remember, if you don’t have a mixed OS environment, and have no problems with starting up Mionet when you want the drive to appear in “My Computer”, My Book World will work great for you, and the remote access capability is a really nice feature.

Updates

Updated 7/19/07: I purchased and reviewed the My Book Pro as well. You can read my review right here.

Updated 8/3/07: Multiple commenters have pointed out (see this, this, this, this, this and this) that you can use the drive just fine with both Macs and PCs, over the network, if you skip the install of the Mionet software altogether. It looks like the clincher is the Mionet install itself. Just forgo it, and you’ll be able to map the drive to both PCs and Macs, and read/write as much as you want. I didn’t realize that I had to uninstall Mionet entirely in order for the read/write to work properly.

But keep in mind, if you don’t use the Mionet software, you won’t be able to access the drive remotely. Well, you might be able to arrange some access, but you’ll need to custom-configure your firewall settings to allow traffic on certain ports, and you’ll need a static external IP or dynamic DNS so you can get at your firewall from the outside. And then you’ll need to worry about data encryption as well, unless you don’t care that your data will travel unencrypted over open networks. If you’re a hardcore geek, feel free to try this last bit out, but if you aren’t, beware, it’s a weekend project, and I can’t help you.

Updated 8/9/07: I’ve had several people comment on how they bought the drive based on this post and the comments made on it by others, believing they could get it working over the network with their Mac. The kicker is that they thought they could connect it directly to their machine and get it working that way. 😐 I don’t know how they got that idea, but let me set the record straight. This is a NETWORK drive. It needs a network in order to work. There’s a chance you might get it working by using a crossed ethernet cable or connecting it directly to your machine, but it probably has to be a crossed ethernet cable.

The best way to get it working is to use a hub or a switch, or best of all, your home router, which can assign IP addresses. The drive ships configured for DHCP. That means it has no IP address to start with, and it’s looking for a place to get them. If you don’t have such a place, you’re going to have a lot of headaches. Get such a place (router) or go buy a USB/Firewire drive. Most people who’ve commented already made it plainly clear that’s what they needed, but they still insisted on using this drive. I don’t know why they enjoy the stress of doing that. I didn’t. As I already said in my post, I returned it and got a WD My Book Pro Edition II.

Last but not least, please do me a big favor. Read through the existing comments before you write one. There are so many already, and there’s a very good chance someone’s already asked your question, and I or someone else has already answered it. Thanks!

Updated 12/11/07: I found out today that Western Digital is going to disallow the sharing of all media files through the Mionet software. In other words, if you’re going to use Mionet to share the files on your drive and make them accessible remotely, you will not be able to see or use any of your media files. I think this is a pretty stupid move on WD’s part, and it’s going to come back to bite them. Until they decide to do away with this boneheaded downgrade, keep it in mind if you’re looking to purchase a My Book World Edition. Do NOT use Mionet. Install the drive without it, and if you’ve got to make the files accessible remotely, find other ways to do it, like through a custom config of your firewall.

Updated 12/18/07: Christian, one of the commenters, has left two very useful comments that are worth mentioning here in the post. The first shows you how to access the drive remotely (when you’re away from home) without using the Mionet software. The second tells you why you don’t need to worry about defragging the drive, and how to troubleshoot its performance if you think it’s not as fast as it should be. Thanks Christian!

Updated 4/5/10: Andrew Bindon has posted an easy-to-follow tutorial on how to remove Mionet completely from your computer and the My Book World Edition drive. If you, like me and many others, think Mionet is an annoyance that would best be removed, then follow his advice.

More information

Standard
Reviews

ChiliBox, the do-it-all machine

The ChiliBox

I’m pretty impressed with the specs for the ChiliBox. This little machine really seems to do it all, right out of the box, and for a very reasonable price. Given the proliferation of NAS devices these days, you wonder how much functionality you get out of them, and for some, it’s not much. Well, the ChiliBox could be the network server for a small business, eliminating the need for other servers or separate hardware. Have a look at its capabilities below, or check out the full spec sheet:

  • Firewall
  • NAS File Share (works with Windows, Mac and Linux)
  • VPN
  • Web Proxy Server
  • Remote Administration
  • Dynamic DNS
  • Wireless Access Point
  • NAT/PAT and Advanced Routing
  • Email
  • Backup
  • Anti-virus

Do you really need more to run your network? Unless you’re a medium to big company, you don’t. Just plug this in, and you’ve got more than you need to run everything at home or at work. If you need extra storage, just plug in another USB drive. How easy is that!

When I first saw it a few months ago, I said to myself, I’d love to have a small office and have a need to run this thing. Right now, I’ve already spent enough for my existing setup, but boy, I’m tempted to get this anyway…

Standard
How To

If you can’t connect to SQL Server on port 1433

Just had two fun days of troubleshooting this by working together with Adobe/Macromedia support, and found the solution.

Here’s the original issue: could not set up a new data source connecting locally (localhost, 127.0.0.1) to SQL Server 2000 Standard running on the web server; kept getting a SQL Exception error. Was told SQL just wasn’t listening on port 1433, or any TCP port for that matter, even though TCP/IP and Named Pipes were clearly enabled in the SQL Network Config Utility. Even in the registry, port 1433 was specified, yet I could not connect to SQL on TCP by any means. I couldn’t even telnet to the machine on that port.

Turns out that even though I’d upgraded SQL Server 2000 to SP4, I needed to downgrade to SP3. Still doesn’t make sense, after all, MS SPs are supposed to be roll-ups, but hey, that’s what worked. Luckily, the server I was working was running on VMware, so I reverted to a snapshot I took after I installed SQL and before I upgraded to SP4. Installed SP3, and was able to set up the data source immediately! Something to keep in mind if you’re in the same boat.

Standard
Reviews

Dictionary of Information Security by Robert Slade

Dictionary of Information SecurityHave you ever wondered just what the jargon of information security specialists really means? What are all those arcane words they throw around to scare us into submission as they lock down our computers even tighter? “What do you mean, we can’t even install a screensaver now?! Can I at least use the bathroom without your permission?”

Unfortunately, there are a lot of dumb Information System Security Officers (ISSOs) at corporations and organizations. I’ve known a few myself. These are the folks that barely know what they’re talking about, and go by the latest article they read. Their reaction to a new piece of software is to lock down the system and disallow it even before they research it properly. Case in point: was Skype shut down at your place of business or at a friend’s workplace? That was a dumb ISSO in action. They also know so little that they simply throw words around, and anyone with a little knowledge of computers can tell when they mess up. “No, ROM is not RAM, and no, it’s not a 300 Gigabit hard drive, it’s a 300 Gigabyte hard drive.”

That’s why books like this Dictionary of Information Security really help. We can educate ourselves, and know when they’re wrong. We can tell when they’re BS-ing, and when they’re telling the truth. My experience has been that they BS for 80 percent of the time, and don’t know what they’re talking about for the other 20 percent. “No, RSS doesn’t stand for Really Scary Stuff, it stands for Really Simple Syndication. And yes, it’s okay for us to subscribe to RSS feeds. Really.” Or, “No, this is a perfectly harmless screensaver. It’s not a RAT (Remote Access Trojan). You’re a rat, for all I care.” I could go on and on…

I love this book. Robert Slade did a great job putting it together, and the terms are explained in language that anyone possessing a cursory knowledge of computers can understand. I’m amused by the forewords, acknowledgments and preface. They’re abnormally long for a book this small, but that’s to be expected. This is, after all, the first Dictionary of Information Security, and a precedent has to be established, so to speak. But once you get down to the terms, you forget about all of the beginning sections, because if knowledge is power, this book packs a wallop.

Get it, and read it. I know it’s hard to believe, after all, who’d read a dictionary, but I’d read this one. And keep it around for reference. And when your ISSO gets on your nerves, start encrypting all your emails with PGP if he doesn’t stop scanning them. Or, if he doesn’t stop blocking access to your webmail account, set up a VPN connection to your home network and do all your web surfing through that. That’ll knock his SOCKS off! Let the fun begin!

Standard
How To

When it comes to home computers, k.i.s.s. and forget it

I’ve been learning a hard lesson these past few weeks, as my parents go through a time of computer trouble, and since I’m the one who purchased their computer equipment and set up their network, it’s up to me to get things right again.

What’s the lesson, you ask? As encapsulated in the title of this post, and as I’ve been yelling it at myself in quiet moments, it’s: keep it simple. 

Here’s how their setup looks:

  1. Cable internet connection
  2. Wireless router
  3. Vonage box hooked up to router, in turn hooked up to phone w/ answering machine, and multi-function printer/fax/copier/scanner
  4. Same multi-function printer/fax/copier/scanner also hooked up to router because it’s networkable
  5. Older desktop hooked up to router, another printer through parallel port, and to the multi-function machine through the network
  6. Laptop with wireless card, using the wireless router, configured to the networkable multi-function machine through the network

Where should I begin? Gee, let me start with WPA. Why? Because that’s how I had their wireless router set up. And every time something happened with the connection, they either couldn’t find the passphrase, or for some reason the laptop’s card didn’t feel like connecting to the router. Lesson learned: ditch encryption, just set up MAC filtering. That way, they can connect on the go, and don’t have to bother with WEP or WPA, which is a real hassle unles you’re a geek. Plus, with MAC filtering, unless someone can spoof a MAC address, they can’t connect to the network. And if they can spoof a MAC address, there’s a good chance they know how to get in even if encryption is enabled. Yes, I know the traffic can be sniffed if the encryption isn’t enabled, but who cares? Even WPA encryption can be sniffed and decrypted with readily available utilities. So why bother with it?

As I banged my head against the wall, I rued the day I set up their multi-function machine through the network. Why? Because if you have to delete it and re-install the printers, or you have to re-format the OS (Thanks, Windows, for the crappy OS, and thanks, driver manufacturers, for the horrible, latrine-worthy job you do writing those drivers – for all devices, not just printers!) you can never find the machine on the network so you can re-configure it, and you spend hours re-setting it to factory defaults through the printer’s LCD menu, then hunting for it on the network. Have you ever tried to walk someone through a printer’s LCD menu when you can’t remember the options, and they’re not familiar with it? It’s not fun. Lesson learned: install through USB, and set up local printers.

Quick question: if you unplug your printer’s or computer’s network cables from the wireless router, can you plug them into the IP telephony router? I guarantee you your parents or friends won’t know the difference, and they’ll plug them into it, then wonder why they can’t get on the Internet or connect to their printer. Lesson learned: forget IP telephony devices like Vonage. It may be cool for us youngsters to brag about how we slashed our phone bill by switching to Vonage or just using Skype, but it’s not cool for your parents when they can’t receive phone calls or faxes. (Yes, I’m talking to you, Vonage, with your awkward and arcane programming steps (or rather, button dances) so I can get my printer to send/receive faxes through your connection! Forget that!) Just set your parents up with a dedicated fax machine, plugged into a wall phone outlet, then sit back and relax, because they won’t call about it! And it’s the same with the phone! Leave it plugged into the wall! Forget saving $5 or $10 a month just for IP telephony. It’ll cost you and your parents much more in stress when their phone doesn’t work.

When my parents lost data because their laptop crashed and had to be reformatted, I realized the value of setting them up with automatic, regular data backup, the kind that just works. You know, you don’t think twice about setting up backups in the server room, but somehow you think the data on your laptop or desktop will take care of itself… Unfortunately, Windows doesn’t come with an easy backup program. Lesson learned: buy a big external hard drive, and set up automatic, regular backup jobs to it. It’s preferable to get a drive that comes bundled with a backup utility. Have any of you used the Windows Backup utility? What a stinker! How do you edit scheduled jobs? First, you can’t edit their every aspect after you’ve created them, and second, who’d think to look under a completely different app, called Scheduled Tasks, to find them there? Really, would anyone other than a geek know that? Why in the world aren’t the jobs available for editing within the Backup utility? It’s just plain dumb design.

As I had to re-educate my parents about the various ways of doing things on the computer, I came to realize (duh!) that I should have spent more time training them at the outset. Yeah, it seems like a no-brainer now, but back when you’ve just spent a couple of days transferring all their stuff and settings from the old computer onto the new one, do you really feel like spending another half day training them on the new machine? No, you just sit them down in front of it, point out the highlights, and tell them to enjoy it! Well, you pay for it later. Lesson learned: spend time training the user at the outset – you’ll avoid problems down the road. And define simple pathways for them, stuff like:

  1. This is where you save your documents.
  2. This is where your email archive gets stored.
  3. This is how your email account is set up. Make sure the settings stay this way!
  4. This is how to back up your bookmarks.
  5. These are the passwords and simple access instructions for the firewall, router, computer accounts, etc.
  6. This is where the photos get stored. Use this application to manage them. Download the photos from your digital camera this way…
  7. This is where the music gets stored. Use this application to manage it. This is how to sync the iPod…
  8. This is where the videos get stored. Use this application to download the videos from your camcorder to the computer. Here’s a simple way to make a DVD from a video…

It’s stuff like this that saves you countless headaches. If you need to, make screen-capture movies and put them on a “how to” DVD for them. Or write instructions, with screenshots. But make it simple, or you’ll pay for it!

Finally, as I troubleshooted why the laptop kept crashing because of obscure driver errors (everything was up to date, and the latest driver versions were installed), I learned the following three things:

  1. Buy a good brand. Don’t get a cheap brand. My parents have an Averatec laptop. That thing clonked out from the start. It was supposed to be able to output video to a TV through an S-video port, and it wasn’t even able to do that. When I called Averatec support, their advice, right off the bat, was to reformat the laptop. Great, the panacea fix used by all lazy tech support people! Then, after the 1-year warranty expired, it started to crash unexpectedly, even though there were no viruses and no spyware on the computer. It didn’t have any weird applications installed, either, just mass apps like Office, Firefox, iTunes, Picasa. So, don’t buy Averatec.
  2. Get an extended support plan. Don’t get cheap when you shouldn’t! Get that support plan, and make sure it includes accidental damage coverage, as well. You’ll be thanking yourself when you have someone to call if the hardware goes bad, or you need help with the system.
  3. Don’t buy Windows. Sounds harsh, doesn’t it? But it’s true. People who aren’t geeks need a simple operating system that’s not fragile – one that doesn’t crash or is susceptible to hundreds of thousands of viruses and malware. Windows may be good for developers who are shackled to it by the work they do (like me), and it may work fine at the office, (where you have a Help Desk department, and you’ve got an industrial-strength firewall and anti-virus thin clients pushed out to all the client computers, with the latest virus definitions,) but it’s not good at home – not for people who are at a loss when they need to tell a bad file apart from a good file. The choice becomes pretty simple: Mac OS! Just get a Mac for your parents, or tell your non-geek friends to get one. Then, when they don’t call you to complain that it keeps crashing, you’ll get some time to pat yourself on the back.

I hope this helps you streamline your work as you set up your parents’ or your friends’ machines. I sure wish someone shoved this under my nose when I started to set up my parents with new computer equipment.

Standard