Reviews

How houses get built in the DC area

I thought that when I lived in Florida, the construction there was shoddy. I was wrong. At least there they used concrete pillars and floors for the houses, and the building code was so strict everything was anchored properly, especially after Hurricane Andrew. When I moved to the DC area, I thought construction would be better here, since it’s a temperate climate and the houses should be built to last and hold up to the weather. I was wrong. Construction here is horribly shoddy.

I have never been so shocked at the cheap and flimsy “workmanship” I see every time I pass some house or building under construction. It never ceases to amaze me what passes code in these parts, and I’ve lived here since 2003. It’s downright thievery, I tell you. I’ll show you some photos below to help you see what I mean. I call it thievery because you’d think housing would be dirt cheap given the materials and level of effort that goes into the construction, but it isn’t. It’s terribly expensive, to the point that people making below what would be called upper middle class in other parts of the country can’t afford to live inside the Beltway, much less outside it. They have to go find housing either in bad neighborhoods, or way out in the boonies, in order to get anything affordable.

It’s not right. It makes my blood boil. Honestly, I can’t believe what goes on. It’s the same construction everywhere, from the (relatively) cheaper townhomes and single family homes right up to the McMansions that have sprung up on River Rd, Georgetown Pike and other richer places. The only thing that changes is the size and price of each monstrosity, but they’re all just as flimsy.

Do you want to see what I mean? Take a look at these photos. They’re from a house currently under construction in my area.

House under construction

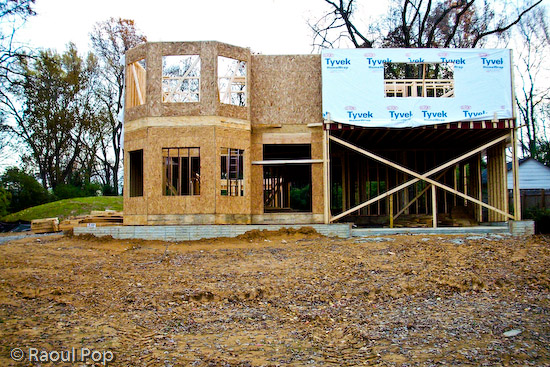
Some unwitting soul is going to pay several hundred thousands of dollars for this piece of crap, and he won’t know what a lemon he’s getting. It’s all 2×4 construction. There’s nothing solid and concrete there except the foundation, and I’m not sure how thick that is, either. It’s all either cheap, soft wood or plywood, including the upper floor. Not only that, but the beams aren’t straight, and the joints aren’t secured properly.

House under construction

It’s basically a big plywood box. I’m not sure what its projected lifetime is, but I can’t imagine it’ll last more than 30 years. It’ll start needing serious repairs even before the mortgage is paid off. Isn’t that terrible?

Do you see that cheap, flimsy Tyvek plastic? That’s the weatherproofing. No, I’m not kidding. That’s it. That’s also the insulation. I doubt they’ll put glass fiber or any other kind of insulation between the drywall and the beams. They might, but I seriously doubt it. I’ve seen the inside of many walls, and they’re usually empty.

House under construction

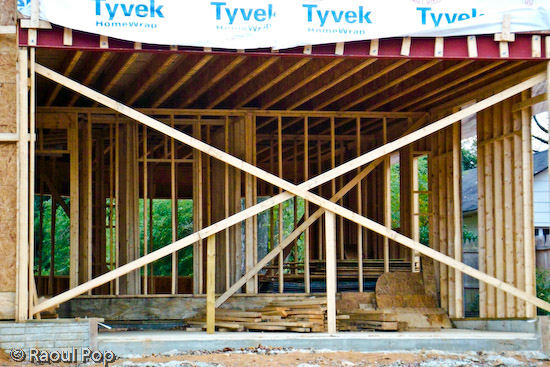
Can you say cheap? I can. It’s cheap construction! It’s a travesty. Look at that horrible plywood shell. That’s going to be a tower. It’s going to look so nice, clad in fake brick or plastic siding only 1-2 inches thick… It’s also going to be horribly inefficient when it comes to temperature preservation. And if water should happen to leak in through that cheap brick cladding and through that flimsy Tyvek sheet, the plywood will rot away quietly and the owner won’t even know it… Wonderful, isn’t it? Isn’t this piece of crap worth mortgaging your life away?

Should we be ill-fortunate enough to get a hurricane or some tornado in our area, the roof on this thing will probably get torn off, and the entire house might or might not be standing when nature’s done with it.

Look, don’t get me wrong. I understand that America has a long history of 2×4 construction. It’s how the West was won. It’s cheap, affordable, goes up quickly, etc. But this isn’t the West, and it’s not the 1800s. This is the supposedly refined East. We should know better by now. It’s our nation’s capital. And the prices of these plywood boxes aren’t cheap. No, they’re so high most people can’t afford them.

I also understand the builders have to make a profit and the cost of land in this area is expensive. But this is ridiculous! If you’re going to build something that someone will want to call their home, and will pay dearly for it, sinking most of their productive, working years into paying it off, then God help you if you don’t build something worthwhile, something that’ll last. You’ll get what’s coming to you, don’t you worry about that…

What I wonder about is how the people and companies that put up these things can live with themselves. That’s what I want to know. How can they sleep at night knowing someone’s going to pay a fortune for something that’ll start falling apart after the first several years, for something that’s so horribly inefficient when it comes to energy use that they’ll be paying through the nose to cool it in the summer and to heat it in the winter? Don’t tell me about efficient windows! You can get the most expensive windows out there — if the walls themselves can’t conserve the inside temperature, you’ll still be nowhere. There’s such a thing as global warming to worry about. Have you heard of it? Everyone needs to reduce their carbon footprint, and it starts in the home.

Whatever happened to the good, old masonry work? What happened to quality stone construction? Yes, it’s more expensive, but isn’t it worth it? Why can’t you builders put a little more pride in your work? Why can’t you make a concrete skeleton, and use thicker insulation and better materials for the cladding? Is it so hard to do? So you’ll make a little less money. You might have to mark up the price a little. You might have to educate the consumers that know nothing about quality construction. But isn’t it all worth it in the end? Won’t you feel better knowing the house you built will last a long time? Won’t you feel better knowing the people that will buy your house will thank you for your solid construction later? Isn’t it it worth it to build good will instead of ill will?

Standard
Reviews

Upgraded to Leopard

Mac OS X LeopardAlmost two weeks ago, on 11/16/07, I upgraded to Leopard, the new version of Mac OS X. In spite of some negative experiences I’d read about, my upgrade went smoothly and I didn’t lose any data. All of my applications worked afterwards. A couple of them, like 3D Home Architect, required Leopard updates to make them stable again. My version of EyeTV needed to have its most recent upgrade re-applied.

There were a couple of hiccups that I wanted to mention. One occurred during the upgrade process itself, and the other afterwards.

  1. I started the upgrade process and booted from the DVD. Went through the various steps, but when it came time for the Leopard installer to find our iMac’s boot disk, it couldn’t see it. I waited for about 5 minutes, then I clicked the Back button a couple of times, went through those screens again, and after I waited for about 2 minutes, it finally saw the boot disk and allowed me to go on to the next step. I have a feeling this might not have been a hiccup, but that the installer was busy calculating the free disk space on the drive. I thought I’d mention this just case some of you have the same problem.
  2. After the upgrade completed, I configured Time Machine to back up to one of my external drives, and it started the initial backup. It kept going through the evening and overnight, then it crashed in the morning, and the iMac required a hard reboot. In other words, everything was frozen and I had to power it off manually. After I started it back up and restarted Time Machine, it finished the initial backup and it picked things up exactly at the point where it crashed. In other words, it didn’t start backing up the entire drive once more, which I thought was a nice touch.

One thing I did before starting to upgrade was to disconnect ALL peripherals. I figured there was no reason to complicate the upgrade process by having extra USB and Firewire drives, printers and other gadgets connected during that time. When the upgrade process completed, I re-connected them, and found, to my delight, that a new driver for my printer had been packaged with the OS. I didn’t have to run HP’s crummy, old drivers from 2005. Very nice!

I’m very happy with Leopard since we installed it. Our iMac runs a little faster now, thanks to the better memory management and pre-fetching features in Leopard. I love Time Machine and the Remote Desktop features included with the new iChat. These two features were my reasons to upgrade to Leopard, and I’m very glad to see that Apple delivered the goods.

Another feature I love is Spaces. I love being able to separate my applications so easily, and I love being able to assign them to different screens. I know that when I start up a certain app, it’ll run in a certain space and won’t clutter up my primary space. That’s awesome.

One thing I didn’t like about the previous version of OS X (Tiger), was the fact that when I used a key shortcut to access my home folder (Command + Shift + H) or the apps folder (Command + Shift + A), it would commandeer any existing open window and go to that location. I wanted to keep the existing location and open a new window, but Tiger wouldn’t let me do it. The same thing still happens in Leopard, and what’s more, when I use Spaces and I’m in screen 2, for example, pressing a key shortcut to access the apps folder will open it up in Screen 1, defeating the purpose of using separate screens. This is one piece of interaction that should be changed.

Mac OS X Leopard Guided Tour I’m otherwise a very happy customer, and I think Leopard is a worthwhile upgrade from Tiger. The new features are awesome.

If you’re thinking about upgrading, I would highly recommend watching the guided tour so you know what to expect. If you can’t watch the video, the booklet included with the Leopard DVD disc is another great resource.

More information

Standard
Reviews

Camera review: Canon Rebel XTi DSLR

Released on August 24, 2006, the Rebel XTi is Canon’s newest entry-level prosumer DSLR. It’s an update on the popular Rebel XT, and it’s different from it as follows:

  • Slightly thinner body, heavier (2.56in vs. 2.63in and 510g vs. 485g)
  • Newer, re-designed sensor with higher resolution (10 megapixels vs. 8.2 megapixels)
  • Sensor cleaning technology (dust shaken off the sensor with ultrasonic waves)
  • Bigger display (2.5in vs. 1.8in)

I only listed the significant differences above. You’re welcome to compare the detailed specs if you’d like, right on Canon’s website. Go to the More Information section at the end of this post and use the links listed there to get the full specs.

Canon Rebel XTi (front)

In my reviews of other DSLRs, like the Canon 30D, the Olympus E-510, or the Olympus E-500, I criticized the Rebel XTi’s small grip, and I still think I’m right. It’s much too small to be held comfortably in a man’s hand, and that’s unfortunate, because the camera is great in every other aspect.

In spite of the camera’s small grip, I was pleasantly surprised by the quality of the photos it produced, and I wanted to share my findings with you. I avoided reviewing it until now on purpose — as I said, I was displeased with its body design — but after using it, I’m happy to say I would recommend it.

I made a video review of the XTi, which should help you get a better idea of the its dimensions. I discussed the camera at length in the video, and also did a side-by-side comparison between it and my Canon 5D. You can watch it below, or scroll past it to read the rest of my review. You can also watch it here, or download it if you like.

I should also mention I goofed in the video. I talked about the XTi having the DIGIC III processor, but it turns out it still has the DIGIC II processor. What I said about the differences between it and the 5D and 30D with respect to exposure value settings is still correct, so don’t disregard that. You may or may not be aware that when you do not adjust the EV settings on a 5D or 30D, and you shoot outside in bright light, the processor will overexpose the shot. The quick fix is to dial down the EV by 1/3rd, and that usually does the trick. But that’s not right. Shots shouldn’t be overexposed, and I’m glad to see the XTi doesn’t suffer from that bug. It exposes shots beautifully, and you’ll see what I mean when you look at my sample photographs below.

Even though the overall design of the camera is similar to that of the larger DSLRs that Canon makes, certain differences are there, and they are caused both by the price and size of the camera. For example, being used to the 5D, I missed the small at-a-glance display on top of the camera. On the 5D, it lets me know what my settings are without having to consult the LCD screen. I also missed the large settings dial next to the LCD that’s a staple on every other Canon prosumer and pro DSLR. I love that dial/wheel, and I miss it on every non-Canon camera I use.

The exposure value adjustment button, along with the drive settings button, are located next to the display instead of the top of the camera. There is no jog controller for the focus point selection, either. But you can’t have everything. The Rebel XTi is an entry-level DSLR, so you can’t have features that are normally found on the more expensive DSLRs. Plus, its body size makes it impossible to have the same button arrangement.

Canon Rebel XTi (back)

Despite my gripes, I liked the size of the body, and I liked the feel of the buttons. They had a soft, glossy surface that made it a joy to press them. The small body of the camera makes it possible to hold it very comfortably in the palm of your hand, and that’s a huge plus, because you can stabilize shots a lot better that way.

I really liked the quality of the photos from the XTi. I shot in RAW format, and I was very pleasantly surprised to see how well exposed the photos were, and how accurate the color reproduction was. I’ll show you some photos very shortly where I made no adjustments in post-processing other than adding meta-data, and I think you, too, will find it hard to believe that those were RAW shots straight from the camera.

I can tell you this: the RAW files made by the XTi have better exposure and color, right out of the camera, than the RAW files made by my 5D. It’s a shocker, yes, but it’s true. I suppose that’s to be expected. The 5D uses technology developed in 2005, while the XTi uses technology developed in 2006. But still, I had to see it with my own eyes to believe it, and being a 5D owner who’s shot tens of thousands of photos with the 5D, this was a hard pill to swallow. Having said this, would I give up my 5D for a Rebel XTi? I’m tempted, but no. 🙂

On to the photos. These are two that I took in early afternoon light, which was bright and unforgiving. I shot in RAW and developed the photos in Lightroom. I had to do very little exposure adjustment. Can you believe how well the XTi exposed the photos and reproduced the colors? Can you believe the dynamic range of the sensor? I didn’t expect this from the XTi.

November afternoon

Light and shadow

Here’s another photo that shows off the dynamic range of the camera. I shot this with the wonderful 18-55mm kit lens. If you’re confused by my characterization of that lens, watch the XTi’s video review, and I think you’ll understand.

Go to the mat

Here’s a macro shot I took with the same 18-55mm kit lens. I was pleasantly surprised with the low noise at 800 ISO.

Cone job

I said it before, and I’ll say it again. I love the colors that I get out of this camera! Have a look at these two photos to see what I mean.

Knobular

Spoon!

I thought I’d put in a dog photo for good measure. This happy pooch posed for me in downtown Alexandria this past summer. I used Keith McCammon‘s XTi for the shot.

Smile for the camera

What else can I say? If I’ve missed anything, let me know in the comments. The Canon Rebel XTi is a great prosumer DSLR. You won’t have to try very hard to get wonderful photos with it, and its affordable price will help make your decision a little easier.

Gilded

Pastels

Buy the XTi

Troglodyte

Bohio’s


World at your feet

Etched in stone

Hand that feeds

Standard
Reviews

Wedding Present (1936)

“Wedding Present” (1936) is a wonderful romantic comedy made toward the end of the great depression. Cary Grant plays an ace reporter named Charlie Mason, in love with his partner in “crime”, Rusty Fleming (played by Joan Bennett). Cary would reprise the role of an intrepid reporter/editor in “His Girl Friday” (1940), opposite Rosalind Russell, although his role in that movie would be somewhat darker.

The “Wedding Present” starts with Charlie attempting to get a wedding certificate but mostly goofing around, which leads to Rusty calling off their engagement. The tagline is “We’re almost married… and we want to stay that way!” Of course, that doesn’t work, so the tension builds up as Rusty is wooed by a pilot, then by a well-known writer of success books, called Dodacker, played by Conrad Nagel.

Seeing Conrad Nagel in the role of Dodacker, one wonders why he had been a matinee idol in the era of silent movies. Not much here endears him to the viewer. Then again, his role in this movie was meant to be unlikable, so who knows… Joan Fontaine certainly saw something in him, since she had an affair with him not long after this movie was made — she was barely 20 while he was well over 40.

There is a wonderful optimism that pervades this movie. It seems nothing can go wrong — except Charlie and Rusty’s relationship — but even that’s rescued in the end. Charlie and Rusty both act as if their jobs don’t matter — and I suppose when you’re both award-winning reporters, you can get a job anywhere you like. They slack off, they skip out on work, but since they always get the first-page stories, things work out alright for both of them.

Although there’s some awkwardness between Cary and Joan, they complement each other very nicely. It’s a lot of fun to watch Joan on screen. She manages to appear charming, intelligent and sexy, all while fitting the part perfectly. It’s hard to imagine that she didn’t want to go into acting when you watch her on screen. She’s so natural — but then that should come as no surprise considering she’d been born into a family of actors with roots in that profession going back to the 18th century.

Cary is still in his pre-polished era. You can see his youthful enthusiasm here, and some of his slightly rough, unpolished edges still show through. Although he looks great in a suit, he’s still not quite comfortable in it, not like in his later years, when his suits became an integral part of his screen persona, a part of who Cary Grant was and always remain. But the youthful Cary is a lot of fun to watch. There’s a sense of unpredictability about his next move. One wonders, how will he handle the next line, the next scene? Much like throwing a pebble in a pond and watching the ripples disturb the water’s surface, watching the young Cary act, one can see the little ripples that belie the thought process behind the role’s mask. This would later solidify into a shiny, pristine, glamorous and timeless surface. In his later years, Cary reached perfection. Cary was the role and the role was Cary.

Although the movie is somewhat anticlimactic in some scenes, and some judicious editing could have fixed it, it’s really wonderful. It’s relaxing to watch and it’s quite entertaining. The ending is spectacularly wonderful, and it alone makes the entire movie worth watching. When you add in everything else — the comedy, the superb acting, the gags, the dialogue, the interaction — you can’t help but realize that you get your money’s worth here. Give it a try, you won’t regret it!

More information

Standard
Reviews

The right CF card reader for me

I had a really hard time finding a good Compact Flash card reader to use with my 5D ever since I purchased it this past April. I almost resigned myself to waiting half an hour to download photos from a single 2GB CF card, until I found something that works as advertised.

It wasn’t for lack of trying, either. Have a look below to see the various card readers I tried. None of them worked properly.

Various card readers

The first one I bought was the SanDisk CF PC Card Adapter. It worked with all of my CF cards, but was horribly slow. Even though it was advertised as a USB 2.0 product, the speeds I got out of it were pretty much USB 1.1.

Then there was another SanDisk product, the little silver reader you see next to the PC Card Adapter. This one was also advertised as a USB 2.0 product, but did it work? Not with all my CF cards. It only worked with the Transcend 4 GB one, but not with the 2 ATP 2GB cards (only one is pictured above). And it also didn’t yield USB 2.0 transfer speeds. It was more like USB 1.5, if there is such a thing.

I figured I’d try a different brand, so I bought the Targus pictured above. This one was advertised as USB 2.0, and supposed to read over 50 different memory cards. Again, it only worked with my Transcend card, not with my ATP cards. It yielded USB 2.0 transfer speeds when it worked, but overall, it was still unsatisfactory.

I finally bought a card reader that works with all my cards (CF and SD included), was less expensive than the Targus, is super fast, and made me happy enough to want to blog about it.

i-rocks card reader

It’s the i-rocks card reader. It makes no silly, untrue claims like the other card readers I own. It reads all the cards I need, it’s very fast, and that’s all I need to know. It also looks pretty good. If you’ve been having problems with your card readers, give the i-rocks a try. It works as advertised, and that’s more than I can say for most products out there…

Standard