
I hadn’t looked at this particular stat in some time, but today I noticed that according to WordPress, my site’s platform, I’ve published 555 posts. Cool! This post makes 556, and we can call it my little pat on the back. I’ll let you know when I hit 1,000. I’ll probably have a little party then.
Deliver First Class Web Sites: 101 Essential Checklists, by Shirley Kaiser
 Deliver First Class Web Sites, released by SitePoint Press, is an informative and compact book, but don’t let its size fool you. By using the checklist format, a whole lot of information was packed into this book. Rather than being an instruction manual, this book is a review guide. If you’re not familiar with today’s web design, you’ll be a bit confused. This is a book written for web designers and developers who want to produce quality web sites, not for novices. That’s how the book size was kept down while a staggering amount of instruction on all sorts of topics was squeezed in.
The checkpoints and checklists included in the book can be broken down into the following major categories:
- Initial preparation and planning
- Site content
- Usability
- Color
- Information architecture
- Navigation
- Best coding practices/W3C standards and recommendations
- Accessibility
- Web site optimization
- Search engine optimization
- Design
- Testing
- Launch
- Follow-up
I found myself drawn by the Color and Information Architecture sections, but all of the sections are worthwhile. They’re thoroughly written, and although most of us already know (or should know) what the author’s talking about, it really helps to have all of this knowledge down on paper, and in checklist format. As we’re building our next great site, or reviewing our current site(s) for a re-design, going through the book helps keep us on the right track by ensuring that our attention stays focused on what’s important. Remember, fluff or eye candy can be always be added as after-thoughts, but nothing can replace proper planning and a good, expandable foundation.
This book is highly recommended for all web designers and developers. Depending on the level of knowledge that each of us possesses, we may get a lot or a little from this book, but whatever we end up with will have been worth our time and money.
ffmpegx, the best video encoding and compression on the Mac
A little while ago, I wrote a post outlining the things I didn’t like about my Mac, and while most of the issues I pointed out are still affecting my iMac, I have to really thank one of the people who left a comment, by the name of Howard Dratch. He pointed me to a great app for video encoding and compression on the Mac, called ffmpegx. I was a little skeptical, but hey, it was free, so I gave it a shot. After the first compression, I was amazed! The compression is fast, clean and very, very good. I can barely notice the difference between the original and the compressed copy. I highly recommend it. It’s one of the best applications I’ve ever used, and I don’t think I exaggerate when I say that it’s probably the best video encoding/compression tool on both the Mac and the PC platforms. Granted, there is no Windows version, but still, I’m hard pressed to find its equivalent there.
What sets it apart is not only the ease of use (though there are tons of options to choose from) or the speed of encoding (although it’s among the fastest I’ve used) or the fact that it’s free (because it is — well, shareware anyway), but it’s all of these things together. It’s a great, all-in-one, wonderful package.
Now, before you think I use it for illegal purposes, I don’t. I’ve never downloaded illegal moves from BitTorrent or anywhere else on the Internet. I’ve never shared movies illegally, and I don’t intend to. I use ffmpegx or any other of my video tools for legitimate purposes, and I encourage you to do the same. When I use tools like these, I use them so I can edit and compress my movies, and fit more of them on my hard drive.
One of things I like to do is to use a PVR (a Tivo-like device for the Mac), and schedule it to record my favorite shows and movies. I happen to like shows like Cartoon Alley on TCM, and I like old movies (made from the 20s through the 60s). So in order to help you learn how to use ffmpegx, I took a few screenshots of a typical movie encoding that I do.
First the main screen. I love its simplicity. You have the original movie on one side, and the compressed movie on the other.

I prefer to encode with the H.264 codec, but I use the mencoder H.264 flavor. The Apple H.264 codec, also available through ffmpegx, is much slower and the resulting file isn’t as small. As you can see, the basic properties of each file are summarized in the columns. Now let’s have a look at the next screen, listing the Video options:

Here you can adjust the bitrate, fit the movie size to a particular archival disc (if you’re so inclined), and adjust its size. If you’re encoding a DVD, you can select which title, chapters and angle you want to encode. What I really like is using the Best button to let it select the best bitrate for the video size. Now let’s have a look at the Audio options:

Here you can select the codec, and the audio parameters. If the movie you’re encoding has more than one audio track, you can select the one you want here, and you can even amplify it if so desired. If this is a silent movie, you can add your own track, or if you’re doing a mash-up video, you can add your own voice-overs or soundtrack.
The Filters screen is where things get really, really interesting. Can you see why?

Forget all the other cool options, what I really like is the Crop option! Although the Autocrop only works sometimes, because the opening credits or sequences may confuse it, it’s a really cool button. If there are extra portions of screen estate taken up by nothing but fuzz or black space, you can take them out through a crop. Remember how wide-screen movies were letterboxed when shown on TV? Well, you can cut away the letterbox and be left with only a nice, widescreen movie! It’s a fantastic option! Oh, and in case the Autocrop button doesn’t work, you can also specify your own crop settings, and preview them by clicking on the Preview button. A white border will indicate the crop settings.
The Options screen lets you adjust the encoder parameters even further, and of course, lets you specify 2-pass encoding if you want extra quality.

The Tools screen has a bunch of sub screens that let you play with the video options even more. There are a lot of features squeezed in there!

Oh, let’s not forget the Progress window:

Finally, if you should need more instructions on how to use ffmpegx, there’s a great how-to section right on their site.
In case you’ve been wondering just what I’ve encoded as I took the screenshots, it’s a lovable and joyous little movie called Luxury Liner (1948). It stars Jane Powell, one of my favorite actresses, Lauritz Melchior, the famous tenor of that time, and George Brent, one of my favorite actors, who also starred in Honeymoon for Three (1941). Incidentally, he was married to Ann Sheridan (his co-star in that movie and another of my favorite actresses) when Honeymoon for Three was filmed. See, now aren’t you glad you read this post to the end? You just learned something new! 🙂
The sky at sunset
The evening sky, in particular during those moments when the sun is just about to go down below the horizon, gets me every time. I took a series of photos last evening, and wanted to share the more notable ones with you. Photos are from North Bethesda, MD.









A quick maintenance operation that will prolong the life of your laptop
I upgraded the RAM in my laptop yesterday, and stumbled onto a really easy maintenance job that will most certainly prolong the life your laptop, and help it run faster, cooler and quieter. It sounds impossible to do all that in one fell swoop, but it’s really easy to do, and it works. I’ll give you a hint: it has to do with your laptop’s cooling.
I realize your laptop is going to be different than mine, so my photos may not help you much when it comes to doing this on your own laptop, but bear with me, the principle is the same, and this simple clean-up job will really help.
What I’m talking about is the laptop’s cooling fan assembly. It’s the fan that cools the processor’s heatsink, and is responsible for keeping the processor below the upper temperature threshold. It’s like your car’s radiator. If it wasn’t working, your car would overheat very fast, wouldn’t it? Same thing here, except your laptop’s “radiator” is prone to getting clogged up with dust – lots of it, too.
After about a year and half of using my laptop mostly on clean tables — not on carpets, or my lap, or on tablecloths, as some of us do [!] — I was very, very surprised to find out how much dust had accumulated on my laptop’s cooling grill. I didn’t even open my laptop in order to inspect it. I just wanted to install some extra RAM, but saw the cooling fan and figured, hey, let me open it up even though it looks clean enough from the outside. Boy, was I in for a shocker! Have a look at this photo to see for yourselves.
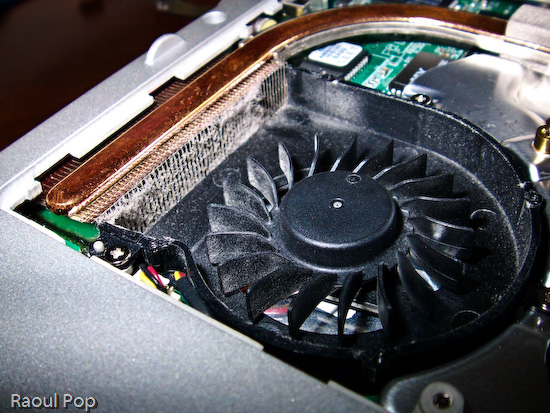
You may not think that layer of dust is much, but have a look at a macro photo I took of a piece of it. I used a moist cotton swab to pull off the dust from the grill. Can you see how thick it was? It’s a wonder any air managed to get through!

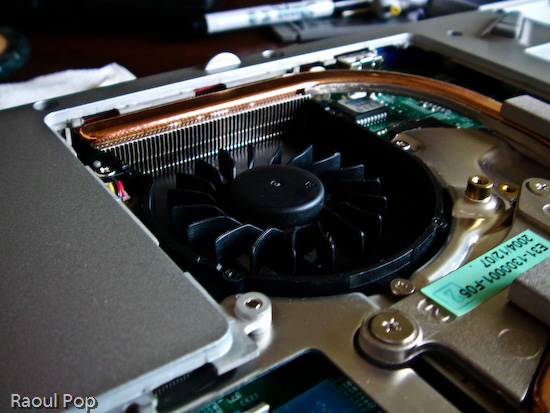
In case you’re wondering how I removed the cover from the cooling fan, it’s simple. There were four small screws holding it in place. They were each about the size of those screws you find in the frames of your eyeglasses, so you can use the small screwdriver from a frame repair kit. (If you’re a geek like me, you probably have your own mini-screwdriver set.) After using moist cotton swabs to thoroughly clean the grill, I blew through the grill from both sides of the laptop to make sure no dust was stuck inside. I was out of air spray, so I just used my lungs — if you do the same, be careful, don’t inhale the dust, it doesn’t taste good… Then I also wiped the fan blades clean with more moist cotton swabs, after which I used a couple of dry ones to wipe the entire assembly. Have a look at the finished product. Looks pretty good, doesn’t it?
The important thing to remember is that most people can do this at home, and it’s a completely user-serviceable operation. I didn’t have to remove any warranty stickers (although my laptop’s out of warranty anyway). As a matter of fact, I only removed the panel that’s supposed to give me access to the RAM. It’s a big panel, so it really gives me access to a lot more stuff.

If my laptop managed to get that much dust inside after only a year and a half of normal use (on tables and desks), I can’t imagine how much dust there is in other laptops that get used everywhere, and never get cleaned! To me, it’s a miracle that most survive through their projected 3-year lifetimes, and even last beyond that. I have to wonder how much better they’d run if their owners would take the time to clean them out once in a while. My suggestion is that you schedule time to do this cleaning once a year.After I finished, I noticed a difference right away. My laptop is cooler now, and runs much quieter. Before, the fan ran in overdrive most of the time. Now, it only runs at higher speeds when the processor is crunching through difficult operations, which is the way it should be. It also runs a little faster, and it’s more responsive. This also makes sense, because a cooler processor works better. It’s the same principle behind water-cooled processors, which can be overclocked because their temperatures are kept low.
At any rate, I encourage you to open up your laptops and try this for yourselves. But please, make sure they’re turned off, unplugged from any power source, and the batteries are removed before you even think of opening them up. Also, ground yourselves before you touch the circuits. You don’t want to short anything inside with any static electricity you might generate.
 Raoul Pop