Reviews

A review of the Stellar Phoenix Photo Recovery software

Having lost photos and videos in the past, I am fairly cautious about my media these days. I keep local and remote backups and I use hardware that writes my data redundantly onto sets of drives, so that I don’t lose anything if one of the drives goes down. I have also purchased data recovery software, just in case something goes bad: I own both Disk Warrior and Data Rescue.

When someone from Stellar Phoenix contacted me to see if I’d be interested in looking at their Photo Recovery software, I agreed. I wanted to see how it compared with what I have. In the interest of full disclosure, you should know they gave me a license key for their paid version of the software.

I put it to a test right away, on what I deemed the hardest task for data recovery software: seeing if it could get anything at all from one of the drives I pulled out of one of my Drobo units.

As you may (or may not) know, Data Robotics, the company that makes the Drobo, uses their own, proprietary version of RAID called BeyondRAID. While this is fine for the Drobo and simple to use for Drobo owners, it also means that data recovery software typically can’t get anything off a drive from a Drobo drive set. Indeed, after several hours of checking, Stellar Phoenix’s software couldn’t find any recoverable files on the drive. I expected as much, because I know specialized, professional-grade software is needed for this, but I gave it a shot because who knows, someday we may be able to buy affordable software that can do this.

Screen Shot 2018-02-24 at 16.30.13

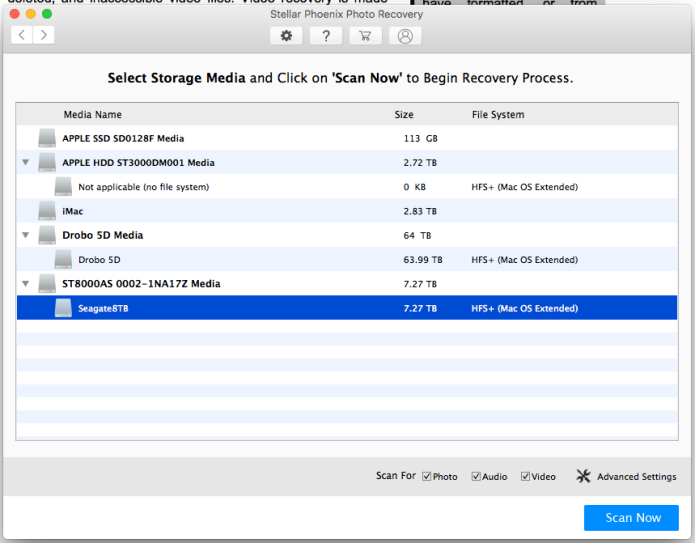
The Seagate 8TB drive is the one I pulled out of the Drobo

Screen Shot 2018-02-24 at 18.29.31.png

What the software found is data gibberish; there were no MP3 or GIF files on that drive

Now onto the bread and butter of this software: recovering photos and videos from SD cards. I made things harder for it again, because I wanted to see what I’d get. I put a single SD card through several write/format cycles by using it in one of my cameras. I took photos until I filled a portion of the card, downloaded them to my computer, put the card back in the camera, formatted it and repeated the cycle. After I did this, I put the software to work on the card.

Before I tell you what happened, I need to be clear about something: because no camera that I know of and no SD card that I know of has any hard and fast rules about where (more precisely what sector) to write new data after you’ve formatted the card, the camera may very well write the bits for new photos/videos right over the bits of the photos/videos you’ve just taken before formatting the card. This makes the recovery of those specific photos that have been written over virtually impossible. What I’m trying to tell you is that what I did results in a file recovery crapshoot: you don’t know what you’re going to get until you run the software on the card.

When I did run it, it took about 40 minutes to check the card and it found 578 RAW files, 579 JPG files and 10 MOV files. Since I write RAW+JPG to the card (I have my camera set to record each photo in both RAW and JPG format simultaneously), I knew those files should be the same images, and they were.

Screen Shot 2018-03-12 at 18.05.31

The software found photos and videos from several sessions and dates

Screen Shot 2018-03-12 at 18.05.54.png

As you can see from the dates, they ranged from March 11 to February 13

I then told the software to save the media onto an external drive, so I could check what it found.

Screen Shot 2018-03-12 at 18.37.08.png

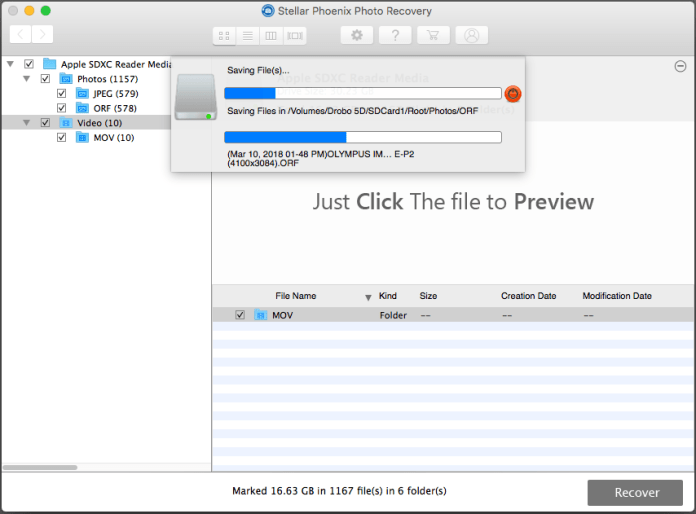
It took about 30-40 minutes to recover the data

When I checked the files, I saw that it recovered two sets of JPG files: each one contained 579 files, but one of the sets began its file names with “T1-…”; they were the thumbnails of the images. All of the JPG files were readable on my Mac. It was a different story with the RAW files. It recovered three sets of RAW files, each containing 578 files. The first set was readable by my Mac. The second set, marked with “T1-…” wasn’t readable at all and the file sizes were tiny, around 10KB in size; they were the thumbnails of the RAW files. The third set, marked with “T2-…” was readable, but the file sizes were around 1MB a piece; they were the mRAW files written automatically by the camera, at a resolution of 3200×2400 pixels. A typical RAW file from the camera I used for my testing ranges in size from 12-14MB and its resolution is 4032×3024 pixels. It’s kind of neat that the mRAW (or sRAW) files were recovered as well.

Now I took 3,328 photos with that camera from February 13th – March 11th. It recovered 578 photos, so that’s a 17% recovery rate. Granted, I made it very hard for it by writing to the card in several cycles and reformatting after each cycle. When I only look at the last set of photos recorded to the card, before the last reformat, I see that I took 523 photos on March 10th and 3 photos on March 11th. The software recovered 525 photos on March 10th (so there’s some doubling up of images somewhere) and 2 photos on March 11th. However, don’t forget about the JPG files, which contained the missing image. So that’s a 100% recovery rate.

In all fairness, there is free software out there that can do basic recovery of images from SD cards and other media, so the quality of a piece of software of this nature is determined by how much media it recovers when the free stuff doesn’t work. I believe I made things hard enough for it,and it still recovered quite a bit of data. That’s a good thing.

Let’s not forget about the video files. Those were written to the card with another camera and they ranged in dates from November 3-6, 2017. I’m surprised it recovered any at all. It gave me 10 video files, out of which 5 were readable, so that’s a 50% recovery rate.

Just for kicks, I decided to run Data Rescue on the SD card as well. It also found 579 JPG files and 578 RAW files. All were readable by my Mac. It also found 10 video files, but none were readable. However, I have Data Rescue 3, which is quite a bit old. Data Rescue 5 is now out, but I haven’t upgraded yet. It’s possible this new version might have found some more files.

Price-wise, Stellar Phoenix Photo Recovery comes in three flavors: $49 for the standard version (this is the one I got), $59 for the professional version (it repairs corrupt JPG files) and $99 for the premium version (it repairs corrupt video files in addition to the rest).

The one thing I didn’t like is that the Buy button didn’t go away from the software even after I entered the license key they gave me. As for the rest, it’s fine. I think it crashed once during testing and it didn’t happen while actually recovering data. The design is intuitive and at $49, this is software you should definitely have around in case something bad happens to your photos or videos. It may not recover all of what you lost, but whatever you get back, it’s much better than nothing, which is what you will definitely get if you don’t have it. It’s also a good idea to have multiple brands of this kind of software if you can afford them, because you never know which one will help you more until you try them all. And believe me, when you’re desperate to get your data back, you’ll try almost anything…

Remember, back up your data and have at least one brand of data recovery software in your virtual toolbelt. Stay safe!

Standard
Reviews

My two new Olympus lenses

I’ve recently purchased two new lenses for my Olympus cameras and I like them very much. Not only are they mignon, but they’re wonderfully sharp, they focus quickly and they offer me something I didn’t think I could get from MFT (Micro Four Thirds) lenses and cameras: bokeh and handheld photography in low light.

Yes, I’ve only just gotten the memo: you can get wonderful bokeh from MFT lenses. Having worked with MFT lenses whose maximum aperture was f/3.5 in the past and present and knowing that MFT sensors had a greater depth of field than larger sensors, I’d become accustomed to not being able to get the kind of bokeh I could get from my other cameras like my Canon 5D. I also didn’t think I could push my aging PEN cameras to take bright, handheld photos in low light. But these new lenses have changed my mind completely!

I love the kind of bokeh I can get from them. Depending on the distance between my subject and the background and the kind of background used, the bokeh is either wonderfully feathered or downright creamy, as you’ll see in the photographs I’ve posted here.

What lenses am I talking about? They’re the M.Zuiko Digital 17mm 1:1.8 and the M.Zuiko Digital 45mm 1:1.8.

Olympus M.ZUIKO DIGITAL 45mm 1:1.8 and M.ZUIKO DIGITAL 17mm 1:1.

There are also Pro versions of these lenses available from Olympus, for all the typical, 35mm equivalent focal lengths, and those lenses open up to f/1.2, so it stands to good reason that the bokeh they make is even better. If I were to take my lenses for example, the equivalent Pro versions for them are the M.Zuiko Digital ED 17mm f1.2 and the M.Zuiko Digital ED 45mm f1.2. Since both of my current Olympus cameras are PEN cameras and I wanted to test the waters first, I bought the f/1.8 lenses, because (1) they’re less expensive, (2) they’re lighter and (3) they’re smaller (amazingly small, actually). However, were I to have a bigger camera such as the OM-D E-M1 Mark II, I would likely get the Pro lenses. They would be a much better fit for a camera that has a native resolution of 20 megapixels and can produce 50 megapixel images in high-res shot mode.

The 17mm f/1.8 lens has a beautiful metal body and is simply lovely to look at. It also has something that Olympus calls “fast focus switch”; I also remember seeing the term “manual clutch focus” somewhere to describe it. The focus ring slides down to reveal a manual focusing scale and it also puts the lens in full manual focus mode. This is different from the manual focus mode you can set in camera, which is more of a focus-by-wire on Olympus cameras. I can explain this in more depth in another post if you’re interested, but for now, I just want to point out the neat feature of this jewel of a lens.

Olympus M.ZUIKO DIGITAL 17mm 1:1.8 Lens

In typical usage, the focus is electronic and set by the camera

Olympus M.ZUIKO DIGITAL 17mm 1:1.8 Lens

When you slide the focus ring down, it reveals the manual focusing scale, with markings in both meters and feet, and it puts the lens in manual mode

It’s time for me to show you some photographs, so you can see the bokeh for yourselves. First, let me show you a few images of the lenses themselves, which I took today with a two-flash setup, right on my desk.

Now let me show you images taken with the 17mm f/1.8 lens. When you see my face in these photos, please don’t think I love taking selfies. It’s just that I’m a readily available subject when I need to test something out.

Finally, here are a selection of photographs taken with the 45mm f/1.8 lens. The bokeh is more pronounced here because of the longer focal length, and it is a truly wonderful thing!

I am so glad I bought these lenses. They have opened up a whole new world for my Olympus cameras. Btw, I took the photographs of the lenses with my PEN E-P2 using the M.Zuiko 12-50mm EZ f/3.5-6.3 lens.

Olympus PEN E-P2 Mirrorless Camera

Olympus PEN E-P2 Mirrorless Camera

Olympus M.Zuiko Digital ED 12-50mm f:3.5-6.3 EZ Lens

Olympus M.Zuiko Digital ED 12-50mm f:3.5-6.3 EZ Lens

I invite you to visit my profile on the MyOlympus website, where I have posted many more photographs taken with my Olympus cameras over the years.

Standard
Reviews

The Sigma sd Quattro

The Sigma sd Quattro is the camera that helped me understand and come to terms with Sigma’s mission as a camera manufacturer. I’ve railed against what I perceived as the faults of Sigma’s cameras in the past (see here and here) and now I have come full circle in my stance on their cameras. It is time for me to apologize for my criticisms. Sigma, please accept my apologies. I didn’t fully understand your mission and your cameras. I now have a better understanding of the situation.

I always thought the Foveon sensor was unique and that it brought a set of features that made it stand out. Where I didn’t “get it” in the past, was in trying to compare Sigma cameras, apples to apples, with other cameras on the market. You can’t do that, because Sigma’s cameras are specialized. When you consider them, the questions you have to ask yourself as a photographer are (1) how important is image quality to you and (2) what are you willing to give up in other areas in order to get that image quality? Once you have that mindset, you can begin to consider the benefits of their cameras.

It must be acknowledged here that the path Sigma has chosen to take is quite different from market trends and consumer expectations. In a world obsessed with resolution and the do-it-all camera that takes photographs and also shoots video, Sigma has chosen to focus most of their attention on the quality of the photographs produced by their cameras, to the detriment of other characteristics that are appealing to consumers. They can afford to do that because they have a thriving lens business, and that’s a beautiful luxury. They don’t have to deal with the pressure of selling as many units of their cameras as possible and they can take their time with their sensor R&D.

It is my belief that with the sd Quattro, Sigma has reached that point where their message is getting across and more people are starting to take notice. I certainly took notice. Just because I criticized them in the past doesn’t mean I didn’t follow their developments. What they have now with the sd Quattro, particularly with the sd Quattro H, is plenty of resolution, an interesting and appealing design and an irresistible price point. Also worthy of mention is the design of the power grip, which makes the camera look even better and extends the battery life by a much-needed 300%.

I invite you to have a look at their website. Also look at their sample photographs and download them so you can appreciate them at full resolution. There are five separate sections with sample photos: for the sd Quattro you have parts one, two and three, for the sd Quattro H you have part one and then there are the general sample photos.

You should know that this camera almost requires a tripod. There will be situations when you won’t need one, but given that the sensor gives you the best quality at low ISO, it’s best to have one with you. I would reiterate what I said above about Sigma cameras being specialized. This is a camera best used in the studio or for landscape photography. You’ll also need plenty of batteries. I understand you get about 100-150 shots per battery. The AF system is fairly slow, so you’ll need to plan each shot carefully and check the focus. The camera also does not shoot video. If you’re thinking about getting it, I highly encourage you to check the specs, read and watch various reviews, and generally speaking, make sure you know what you’re getting into. If you care about accurate (I would even say amazing) color reproduction and you’re willing to sacrifice a lot of the other amenities we’ve come to expect from modern photographic equipment, then you’ll love this camera.

I’ll leave you with several images of the camera itself.

Standard
Places

The Suceava Castle

The Castle of Suceava (Cetatea de Scaun a Sucevei) was the ruling place of a Romanian historical figure who has become the stuff of legend, namely Ștefan cel Mare, also known as Stephen III of Moldavia. He was “voivode” (ruler) of Moldavia from 1457 until his death in 1504. I’ll let you read more about him here.

Stefan cel Mare

Stefan cel Mare

The castle was built and extended in multiple stages. The initial medieval keep was completed in the 14th century and was called Fort Mușatin. The exterior wall around the keep was built during the reign of Stefan cel Mare, between 1476-1478. The moat was dug at the end of the 15 century. The counterattack wall around the moat was built in the second half of the 15th century. The castle’s architecture allows for the walls at the main points of cannon attack to be as thick as 3.5 meters. It’s an impressive structure and once inside its walls, there’s a certain air of history that will take hold of you, provided you’re not surrounded by crowds of tourists.

Enjoy the photos!

I shot these photos with my Canon EOS 5D and the EF 24-105mm f/4L lens.

Canon EOS 5D (front)

Canon EOS 5D

Canon EF 24-105mm f4L IS USM Lens

Canon EF 24-105mm f4L IS USM Lens


Standard
Places

Images from historic churches and monasteries in Bucovina and Moldova

In August of 2*** (regular readers will know the year 😁), we took a tour of the historic churches and monasteries in the provinces of Moldova and Bucovina (within the territory of Romania).

A clarification is in order here. When people hear Moldova they automatically think about the Republic of Moldova, which used to be part of the Romanian province of Moldova but was taken by the Russians in 1940. That whole region has a fairly tumultuous history which you can read here. Just keep in mind these photographs were taken within the current-day borders of Romania and yes, there are two provinces called Bucovina and Moldova in Romania. I’ve lost track of how many times people have tried to correct me on this, all of them foreigners…

romania-historical-provinces

I could have published individual posts of each place but that would have been tedious for me (and for you too). I know it was tedious for me when we visited these places, one after another, day after day, dealing with heat, huge crowds and the hospitality industry (you know, the three Hs of travel; they add together to form a fourth H which is a four-letter word)… but we had made a plan and we stuck to it. Romanians in general tend to make trips to these places yearly for religious reasons. We visited these places because of their historical and architectural value, so while we were there we saw as many as we could in the time we had allotted ourselves.

In this gallery of photographs (there are 134 of them), you will see images from the following places:

  • The wooden church in Șurdești (Maramureș), a UNESCO monument and also the highest wooden church in the world
  • Moldovița Monastery
  • Sucevița Monastery
  • Chilia lui Daniil Sihastrul
  • Putna Monastery
  • “Dragoș Vodă” wooden church
  • Voroneț Monastery, famous for the blue used in its exterior murals, called Voroneț Blue
  • Humorul Monastery
  • Arbore Church
  • Dragomirna Monastery
  • Agapia Monastery
  • Văratec Monastery
  • Neamț Monastery
  • Secu Monastery
  • Sihăstria Monastery

Since I arranged the photos in chronological order, you’ll see them just as they’re listed above. You’ll probably want to know which was my favorite place. Dragomirna Monastery, definitely! Enjoy the gallery and thanks for being a subscriber!

I kept things simple in terms of photo gear for this trip, because there were four of us in the car and I knew I’d have to deal with the 3Hs of travel I mentioned above. I shot mainly with my Canon EOS 5D and the EF 24-105mm f/4L lens. My backup camera was the Canon PowerShot G10.

Canon EOS 5D (front)

Canon EOS 5D

Canon EF 24-105mm f4L IS USM Lens

Canon EF 24-105mm f4L IS USM Lens

Canon PowerShot G10

Canon PowerShot G10

Standard