Reviews

One more reason why Microsoft doesn't get it

At work, I use Windows Vista Ultimate Edition. I tried to install Vista SP1 on my computer yesterday. I created a restore point, just in case something went badly, and started the install. Here’s the error message that I got:

Vista SP1 cannot install

Apparently, Vista SP1 cannot install on my machine, because I’ve got too many language packs installed. Fine, I can understand that. But what I don’t understand is why Microsoft itself kept tagging the extra language packs as “Important Updates”, basically shoving them down my throat and forcing me to install them in the first place. Don’t believe me? Hang on, I’ll give you proof of it below.

I started to remove the language packs, and the uninstall process itself is just horrible. You cannot remove more than one language pack at a time, and it takes at least 10 minutes to do it. Try it yourselves and see. It’s a three-step process. You run the uninstaller from the Control Panel, it takes a few minutes for that, then you’re prompted to reboot, you do so, it takes a few more minutes for the second step, then reboots and runs the third step, which takes the longest. It’s insanely frustrating and a big waste of time. I’m hard-pressed to think Microsoft couldn’t have come up with a better and faster way to install/uninstall language packs.

I had about 7-8 extra languages installed (other than the standard EN/FR/IT/JP). I only did it because Windows wouldn’t quit bugging me to update it by installing the language packs in the first place, and now I find I have to waste more than an hour of my time uninstalling them after having already wasted more than an hour installing them a few months ago. Thanks, Microsoft! Increased productivity my foot…

I uninstalled a few of them yesterday, and here’s the message that I got from Windows after doing that:

Windows Update: Available Updates

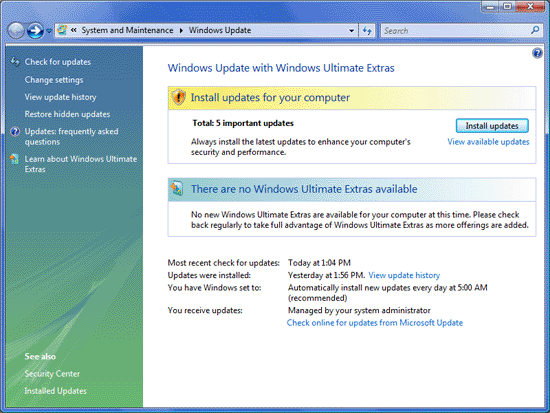
See those 5 important updates tagged with yellow, that Windows advises me to install in order to “enhance my computer’s security and performance”. That’s Microsoft-speak for “waste your time and decrease your computer’s performance”. Guess what they are?

Windows Update: Available Updates

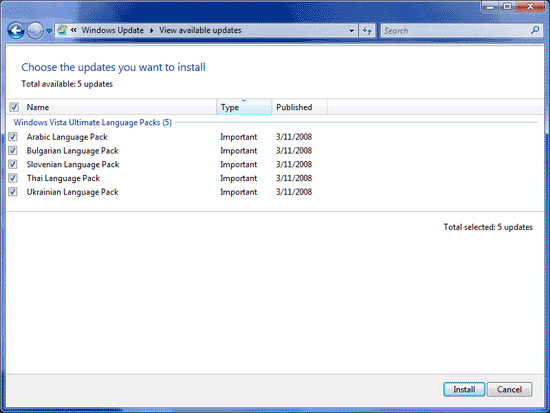
As you can see, it’s the very five language packs that I uninstalled. Windows wants me to install them right back, just so I can’t upgrade to SP1. Isn’t that grand? Don’t you just love Microsoft for their obvious programming logic?

That’s exactly the same type of message I kept getting from Windows before I installed the damned things in the first place. I only installed them so Windows would leave me alone. I guess that won’t happen any time soon, because I now see the same “Available Updates” icon in the taskbar, glaring at me, nagging me to install the stupid language packs. Do you see it below? It’s the blue icon with some sort of orange satellite flying around it.

Windows taskbar available updates icon

I only hope Vista SP1 will fix this annoying behavior, but somehow I doubt it. I have a feeling I’m going to have to revert to an earlier system restore point, which would be a real shame, but then again, it would be just what I’d expect from Microsoft.

Standard
Reviews

Bugs in Lightroom 1.2

The latest version of Adobe’s Lightroom, 1.2, introduced corrections for several issues such as XMP auto-write performance, Vista grid display errors, and noise reduction for Bayer-patterned sensors (the majority of digital sensors on the market user Bayer patterns in their color pixel distributions). It also introduced support for new cameras such as the Canon EOS 40D and the Olympus EVOLT E-510. The upgrade was a marked improvement upon 1.1 and 1.0, but I’ve noticed a few bugs:

  1. Time-shifted capture times don’t transfer properly on import from catalog to catalog. While on a recent trip in Romania, I took along my laptop but didn’t take my WD My Book Pro Edition II, since I wanted it to stay safely at home. (That’s where I keep my photo library.) I thought, no problem, I’ll just start a new catalog directly on my laptop, work with my photos there, and do a catalog to catalog import when I get home. In theory, that should have worked just fine — in practice, it was somewhat different. You see, I’d forgotten to set my 5D to Romania’s local time, and that meant that all of the photos I’d taken for the first few days lagged behind local time by 7 hours. I corrected those times by selecting those photos in Lightroom and choosing Metadata >> Edit Capture Time >> Shift by set numbers of hours. That fixed those times in the catalog on my laptop, but when I imported those same photos, I found out that very few of those corrected times transferred during the catalog import operation. What’s worse, the capture time for others was somehow shifted by seemingly random values to something else altogether, so I had to fix that as well.
  2. There’s an annoying and somewhat destructive color shift that takes place when I import photos into Lightroom. For a few moments after I open a photo, it’ll look just like it looked on my 5D’s LCD screen, but then Lightroom will shift the colors slightly as it loads and develops the RAW file. It seems to do less of it now than in version 1.0, but it’s still happening, and then it’s really difficult, if not impossible, to get my photos to look like they’re supposed to look. Canon’s own RAW viewer doesn’t do this, and neither does Microsoft’s RAW viewer.
  3. Batch-editing photos selected from the filmstrip (instead of the grid view) does not apply the actions to all of the photos, only to the first photo selected from that bunch. In other words, if I were to select the same group of photos in grid view and apply a set of modifications to all of them (keywords, etc.), these modifications would be applied to all of the photos selected. When the same group of photos is selected in the filmstrip, the modifications are not applied to all of them, only to the first selected photo. By the same token, if I select multiple photos from the filmstrip in develop view and apply a sharpening change to all of them, it doesn’t take. It only gets applied to the first selected photo.
  4. Changes to ITPC meta data are often not written to the files until Lightroom is restarted. For example, if I select a group of photos, and specify location information for them, Lightroom will not write that data to the XMP files right away. Instead, it’ll wait until I exit, then start Lightroom again. Only then will it start to write those changes to each photo’s meta data. I’m not sure why it’s like this, but it’s confusing to the user.

As frustrating as these bugs are — especially #3 — I can’t imagine working on my photographs without Lightroom. It’s made my life a whole lot easier, and it’s streamlined my photographic workflow tremendously. I can locate all of my photos very easily, and I can organize them in ways I could only dream about before. It’s really a wonderful product, and I look forward to future versions with rapt attention. I hope Adobe continues to dedicate proper focus to Lightroom as it goes forward with its market strategy.

More information:

Standard
How To

Automatic redirect from HTTP to HTTPS

IIS (Internet Information Server) doesn’t have a way to automatically redirect HTTP traffic to HTTPS if SSL encryption is enabled for a site. So if you’ve got a site that users are supposed to access by typing in https://www.example.com, but they type in http://www.example.com or http://www.example.com or just example.com, they’re going to get a pretty ugly error message that looks like this:

What can you do? Well, there are two ways of going about it, and both of them are hacks, but they do the job just fine. I prefer method 2 myself.

Method 1:

Make sure the original site (the one with SSL encryption) is listening only on port 443 for the IP address you’ve assigned to it. Now create a separate site using that same IP address, and make sure it only listens on port 80. Create a single file at the root level and call it default.htm or default.asp. If you want to use HTML, then use a meta refresh tag. If you want to use ASP, use a redirect. I’ll give you examples for both below.

<meta http-equiv="Refresh" content="0;URL=https://www.example.com" /> 

or

<% Response.Redirect("https://www.example.com") %>

Don’t forget to enclose each line in its proper brackets. This method works great, but it has one shortcoming. If the site visitor chooses to go to http://www.example.com/somepage.htm, they’re going to get forwarded to the root-level of the HTTPS site, because that’s the nature of the script. It doesn’t differentiate between the page addresses. So you may ask yourself, isn’t there some other way of doing this? Yes, there is.

Method 2:

This method doesn’t require the creation of an additional site. All that you need to do for this is to create an HTML file — I call mine SSLredirect.htm — then point IIS to it using a custom error capture. First, here’s the code that you need to paste in that HTML file:


<script language="JavaScript">
<!-- begin hide

function goElseWhere()
{
var oldURL = window.location.hostname + window.location.pathname;
var newURL = "https://" + oldURL;
window.location = newURL;
}
goElseWhere();

// end hide -->
</script>

Once you’re done editing the file, save it to the root level of your site, or to the root level of IIS (c:\inetpub\wwwroot\). Saving it to that general location lets you use that same file to fix the HTTPS redirection problem for all of the sites you host on a single server.

Now, in IIS 6, right-click on the site in question, go to Properties >> Custom Errors, and double-click on 403;4. Select File for Message Type, then browse for the file you’ve just created and click on OK. In IIS 7, click on your site, then double-click on Custom Errors, locate the Add link in the top right-corner, and add an error for 403;4, as shown in the image below.

IIS 7 Error Configuration

Once you’ve done this, your sites should automatically transfer HTTP traffic to HTTPS when it’s required, and the visitors won’t be forwarded to the root-level of the site. Instead, the URL will be remembered, and the page will simply be re-loaded using the HTTPS protocol. Come to think of it, you could write this in ASP as well, and avoid potential problems caused by browsers that have JavaScript turned off, but this code should work just fine for a lot of people.

Standard
Reviews

Flickr tightens up image security

Given my concern with image theft, I do not like to hear about Flickr hacks. A while back, a Flickr hack circulated around that allowed people to view an image’s full size even if the photographer didn’t allow it (provided the image was uploaded at high resolution.) The hack was based on Flickr’s standard URL structure for both pages and image file names, and allowed people to get at the original sizes in two ways. It was so easy to use, and the security hole was so big, that I was shocked Flickr didn’t take care of it as soon as the hack started to make the rounds.

It’s been a few months now, and I’m glad to say the hack no longer works. I’m not sure exactly when they fixed it. Since it’s no longer functional, I might as well tell you how it worked, and how they fixed it.

D

First, let’s look at a page’s URL structure. Take this photo of mine (reproduced above). The URL for the Medium size (the same size that gets displayed on the photo page) is:

http://flickr.com/photo_zoom.gne?id=511744735&size=m

Notice the last URL parameter: size=m. The URL for the Original size is the same, except for that last parameter, which changes to size=o. That makes the URL for the original photo size:

http://flickr.com/photo_zoom.gne?id=511744735&size=o

Thankfully, that no longer works. If the photographer disallows the availability of sizes larger than Medium (500px wide), then you get an error that says something like “This page is private…”

Second, they’ve randomized the actual file names. So although that image of mine is number 511744735, and it stands to reason that I would be able to access the file by typing in something like http://farm1.static.flickr.com/231/511744735_o.jpg, that’s just not the case. Each file name is made up of that sequential number, plus a random component made up of letters and numbers, plus the size indicator. So the actual path to the medium size of the image file is:

http://farm1.static.flickr.com/231/511744735_b873d33b12_m.jpg

This may lead you to think that if you can get that random component from the URLs of the smaller sizes, you can then apply the same URL structure to get at the larger size, but this is also not the case. It turns out that Flickr randomizes that middle part again for the original size. So although it stays the same for all sizes up to 1024×768, it’s different for the original. For example, the URL for the original size of that same photo is:

http://farm1.static.flickr.com/231/511744735_d3eb0edf2d_o.jpg

This means that even if you go to the trouble of getting the file name for one of the smaller sizes, you cannot guess the file name of the original photo, and this is great news for photographers worried about image theft.

While I’m writing about this, let me not forget about spaceball.gif, the transparent GIF file that gets placed over an image to discourage downloads. It can be circumvented by going to View >> Source and looking at the code to find the URL for the medium-size image file. It’s painful, but it can be done, and I understand there are some scripts that do it automatically. The cool thing is that after Flickr randomized the file names, it became next to impossible to guess the URL for a file’s original size. The best image size that someone can get is 1024×768, which might be enough for a 4×6 print, and can probably be blown up with special apps to a larger size, but still, it’s not the original.

Perhaps it would be even better to randomize the file name for the large size as well, so that it’s different from the smaller sizes and the original size. That would definitely take care of the problem. Still, this is a big step in the right direction.

Standard
How To

If you can’t connect to SQL Server on port 1433

Just had two fun days of troubleshooting this by working together with Adobe/Macromedia support, and found the solution.

Here’s the original issue: could not set up a new data source connecting locally (localhost, 127.0.0.1) to SQL Server 2000 Standard running on the web server; kept getting a SQL Exception error. Was told SQL just wasn’t listening on port 1433, or any TCP port for that matter, even though TCP/IP and Named Pipes were clearly enabled in the SQL Network Config Utility. Even in the registry, port 1433 was specified, yet I could not connect to SQL on TCP by any means. I couldn’t even telnet to the machine on that port.

Turns out that even though I’d upgraded SQL Server 2000 to SP4, I needed to downgrade to SP3. Still doesn’t make sense, after all, MS SPs are supposed to be roll-ups, but hey, that’s what worked. Luckily, the server I was working was running on VMware, so I reverted to a snapshot I took after I installed SQL and before I upgraded to SP4. Installed SP3, and was able to set up the data source immediately! Something to keep in mind if you’re in the same boat.

Standard