How To

A quick maintenance operation that will prolong the life of your laptop

I upgraded the RAM in my laptop yesterday, and stumbled onto a really easy maintenance job that will most certainly prolong the life your laptop, and help it run faster, cooler and quieter. It sounds impossible to do all that in one fell swoop, but it’s really easy to do, and it works. I’ll give you a hint: it has to do with your laptop’s cooling.

I realize your laptop is going to be different than mine, so my photos may not help you much when it comes to doing this on your own laptop, but bear with me, the principle is the same, and this simple clean-up job will really help.

What I’m talking about is the laptop’s cooling fan assembly. It’s the fan that cools the processor’s heatsink, and is responsible for keeping the processor below the upper temperature threshold. It’s like your car’s radiator. If it wasn’t working, your car would overheat very fast, wouldn’t it? Same thing here, except your laptop’s “radiator” is prone to getting clogged up with dust – lots of it, too.

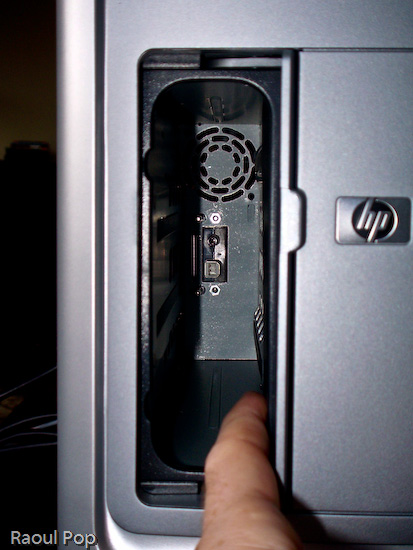
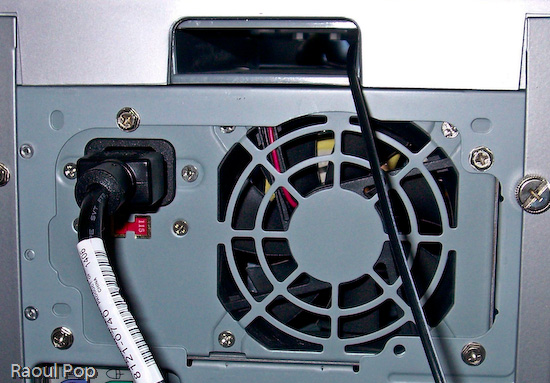
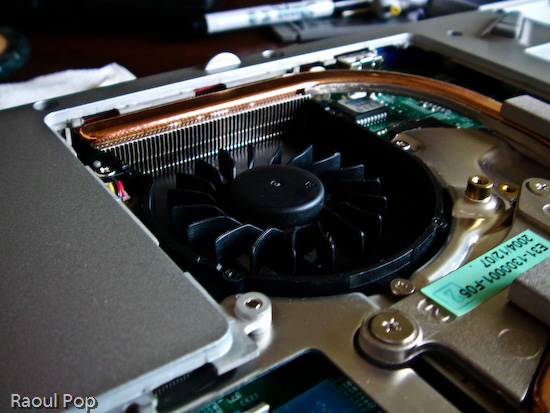
After about a year and half of using my laptop mostly on clean tables — not on carpets, or my lap, or on tablecloths, as some of us do [!] — I was very, very surprised to find out how much dust had accumulated on my laptop’s cooling grill. I didn’t even open my laptop in order to inspect it. I just wanted to install some extra RAM, but saw the cooling fan and figured, hey, let me open it up even though it looks clean enough from the outside. Boy, was I in for a shocker! Have a look at this photo to see for yourselves.

Cleaning an Averatec 6240 series laptop

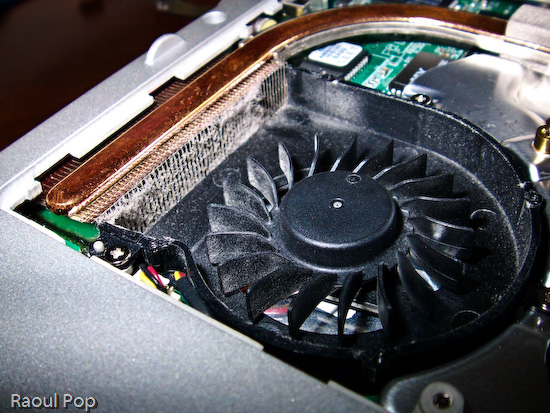
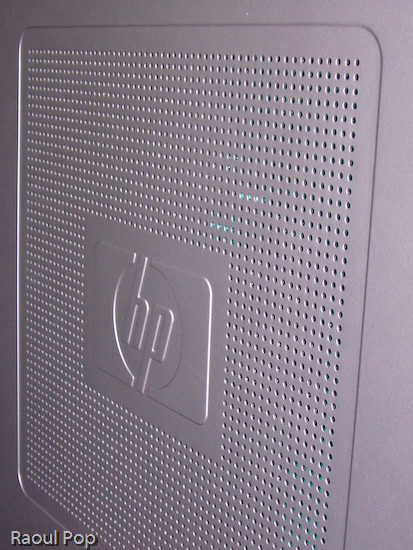
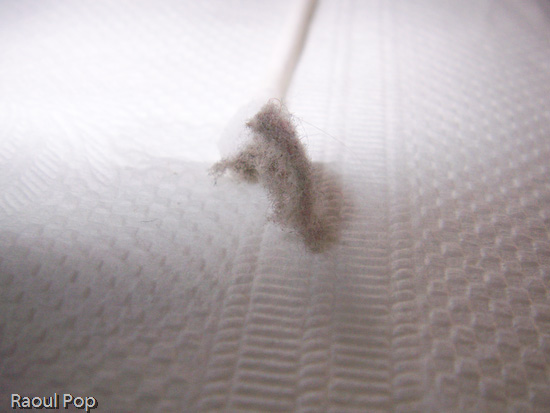
You may not think that layer of dust is much, but have a look at a macro photo I took of a piece of it. I used a moist cotton swab to pull off the dust from the grill. Can you see how thick it was? It’s a wonder any air managed to get through!

Cleaning an Averatec 6240 series laptop

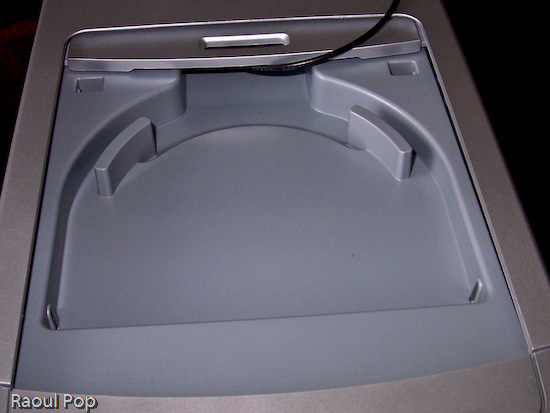
In case you’re wondering how I removed the cover from the cooling fan, it’s simple. There were four small screws holding it in place. They were each about the size of those screws you find in the frames of your eyeglasses, so you can use the small screwdriver from a frame repair kit. (If you’re a geek like me, you probably have your own mini-screwdriver set.) After using moist cotton swabs to thoroughly clean the grill, I blew through the grill from both sides of the laptop to make sure no dust was stuck inside. I was out of air spray, so I just used my lungs — if you do the same, be careful, don’t inhale the dust, it doesn’t taste good… Then I also wiped the fan blades clean with more moist cotton swabs, after which I used a couple of dry ones to wipe the entire assembly. Have a look at the finished product. Looks pretty good, doesn’t it?

Cleaning an Averatec 6240 series laptop

The important thing to remember is that most people can do this at home, and it’s a completely user-serviceable operation. I didn’t have to remove any warranty stickers (although my laptop’s out of warranty anyway). As a matter of fact, I only removed the panel that’s supposed to give me access to the RAM. It’s a big panel, so it really gives me access to a lot more stuff.

Cleaning an Averatec 6240 series laptop

If my laptop managed to get that much dust inside after only a year and a half of normal use (on tables and desks), I can’t imagine how much dust there is in other laptops that get used everywhere, and never get cleaned! To me, it’s a miracle that most survive through their projected 3-year lifetimes, and even last beyond that. I have to wonder how much better they’d run if their owners would take the time to clean them out once in a while. My suggestion is that you schedule time to do this cleaning once a year.After I finished, I noticed a difference right away. My laptop is cooler now, and runs much quieter. Before, the fan ran in overdrive most of the time. Now, it only runs at higher speeds when the processor is crunching through difficult operations, which is the way it should be. It also runs a little faster, and it’s more responsive. This also makes sense, because a cooler processor works better. It’s the same principle behind water-cooled processors, which can be overclocked because their temperatures are kept low.

At any rate, I encourage you to open up your laptops and try this for yourselves. But please, make sure they’re turned off, unplugged from any power source, and the batteries are removed before you even think of opening them up. Also, ground yourselves before you touch the circuits. You don’t want to short anything inside with any static electricity you might generate.

Standard
Reviews

Hardware review: HP Pavilion m7480n desktop

I’ve been using the Pavilion m7480n desktop for the last 2 and a half months, and I’m pleasantly impressed. This is a great desktop system, it’s fast, stable, packed with great features, but most of all, it’s well designed, and that’s what sets it apart from other desktops on the market.

HP Pavilion m7480n Desktop

HP Pavilion m7480n Desktop

I have never seen so many great and useful features packed into the desktop form factor. Let’s start with the front side of this computer, which is, as far as I’m concerned, fantastic.

HP Pavilion m7480n Desktop

HP Pavilion m7480n Desktop

A lot of computers have flash memory readers, but not a lot of them have them custom-built into the desktop case, located right at the top for easy access, and have so many choices when it comes to card formats.Want an all-in-one solution for writing DVDs and CDs? The LightScribe drive is it. Not only will it write single- and double-layer DVDs, DVD-RWs, CD-Rs and CD-RWs, but it will also print your label for you. Also included is an extra DVD-ROM/CD-ROM drive, just for fun.

See the two panel doors? One of them is for the Personal Media Drive Bay, which is hands-down, the coolest feature you’ll find in any desktop computer. Want extra storage? Just slide in a Personal Media Drive. Want to add another hard drive? Just slide in another Personal Media Drive. Seriously, it’s that easy! The drive slides in, and automatically connects to the computer through USB, and is also powered by a special connector, no wires required. I don’t know about you, but I’m really annoyed by the extra power cords and power adapters that come with external storage drives. Sure, the drive may look nice by itself, but when you add the bulky adapter and power cord, it’s suddenly not so nice and neat. So the great thing about HP’s Personal Media Drives is that there are no cables and power adapters – you only need the drive, which is a beautiful thing.

HP Pavilion m7480n Desktop

You’d think HP would charge you a ridiculous price for this extra convenience and the custom form factor, but they don’t, which is also nice. Currently, they come in three sizes: 160GB, 300GB and 400GB. The 160GB PMD is $149.99, the 300GB PMD is $249.99, and the 400GB PMD is $319.99, which runs a little above the low margin of the market for personal storage, but not by a lot.

Let’s look at the other useful front panel: the Connectivity Center. Tell me honestly, have you seen such a thorough front panel on any other computer line? I haven’t. There’s an S-Video port, composite video ports, the standard headphone/microphone jacks, two USB ports, and — a really nice thing — a Firewire (1394) port. Finally, a computer manufacturer gets it, and puts a ready-to-use Firewire port on the front of a computer.

HP Pavilion m7480n Desktop

Also on the front side of the desktop, let’s not forget the little things, like the sliding doors that hide inside the chassis for the front panels (the Personal Media Drive Bay and the Connectivity Center). They’re very useful because when you don’t use the panels, you can close the doors and hide away the ports. And, you don’t have to flip them up, like on a Dell desktop (yuck), or you don’t have to slide them up and have the door fall back down after it’s gotten a little used — no, you simply slide them to the side. It just works. An added bonus on the front is a Wireless Lan light that turns on when a connection has been established — this is a great visual indicator for those of us who are less tech savvy.

It isn’t just the front of the desktop that’s interesting. I like the side cooling grille as well. One small note: although the finish of the desktop case looks like plastic, it’s actually metal. Only the front and top side of the case are plastic — the sides are metal. Another useful feature is that this desktop runs very quietly. I’ve had desktops in the past that really made a lot of noise, so I can readily appreciate the silence in the room when I use this system. The only sound I can hear out of it is the hard drive — and that only when I really push it.

HP Pavilion m7480n Desktop

Another notable feature is the dock for an HP Photosmart printer right on top of the computer. Like the Personal Media Drive Bay, this is a feature that’s unique to HP desktops, and I really like it. Who’d have thought of building in a dock for a photo printer on top of the computer — but it makes perfect sense. You have the card reader right on top as well, so you simply slide in the flash card containing your photos or you connect your camera, and print your photos right away. You don’t have to worry about where you place the printer, because it’s right on top of the computer. This is beautiful, functional design.

HP Pavilion m7480n Desktop

The cover for the dock is easily removed, and the really nifty thing is that HP designers included a slot at the back end of the dock for the printer wires (USB, power). That way, you can slide them right through the case and out the back, easily connecting the printer to the computer and the power supply. Very, very nice! For example, I used the dock to sit my wireless antenna in it, and I slid the antenna cable through the very same slot, pulling it out through the back of the case, as you can see below.

HP Pavilion m7480n Desktop

The back panel itself is also very useful. Besides the usual connectors and ports, it has digital sound in and out, connectors for 5.1 speakers, 4 USB ports and another Firewire (1394) port, a video card with S-video and RCA video out ports, and an input slot with the following ports: composite A/V, S-video, TV/Cable antenna and FM antenna. I would have liked to see a DVI-out connector on the video card, but other than that, this is a pretty good collection of connectors and ports.

HP Pavilion m7480n Desktop

This system comes standard with a wireless keyboard and mouse, and they both work great. The battery life is as expected or longer: I only had to replace the batteries in the mouse after 2 months, and the keyboard batteries are still going strong. The only thing that could be improved on the keyboard are the keys. While they work fine, they’re a bit loud, and could stand to be made quieter. The multimedia controls on the keyboard also work all the time, which, at least for me, is a departure from the norm. I’m used to seeing multimedia keys on other laptops and desktops be unreliable, so it’s nice to see them working non-stop for a change.

The HP Pavilion m7480n is one great desktop. It comes with an Intel Dual Core chip, which clocks in at 3.00GHz for each core. My system had 2GB of RAM in it, and it ran wonderfully on that. The hard drive was 300GB, and HP reserved 10GB of it for a separate recovery drive that can be used to restore the OS and applications when needed. But what sets this desktop apart isn’t necessarily the specs (which are top of the line anyway) but the amazingly useful design. Serious thought was given to functionality and ease of use when it came to the case of this desktop, and that’s what impresses me and really counts.

Standard
Thoughts

Want to see the inside of a SanDisk Cruzer 1.0GB USB flash drive?

Yes, you read correctly. That is a Google-compliant post title. It may give away the entire post, but I can be sure it’ll get indexed properly now…

Now for the raison d’etre, or the why, as we say in these here parts. My friend Peter is the owner of the USB flash drive in question. Actually, he has two of them, and one stopped working. Ever curious, he wanted to see what was inside, so he took it apart. One of the fringe benefits of having a geeky friend and being a geek yourself (and I mean that in the nicest way, honest) is that you get to share such delightful experiences. So when Ligia and I visited them, Peter showed me the parts, and suggested I post the photos to my site. Well, he didn’t have to ask twice! He had me when he pulled out the broken drive! I mean, what self-respecting geek would say no when presented with the chance to:

  1. Have a look at mini circuit boards,
  2. Take macro photos with his new digital camera,
  3. Post said photos online,
  4. Write a blog entry about it

So, without further ado, here are the photos, starting with the external components and progressing to the internal ones.

SanDisk Cruzer flash drive

SanDisk Cruzer flash drive

SanDisk Cruzer flash drive

SanDisk Cruzer flash drive

SanDisk Cruzer flash drive

SanDisk Cruzer flash drive

SanDisk Cruzer flash drive

Standard
How To

When it comes to home computers, k.i.s.s. and forget it

I’ve been learning a hard lesson these past few weeks, as my parents go through a time of computer trouble, and since I’m the one who purchased their computer equipment and set up their network, it’s up to me to get things right again.

What’s the lesson, you ask? As encapsulated in the title of this post, and as I’ve been yelling it at myself in quiet moments, it’s: keep it simple. 

Here’s how their setup looks:

  1. Cable internet connection
  2. Wireless router
  3. Vonage box hooked up to router, in turn hooked up to phone w/ answering machine, and multi-function printer/fax/copier/scanner
  4. Same multi-function printer/fax/copier/scanner also hooked up to router because it’s networkable
  5. Older desktop hooked up to router, another printer through parallel port, and to the multi-function machine through the network
  6. Laptop with wireless card, using the wireless router, configured to the networkable multi-function machine through the network

Where should I begin? Gee, let me start with WPA. Why? Because that’s how I had their wireless router set up. And every time something happened with the connection, they either couldn’t find the passphrase, or for some reason the laptop’s card didn’t feel like connecting to the router. Lesson learned: ditch encryption, just set up MAC filtering. That way, they can connect on the go, and don’t have to bother with WEP or WPA, which is a real hassle unles you’re a geek. Plus, with MAC filtering, unless someone can spoof a MAC address, they can’t connect to the network. And if they can spoof a MAC address, there’s a good chance they know how to get in even if encryption is enabled. Yes, I know the traffic can be sniffed if the encryption isn’t enabled, but who cares? Even WPA encryption can be sniffed and decrypted with readily available utilities. So why bother with it?

As I banged my head against the wall, I rued the day I set up their multi-function machine through the network. Why? Because if you have to delete it and re-install the printers, or you have to re-format the OS (Thanks, Windows, for the crappy OS, and thanks, driver manufacturers, for the horrible, latrine-worthy job you do writing those drivers – for all devices, not just printers!) you can never find the machine on the network so you can re-configure it, and you spend hours re-setting it to factory defaults through the printer’s LCD menu, then hunting for it on the network. Have you ever tried to walk someone through a printer’s LCD menu when you can’t remember the options, and they’re not familiar with it? It’s not fun. Lesson learned: install through USB, and set up local printers.

Quick question: if you unplug your printer’s or computer’s network cables from the wireless router, can you plug them into the IP telephony router? I guarantee you your parents or friends won’t know the difference, and they’ll plug them into it, then wonder why they can’t get on the Internet or connect to their printer. Lesson learned: forget IP telephony devices like Vonage. It may be cool for us youngsters to brag about how we slashed our phone bill by switching to Vonage or just using Skype, but it’s not cool for your parents when they can’t receive phone calls or faxes. (Yes, I’m talking to you, Vonage, with your awkward and arcane programming steps (or rather, button dances) so I can get my printer to send/receive faxes through your connection! Forget that!) Just set your parents up with a dedicated fax machine, plugged into a wall phone outlet, then sit back and relax, because they won’t call about it! And it’s the same with the phone! Leave it plugged into the wall! Forget saving $5 or $10 a month just for IP telephony. It’ll cost you and your parents much more in stress when their phone doesn’t work.

When my parents lost data because their laptop crashed and had to be reformatted, I realized the value of setting them up with automatic, regular data backup, the kind that just works. You know, you don’t think twice about setting up backups in the server room, but somehow you think the data on your laptop or desktop will take care of itself… Unfortunately, Windows doesn’t come with an easy backup program. Lesson learned: buy a big external hard drive, and set up automatic, regular backup jobs to it. It’s preferable to get a drive that comes bundled with a backup utility. Have any of you used the Windows Backup utility? What a stinker! How do you edit scheduled jobs? First, you can’t edit their every aspect after you’ve created them, and second, who’d think to look under a completely different app, called Scheduled Tasks, to find them there? Really, would anyone other than a geek know that? Why in the world aren’t the jobs available for editing within the Backup utility? It’s just plain dumb design.

As I had to re-educate my parents about the various ways of doing things on the computer, I came to realize (duh!) that I should have spent more time training them at the outset. Yeah, it seems like a no-brainer now, but back when you’ve just spent a couple of days transferring all their stuff and settings from the old computer onto the new one, do you really feel like spending another half day training them on the new machine? No, you just sit them down in front of it, point out the highlights, and tell them to enjoy it! Well, you pay for it later. Lesson learned: spend time training the user at the outset – you’ll avoid problems down the road. And define simple pathways for them, stuff like:

  1. This is where you save your documents.
  2. This is where your email archive gets stored.
  3. This is how your email account is set up. Make sure the settings stay this way!
  4. This is how to back up your bookmarks.
  5. These are the passwords and simple access instructions for the firewall, router, computer accounts, etc.
  6. This is where the photos get stored. Use this application to manage them. Download the photos from your digital camera this way…
  7. This is where the music gets stored. Use this application to manage it. This is how to sync the iPod…
  8. This is where the videos get stored. Use this application to download the videos from your camcorder to the computer. Here’s a simple way to make a DVD from a video…

It’s stuff like this that saves you countless headaches. If you need to, make screen-capture movies and put them on a “how to” DVD for them. Or write instructions, with screenshots. But make it simple, or you’ll pay for it!

Finally, as I troubleshooted why the laptop kept crashing because of obscure driver errors (everything was up to date, and the latest driver versions were installed), I learned the following three things:

  1. Buy a good brand. Don’t get a cheap brand. My parents have an Averatec laptop. That thing clonked out from the start. It was supposed to be able to output video to a TV through an S-video port, and it wasn’t even able to do that. When I called Averatec support, their advice, right off the bat, was to reformat the laptop. Great, the panacea fix used by all lazy tech support people! Then, after the 1-year warranty expired, it started to crash unexpectedly, even though there were no viruses and no spyware on the computer. It didn’t have any weird applications installed, either, just mass apps like Office, Firefox, iTunes, Picasa. So, don’t buy Averatec.
  2. Get an extended support plan. Don’t get cheap when you shouldn’t! Get that support plan, and make sure it includes accidental damage coverage, as well. You’ll be thanking yourself when you have someone to call if the hardware goes bad, or you need help with the system.
  3. Don’t buy Windows. Sounds harsh, doesn’t it? But it’s true. People who aren’t geeks need a simple operating system that’s not fragile – one that doesn’t crash or is susceptible to hundreds of thousands of viruses and malware. Windows may be good for developers who are shackled to it by the work they do (like me), and it may work fine at the office, (where you have a Help Desk department, and you’ve got an industrial-strength firewall and anti-virus thin clients pushed out to all the client computers, with the latest virus definitions,) but it’s not good at home – not for people who are at a loss when they need to tell a bad file apart from a good file. The choice becomes pretty simple: Mac OS! Just get a Mac for your parents, or tell your non-geek friends to get one. Then, when they don’t call you to complain that it keeps crashing, you’ll get some time to pat yourself on the back.

I hope this helps you streamline your work as you set up your parents’ or your friends’ machines. I sure wish someone shoved this under my nose when I started to set up my parents with new computer equipment.

Standard
Reviews

Building Scalable Web Sites, by Cal Henderson

I love this book! There, I’ve given away the clincher already.

Truth is, the writing is addictive. Once I picked it up, it was hard to tear myself away. Perhaps it’s because I’m fascinated with the subject matter, but boy, the writing style ain’t too shabby either. It’s easy on the eyes, and easy on the brain. You just start reading, and go on reading. There are no stumbling blocks, just nice, smooth writing that encourages you to keep moving on as you’re reading.

Let’s face it, which web developer out there doesn’t want to find out how to build scalable websites? Don’t we all dream that our sites or web apps will hit it big, and we’ll have to start planning how to expand? Well, this book will show you how. No, this book won’t show you how to code such sites. There are so many languages out there, it’d be impossible to do that in a book. And besides, code and its structure varies wildly based on the application you’re building. The load imposed on the server varies as well, based on the nature of your application. Some require more RAM, others crave more disk space, others are cuckoo for I/O… you get the point.

What this book will do is to set you straight: what is scalability, and how it’s done, from scratch to finished product, from hardware planning to software planning. It’s all laid out, and it’s easy to understand. Oh heck, Cal even explains what a web application is. And he’ll shatter a few myths, such as this: scalability and performance aren’t the same thing. And, PHP can be used in scalable applications. What?! The heresy! Only Java is scalable, right? Nope.

You’ll also learn things such as… Which scaling (vertical or horizontal) is more cost and resource-effective? How do you load balance with both software and hardware? What in the world is involved when exposing web services? Well, it’s not about nerds flashing in the server room, that’s for sure. How should you react when someone pulls an RPC on your XML? Should you wash it with SOAP, or should you cry API Abuse? Is a data cache a good thing? Should you worry about your database slaves? Should you buy cheap machines like Google, or should you spend your cash on real servers? Read the book, and find out the answers to all these captivating questions.

By my estimate, most people interested in the subject will manage to read the book in less than a week, and that’s with leisurely reading in the evenings. That’s more than I can say about many tech books, where you get bogged down trying to understand the code and what it’s doing. This book is instructive, entertaining, and intellectually enriching. Cal has a lot of knowledge in building scalable websites, and there’ll be no mistaking that when you pick up the book. This fellow speaks from personal experience. Do yourself a favor, and don’t build a hamstrung site. Read this book first!

Standard