Thoughts

Where’s the SmugMug Publish Service for Lightroom?

I love the Flickr Publish Service in Lightroom 3, and would love to see SmugMug make their own.

The only thing missing for the Flickr service is for it to know which photos I’ve exported and uploaded to Flickr before the service became available, in previous versions of Lightroom. I for example have either tagged the photos uploaded to Flickr with, obviously enough, “Flickr”, or have added them to a Flickr collection in Lightroom, so I could easily find them.

Here’s where SmugMug has the chance to shine! I’d love to be able to publish my photos to SmugMug directly from Lightroom, using the Publish Services functionality, so I could always sync up any photos that I’ve re-developed or where I’ve updated the metadata. But for this service to really stand out, it needs to know which photos I’ve already uploaded.

You can see where this is going, right? I’ve already tagged all my SmugMug photos, and have already placed them in collection sets and collections that match my SmugMug categories breakdown exactly. With a little bit of computing power and some smart algorithms, the folks at SmugMug could put together a killer Publish Service for Lightroom that incorporates all the Flickr functionality and bests it by matching my already-uploaded photos.

What about the cost? The Flickr Publish Service is free to use for all Flickr users, but you cannot re-publish uploaded photos if you’ve changed them in Lightroom. (You can, but if you’re not a Pro, it’ll wipe out any comments and faves on the photo, so it’s not advisable.)

SmugMug could use a similar approach. Their Publish Service could be free for basic SmugMug users, with limited functionality, and it could offer full functionality to Power and Pro users. (I myself have the Pro membership.) I’d even be willing to pay a one-time fee to download and install the service, because I think the functionality would be amazing.

Standard
How To

Stop the headache – generate 1:1 previews before editing

One of my gripes with Lightroom ever since I started using it was the image blurring that took place as it generated image previews or re-rendered images while in Develop mode. (I started using LR in February 2007.)

It looks like Adobe listened, and the image preview rendering that takes place as I develop photos isn’t noticeable anymore — that, or my faster laptop has something to do with it, too. However, the very noticeable lag in generating either standard or 1:1 previews still occurs as I browse through images in my catalog, and that can’t be helped even by my zippy MacBook Pro. As you move through images, Lightroom will blur them until it generates a standard preview, then blur them some more you zoom in, until it generates the 1:1 preview.

Fortunately, there’s a solution for it. I’m not sure if this existed from the start, or if it was introduced in later versions of the software, but you can choose to generate 1:1 previews for a set of photos before you begin working with them. (I found this out thanks to this article from Steve Paxton at O’Reilly.) Just select the images you plan to work with on a given day, and go to Library >> Previews >> Render 1:1 Previews.

lightroom-generate-previews

If you choose that option, Lightroom will also render Standard-Sized Previews in addition to the full ones, allowing you to work with the photos right away, in standard or loupe view, with no lag or blurring (well, your computer’s specs might also have something to do with it). Still, if you’re sorting through a large set of images (hundreds or thousands), this pays off handsomely, in ways that you cannot even appreciate until you start popping aspirins to deal with the tension headache caused by all that screen blurring you could have avoided if you planned ahead.

If you’ve been a long-time subscriber to my site, then you may know about an article of mine written in January ’08, entitled “The next stage for Lightroom“. In it, I described the need for Lightroom to:

  1. Allow the storage of photos from its catalog on multiple volumes
  2. Allow people to work with photos from the catalog even when external volumes were disconnected
  3. Allow for the storage of the previews database (which can be very sizable) on an external volume, or for its splitting into two parts

Guess what? Most readers just couldn’t get what I was saying. But Adobe listened. Points one and two have already been implemented in later versions. Now I can store my photos on multiple volumes, and I can work with their meta-data even when I can’t access the image files because I’ve disconnected the external drives. As for the the storage of the previews, that’s now easily solved, too.

Because I’m now storing my Lightroom catalog on my laptop, where hard drive space is an issue, this means I have to limit the size of the previews database. I do this by giving it very little play. I tell LR to generate medium-quality 1024 px standard previews, and to delete 1:1 previews after a day. The previews database is no joking matter. Just a short while back, LR was set to discard 1:1 previews after a month, and my previews database had ballooned to over 60 GB!

lightroom-previews-settings

So, even though I allow myself the luxury of generating 1:1 previews for hundreds of photos, as you’ve seen above, the size of my previews folder stays manageable, and the free space on my hard drive stays where it needs to stay, because Lightroom cleans up after itself. Instead of worrying about free space, I allow my MacBook Pro to flex its processing muscle for 15-30 minutes before I dig into a large set of photos from a particular location, and then I can work undisturbed and headache-free for that day.

Standard
How To

Get the tiltshift look right from Adobe Lightroom

If you use Adobe Lightroom and want to apply a tiltshift effect to your photos, you can spend hundreds of dollars on expensive Photoshop plugins, or you can do it for free, with an Adobe AIR app called TiltShift.

If you’ve used TiltShift before, you know you can open any photo in it and apply tiltshift effects to it, but did you know you can do this right from Lightroom? Here’s how.

In Lightroom, open up the Export window and add a new Export Preset. See the screenshot below. I called mine TiltShift, so I can easily remember it. Adjust any of the settings, like color space, sizing, sharpening, etc. They don’t really matter, although it’s better to keep the image smaller so TiltShift can work faster with it.

The really important option is in the post-processing section — the very last one in the Export window. There, you’ve got to make sure you tell Lightroom to “Open [your photo] in Other Application…”, then click on the Choose button and browse to find the TiltShift app. This is pretty much it.

lightroom-tiltshift-setup

Lightroom will automatically pass your image to TiltShift, which will open it and allow you add tiltshift effects to it, to your liking. For example, I initially processed this image of a medieval water pump found on the streets of Medias, Romania, in Lightroom.

The old water fountain

Then I exported it into TiltShift using the export preset set up as described above, and adjusted the settings there to get the effect I wanted. This is how the controls and the image looked inside TiltShift.

tiltshift-screenshot

Once I did that, I saved the photo and uploaded it here. This is how the final image looks.

water-fountain-tiltshift

It couldn’t be easier, and again, let me remind you TiltShift is a free app.

[TiltShift home page] [Download TiltShift]

Standard
Thoughts

What's on my desk?

The idea for this post has been sitting among my drafts for a long time. I always thought it’d be a good idea to share how I work and what equipment I use, for the benefit of those of you that want to put together a similar setup. Let me make it clear that I’m not doing this to brag. I realize my equipment is fairly expensive and out of reach for some. Believe me, I’m keenly aware of its cost, and have made certain sacrifices in order to acquire it.

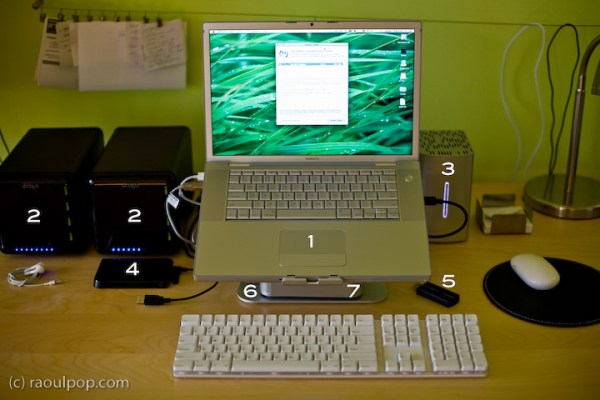
The hardware I have now is the best hardware I’ve had so far, and it allows me to easily develop for my clients, write for my sites, process my photographs and edit my videos and movies. See the photo enclosed below. Each important piece of equipment is marked with a number, and each number is explained in detail.

Here’s what you see above:

  1. 15″ Apple MacBook Pro: I love its dedicated 512 MB video card, and its design and speed. It allows me to focus on my work, not twiddle my thumbs while the computer plays catchup to my commands.
  2. Drobo: I have two of them. I store backups of my photos on one, and my videos on the other. Both of them are shared over my home network, so that my other Mac, a 20″ iMac G5, can access the videos and play them in Front Row.
  3. 2TB WD My Book Studio Edition II drive, running in RAID 0 (striped) mode: WD was kind enough to give me this drive as a gift of sorts, considering the significant problems I had with my 1TB WD MyBook Pro Edition II drive. I think they got tired of my complaining, and sent it to me to shut me up. Well, it worked. This drive has done great so far, and I have no complaints. I plan to write a review for it soon. I’ve been putting it through its paces so far, and it’s held up nicely. I connect it to my MBP through the Firewire 800 port, and I love the transfer speeds.
  4. 250GB WD Passport drive: I bought this last year, and it has been very useful. It’s small, stylish, and it’s powered solely by the USB port. I use it a LOT to transfer big files between computers.
  5. Turbo.264: a nifty little gadget built by the folks at Elgato, it speeds up H.264 conversions significantly. I’ve been putting this through its paces as well, and plan to write a review soon.
  6. mStand laptop stand: I love this stand, and reviewed it recently. It’s the best-designed stand for the MBP.
  7. newerTech miniStack v1: This is the first version of the popular miniStack drive enclosure. It uses PATA drives, and it has built-in FireWire and USB hubs (3 ports each). I use it as a USB hub, and it sits underneath my laptop stand — that’s why it’s not clearly visible in the photo. Both my Drobos are connected into it, and I have a spare USB port that I can use for my CF card reader, etc. If you want to have a better look at this enclosure, you can see it better in my Drobo review, where it appears in both the photos and the video.

As you can see, I aimed for simplicity in my setup. I wanted the most amount of processing power and hard disk space, in the smallest amount of physical space. You’re looking at about 5TB of storage in the photo.

Most of the heavy lifting (in terms of data crunching) happens on the WD Studio drive. I use it as a staging area for video processing, and transfer the finished, edited ones to one of the Drobos. I also use it to store and work with my Lightroom photo libraries. Working with photos in Lightroom from a Drobo is too slow for me, and the WD Studio Drive offers a visible advantage as I process each photo. I then back up my laptop and the WD Studio Drive to the Drobo through Time Machine.

You may recall I initially moved my photo libraries to one of the Drobos because I kept experiencing Lightroom library corruption and thought the WD Studio drive was at fault. As it turns out, Lightroom itself is to blame. Once your photo library reaches tens of thousands of photos (I have over 40,000 photos in one of my libraries), Lightroom will experience library corruption on a fairly regular basis. It’s just an unstable piece of software, and I hope that the next version will be better.

Just a quick note for those of you that noticed it. There’s a wire that runs behind the laptop, along the wall. The photo isn’t crooked, the wire is. I use it to hang small wires or notes to myself on it, and being loaded down with a few toward the center (which is only partially shown in the photo), it appears slanted. Sorry about that. It bothered me, but I wasn’t going to spend an hour or so in Photoshop cloning it out.

Hope this helped give you some ideas! If you have any questions, let me know.

Standard
How To

How to transfer photos between Lightroom catalogs

This screencast will show you how to transfer photos between different Lightroom catalogs, and it will go beyond that by also demonstrating how the whole process could be made a LOT easier if Adobe wanted to.

In the screencast, I refer to an article I wrote a while back, entitled “The next stage for Lightroom“, where I put forth a proposal for improving the way Lightroom stores photos, with an eye on catalog portability (laptops, for example). If you have the time, please read through that article after you see the video.

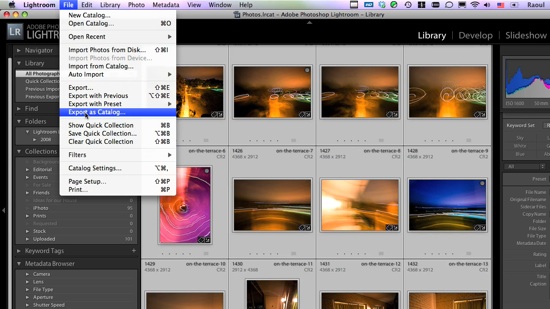
The video is about 10 1/2 minutes long, file size is 78MB, and it’s 720p HD, MOV. You can view it online by clicking on the screenshot below, or download it.

Standard