How To

Run WordPress by itself or cached?

I’ve been running an experiment for the past three months. I wanted to see how well WordPress would do if I ran it by itself, without any sort of caching. So far, so good.

About four months ago, my web server kept getting pummelled into the ground almost daily, and I couldn’t figure out why it kept happening. After researching the issue, I found the prevailing opinion to side with the need for a caching plugin. People were complaining that it’s just not optimized well, and must be run with the aid of such a plugin, otherwise higher levels of traffic will bring the web server down. Trouble was, I already ran my WP install cached, using WP Super Cache, had been doing so for over a year, and my server still went down. (I should specify it had only recently started to go down.) What was I to do?

I posted a message in the WP forums asking why WordPress doesn’t generate static files. Were there any plans to do so in the future? To my surprise, Matt Mullenweg (WP’s founder) replied to my post, and told me that while there are caching plugins out there, WordPress.com doesn’t run any, and they’re doing just fine hosting millions of blogs. Others chimed in as well, and their replies got me to make the following changes:

  1. Made the switch to a VPS (Virtual Private Server) with SliceHost. Four months later, I’m still very happy about that move.
  2. Doubled the RAM on my web server (to 512MB from 256MB).
  3. Turned off WP Super Cache and started running my site by itself.

Each step followed the other in succession. I wanted to make gradual changes so I could see why my server kept having issues. Switching to a VPS host was good, and it was needed, but for my traffic levels, it wasn’t enough. Doubling the RAM was good and it was needed, and while the new RAM is enough for now, I’d still be having problems if I didn’t also disable my caching plugin.

Here’s where I think the crux of the caching/non-caching issue lies: it has to do with the load placed on the server as cached versions of the pages get created. Normally, that’s a non-issue. But as I monitored my server carefully, I discovered that it went down only as it started to get indexed heavily by search engines. Their bots visited my site in spurts, with traffic peaking, then falling back down. They spawned multiple threads, over ten at times, following links and slurping up the content. It’s when bot traffic peaked that an incredible load was placed on the web server. It kept generating cached versions of pages it hadn’t already cached, RAM and CPU demand increased to unsustainable levels, and it went down.

No amount of tweaking the Apache and MySQL config files helped with this sort of scenario, or at least it didn’t help me. You see, the difference between peak traffic levels with search engines vs. people is that people will go to a single article or a group of articles that are in demand. A caching plugin works great for those sorts of situations. There’s a limited number of pages to worry about caching, and those pages get served up time and time again. The load is acceptable. When a search engine bot starts indexing your site, it’ll call up any and all available pages that it can find. That can place a huge load on the web server as it scrambles to serve up those pages and build static versions for the caching plugin. I believe that it’s too much for most medium-sized servers to handle, and they will usually go down.

In my case, disabling the caching plugin and making sure no traces were left in the .htaccess file were the only things that helped. Now, I might have up to four different search engine bots crawling my site, each spawning multiple threads, and my server will usually not go down. Sure, there are times when the server will get dangerously low on RAM, and will be unresponsive for 5-10 minutes, but that’s an acceptable scenario for me. And if I should all of a sudden get huge amounts of people traffic to a post, it’s possible that the web server will also become unresponsive, at least for a time. But the great thing about running WordPress by itself is that Apache will usually take care of itself. As the requests die down, Apache will kill the extra threads, the available RAM will go back up again, and the server will recover nicely. That wasn’t possible while I ran the caching plugin. When it went down, it stayed down, and that was a problem.

I realize that what works for me may not work for others. I have not tested what happens with WP Super Cache on a larger server, for example one with more RAM. It’s possible that the larger amount of RAM there will offset the greater demand placed on the server as it builds static versions of the pages, although I’m not sure what to say about the CPU usage. That also peaked as the caching plugin went crazy. Not sure how that’ll work on a more powerful server.

WP Super Cache has some options that allow you to cache more pages and keep them cached for longer periods of time. Perhaps fiddling with those options would have allowed me to keep running the plugin, but I wanted to see how things stood from the other side of the fence. Like I said, so far, so good. Caveats aside, running WordPress by itself was the cure for my persistent web server outages.


Standard
How To

A cure for cold sores

I can’t take credit for this cure. A life-long nurse told me about it a few years ago, and it’s worked for us ever since. I’m not sure if she’d be comfortable having her name revealed here, so I won’t do it. But I’ll always be grateful to her for the advice.

In a few words, cold sores are cured and even prevented by Lysine. Any brand should do. Just go to your local supermarket or drug store and pick up some Lysine pills. They’re white, round, medium-sized as pills go, and they’ll do a number on your cold sore.

I, for example, have had these things since my childhood. Whenever I got stressed, or ate too much sugared stuff, or happened to be recovering from a cold or some other illness and my immune system was down, I got a cold sore. I used to be terribly embarrassed about them, and I still am, to some degree. Sometimes I’d get them four or five times a year, and each one took about 2-3 weeks to go away completely.

Now, whenever I feel that tingle in my skin and know that one’s on the way, I take a Lysine pill. You can take up to 3-4 pills a day, just don’t take them all at once. It’s not a sure-fire, 100% kind of thing, but I would say the overwhelming majority of the time, the cold sore doesn’t even show up on the skin. It just goes away. And when it does manage to break out, taking Lysine while you have it will make it go away sooner.

I don’t know why other cures don’t work, particularly the useless brand-name cremes that cost upwards of $20 for a tiny little tube (they only make things worse for me) — but inexpensive Lysine does the job just great. For less than $10, you get a huge pill bottle that will likely last you more years than you’ll remember.

Standard
How To

Cannot change WP theme if Turbo mode is enabled

I’ve been wondering what sort of bug I’ve had in my WP installs for the last few weeks, and only now figured out what’s going on.The Turbo mode for WP is done through Google Gears. There’s a bug in the Turbo mode that will not allow you to change your blog’s theme. It works by not displaying the “x” (Close) or the “Activate …” options in the DHTML layer that opens up when you preview a theme.

Try it out if you want. Enable Turbo mode, then go to Design >> Themes and click on a theme that you’d like to preview and possibly activate. It’ll open as a full page instead of opening in a separate layer above the regular page, and the option to activate it will not display. In essence, you’re locked out of switching themes. You have to hit the Back button to get back to the Admin panel, else you’re stuck in a Live Preview mode.

This has nothing to do with file permissions, as I originally thought, or with corrupt theme files. No, it has everything to do with Turbo/Google Gears and the way WP implemented this. It’s a bug that needs to get fixed. The only way to enable theme-switching for now is to disable Turbo mode. After that, things work just fine.

This bug is present even in the latest WP version, 2.6.3. I hope it gets fixed soon.

Standard
How To

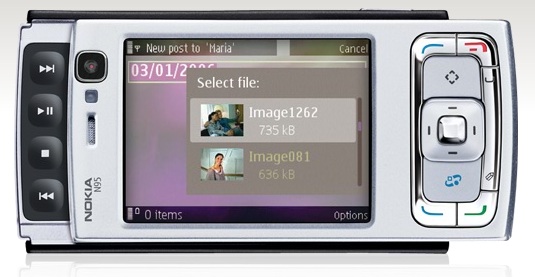
Use a Nokia N95 as a Bluetooth modem on a Mac

One of the reasons I bought a Nokia N95 was the ability to tether it as a Bluetooth modem on my MacBook Pro. I wanted to access the internet via my mobile phone if I’m away from home or from a WiFi spot. While Nokia’s PC Suite of applications includes an option to tether the phone to a Windows machine with just a few clicks of the mouse, it’s not that simple for the Mac.

Fortunately, once you go through a 5-10 minute initial setup process (outlined below), connecting to the net via the N95 becomes a simple matter of two mouse clicks. Keep in mind that this tutorial will help you configure a Nokia N95 phone only for the T-Mobile network; you’re on your own when it comes to other service providers, but the process should be fairly similar.

I’m indebted to this pre-existing tutorial from The Nokia Blog. However, I found the instructions a bit confusing, as the Mac OS X operating system has been updated since and the network preference screens don’t look the same. Consider my post an updated tutorial, with screenshots from the current Mac OS X (10.5.5).

1. Get the 3G modem scripts for Nokia phones from Ross Barkman‘s website.

Look for the section called “Scripts for Nokia 3G (EDGE/UMTS) phones”.

He’s written numerous such scripts and posted them for download on his site. They work fine for countless people, so please, if his script works for you, show your thanks by donating a few dollars to him.

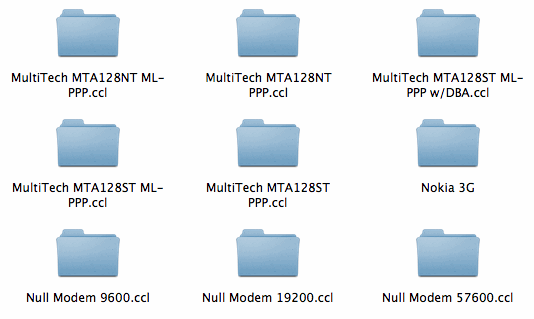
2. Drop the “Nokia 3G” folder containing the modem scripts (yes, the entire folder), in the /Library/Modem Scripts/ directory at the root level of your Mac’s hard drive.

It should look like this once it’s in there:

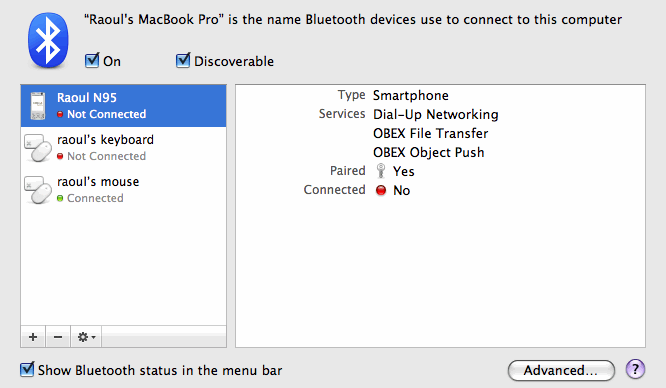
3. Add your Nokia N95 phone as a paired Bluetooth device.

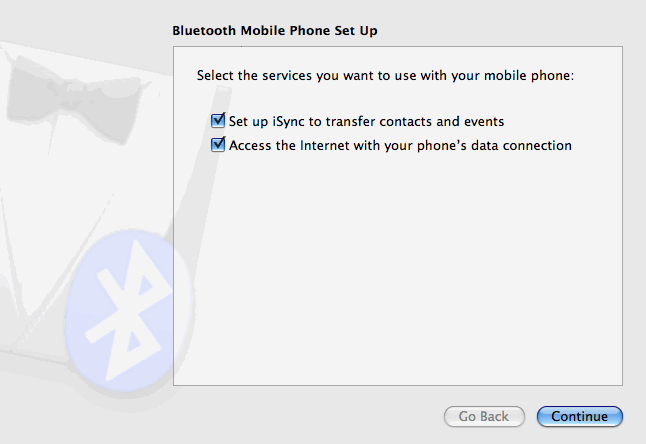
If you haven’t added your phone as a Bluetooth device yet, click on the plus sign in the lower left corner and go through the wizard to add it. Make sure to check both boxes shown below, and to pair it as well.

If you have already added it as a Bluetooth device, you may want to run through the configuration wizard again, making sure to mark both checkboxes, as seen below. Click on the phone to select it from the list of Bluetooth devices (see screenshot above), then click on the little gear icon in the lower left corner of the dialog box and select “Configure this device”. You will get the following screen. Click on Continue and run through the wizard to the end.

4. Configure the Bluetooth service preferences.

Go to Network preferences. Here’s where you have a choice. If you’re going to want to use multiple mobile phones or Bluetooth devices as modems, you may want to duplicate the existing Bluetooth service and configure each copy separately, naming them accordingly (Nokia N95, iPhone, etc). To do that, select Bluetooth, then click on the little gear in the lower left corner and select “Duplicate Service”.

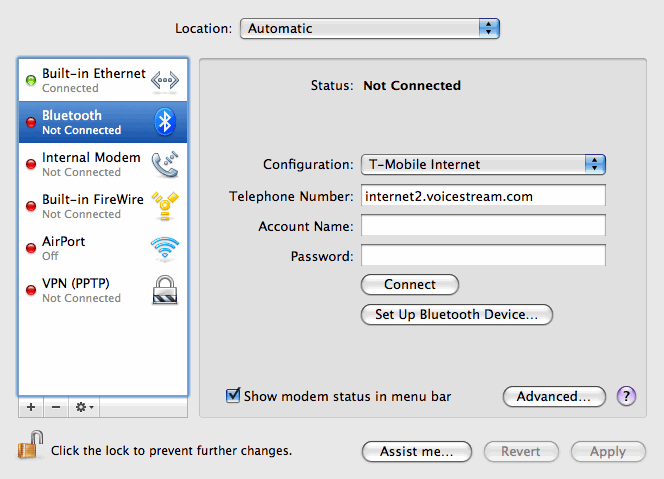
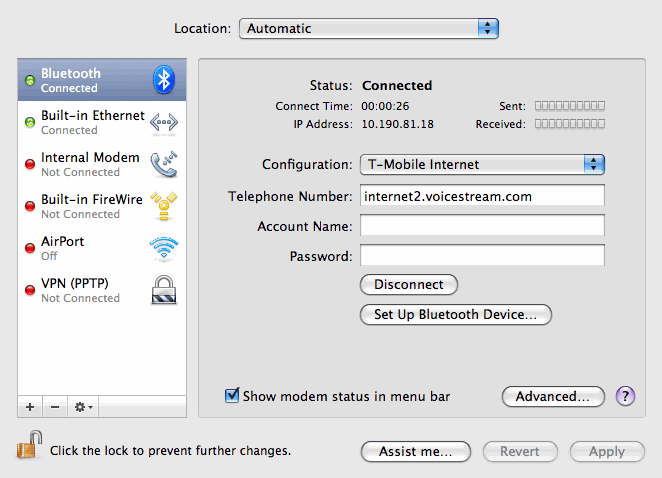
I’m only going to use the Nokia N95 as a Bluetooth modem, so I chose to work directly with the existing Bluetooth service, as you can see below. To do that, click on the Configuration drop-down menu and choose “Add Configuration”. You’ll be asked for a name. I named it “T-Mobile Internet”. In the Telephone Number field, I put “internet2.voicestream.com”.

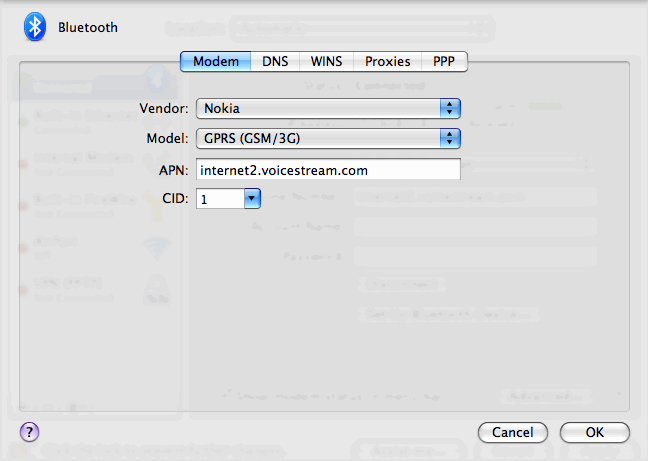
Now click on Advanced, and you’ll get a whole series of preference panes. Modem is the first one. Make sure the information matches what you see below.

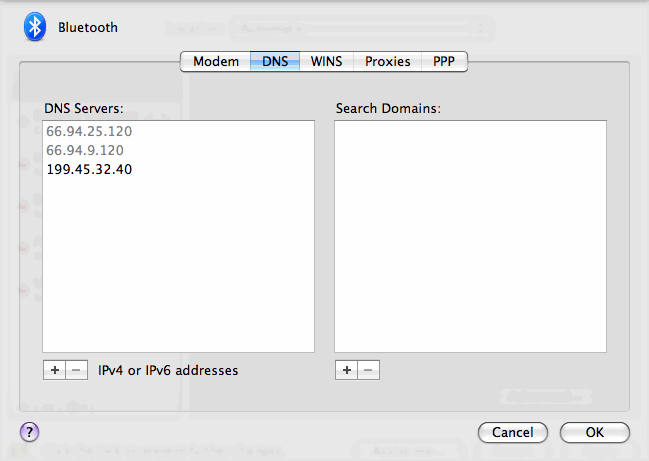
Now click on DNS. Some say you should pre-fill DNS server addresses, because your mobile service provider may or may not give them to you. Thankfully, T-Mobile will automatically assign you two DNS server addresses when you connect, but just to be on the safe side, grab one or two more DNS addresses from a public DNS server list like this one and add them to the DNS preference pane. If you look below, the two DNS addresses that are grayed out were automatically assigned by T-Mobile after I connected through the phone, and the single address in black was the one I manually added.

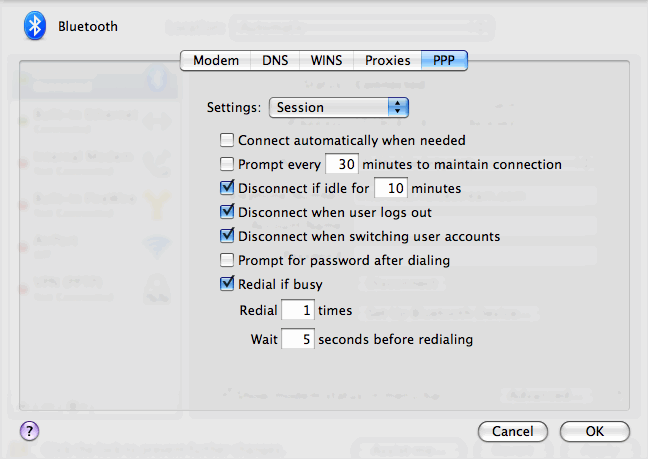
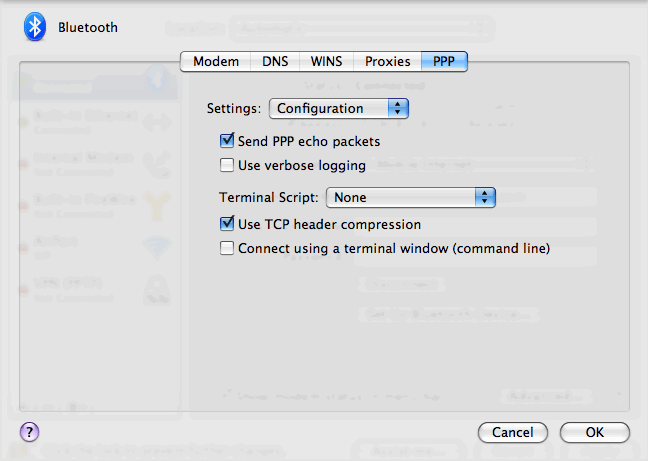
Don’t worry about WINS or Proxies, go to PPP, where you’ll have a drop-down menu. The Session options on the PPP preference pane should look like this:

And the Configuration options on the PPP preference pane should look like this:

Some people say you should disable “Send PPP echo packets” and “Use TCP header compression”. I left them enabled, and my connection works just fine. But, if you should have problems connecting and staying on, you may want to disable them. Just uncheck them and hit OK.

5. Apply the changes and click on Connect.

The Bluetooth modem status should change in the menu bar and first say “Connecting…” then “Authorizing…”. After it connects, it should show the time elapsed since the connection started, like this:

There’s one thing I haven’t been able to figure out though, and I would appreciate your help on this. Getting the Mac to connect to the internet reliably through the phone, every single time, is still something that I need to work out.

That first evening after I configured things as outlined above, I was able to connect and disconnect at will. However, the second morning, I got a “Could not authenticate” error. I clicked on the “Set Up Bluetooth Device” (shown above), and re-configured my N95 (as detailed in Step 3). After that, it was okay for the rest of the day, but the same connection issue re-surfaced the next day. I’d read that keeping iSync open while you connect will help, and I tried it, but it didn’t seem to work reliably for me. What has seemed to work is logging in and out of my account on the Mac, and rebooting the phone.

It seems that Nokia would be best equipped here to make things easier and more reliable. I do wish they’d release a tethering app for the Mac, just like they released an iSync plugin that lets the N95 sync with the Address Book and iCal. Until then, you can try any of the following workarounds when you experience connection issues:

  • Re-configure the phone as a Bluetooth device (as outlined in Step 3 above)
  • Disable “Send PPP echo packets” and “Use TCP header compression” in the PPP Configuration preference pane
  • Open iSync before you try to connect to the Internet through the phone
  • Log out of your account on the Mac and reboot the phone

Once the phone is tethered properly, it’s an enjoyable experience. There’s a newfound freedom I feel when I can go online from just about anywhere. There’s something elegant in using my phone as a Bluetooth modem. It can stay in my pocket or on the table next to my laptop, tethered wirelessly, still working fine as a phone while also letting me get on the Internet. Cool stuff indeed.

Standard
How To

Get the Nokia N95 for $390

I’ve been amazed by the capabilities of the Nokia N95 smartphone since I first heard about it in 2007. Its price though put it sadly out of reach for me, until a couple of days ago, when I saw it at Micro Center for $389.99. This is a new, unlocked Nokia N95 V3.

If you’ve been watching the price for this phone, like me, then you know that’s at least $60-70 off the lowest price listed anywhere else, if not more. When I search the internet, I still see it listed at some places for over $580.

Of course I bought one. You might want to do the same. If you find it for a lower prices somewhere else, let me know. Keep in mind this isn’t the new N95 8GB model. This is the older N95 that runs the 3rd edition of the S60 software, also known as V3. Btw, the specs say the max size for its MicroSD memory card can only be 2GB, but mine runs fine with a 4GB card.

Standard