“Easter Parade” is a veritable showcase of talent: Fred Astaire, Judy Garland, Irving Berlin, Ann Miller… need I say more?
There are many memorable scenes in this movie. One such scene is at the opening of the movie, where we see Fred, who plays Don Hewes, a famous dancer of his time, strolling through the streets of his town and buying gifts for his sweetheart, who is also his dancing partner. Happy as can be, he loads the arms of his gift carriers, while unbeknownst to him, his sweetheart is signing a contract and leaving their act. In this particular scene, Fred sees a rabbit he really wants to buy. Unfortunately, a little boy has sighted that same rabbit. Fred has to dazzle the boy with his dancing, and manages to draw his attention away to other toys – namely, drums. One can’t help thinking the boy’s mother would have preferred the rabbit! Nonetheless, Fred dances amazingly here. The absolute ease with which he dances still leaves me speechless.
To this day, I have not seen anyone dance as gracefully and as effortlessly as Fred Astaire, and this scene shows why. Every other tap dancer I’ve seen struggled through difficult movements, while Fred lightly tosses them at the viewer, nonchalantly, as if to say, “Look, it’s no big deal, I’m just enjoying myself…” Wow!
Ann Miller plays her usual role of hard-working girl, and her legs take center-stage in one of the movie’s big numbers. I think she manages to show her legs in most, if not all of the movies where she acts, but nowhere as prominently as in Kiss Me Kate (1953). I wonder if she wanted to do that, or the directors pushed her to do it. Peter Lawford also reprises his usual role of the time, that of the English pal, and does a great job at it, too.
Check out the trumpet player in the scene where Judy sings “That’s why I wish-igan I was in Michigan”. He can’t help smiling as Judy stands next to him. He’s starstruck, and it’s pretty funny.
In the scene where Fred tests out Judy as his dancing partner, Judy quips “I’m never sure” when he asks her whether she knows her left foot from her right, then goes on to explain why. When she was little, her doctor advised her family to force her to write with her right hand, even though she was left-handed. You might think that’s just a funny line, but it’s true, and it really wasn’t that funny for the children who were beaten and forced to use their right hands.
Another truly funny scene is when Fred asks Judy (the future “Juanita”) to walk ahead while on the street, so he could see whether men would notice her. The poor Judy tries saying hello to them, only to be ignored ruthlessly, until she makes the funniest face! Suddenly, everyone takes notice of her! To me, this is one of the most hilarious movie moments ever, and ranks right up there with the face that Cary Grant makes in the ending scene of Charade (1963).
Their first dance together as Hewes and Juanita is a disaster, and is worth watching for the wonderful counterpoint that it presents. There’s Fred, being truly professional, looking great, and thrown constantly off balance and out of poise by Judy’s confused prancing. And let’s not forget the flying feathers! The stage is filled with them. Judy ends up looking like a mad mother hen, turning out and looking for her chicks, while Fred, the elegant rooster, is ignored and stepped on. Wonderful, just wonderful!
I couldn’t find out the name of the frustrated head waiter at the restaurant featured in the movie. He’s snubbed not once, but twice, by Fred, Ann Miller and Peter Lawford, when they leave the restaurant without dining. His facial expressions and gestures are great fun to watch.
Fred’s “Steppin’ Out” number is the most interesting and difficult one in the movie. Besides the coreography, which is complicated enough, Fred does something amazing here. When you watch the scene, you wonder why it’s raised by about 2 inches halfway down its depth. Fred and the dancers have to watch out for that ledge, and it just doesn’t make sense, until something amazing happens at its end. The camera angle changes suddenly, and Fred starts moving in slow motion while the dancers in the background continue through at a normal pace. It is then that we realize the raised floor was used to delineate between the two shots, which were superimposed to create this wonderful effect. Today, this might not seem like much, but back then, this was amazing stuff. It’s similar to the special effects used by Fred in the Bojangles dance of Swing Time (1936).
Finally, it’s wonderful to watch the Fred and Judy’s vagabond dance. They’re dressed in the funniest outfits, and they play the roles of two “well-to-do” tramps who would like to make it to the town’s upper crust social events, but have no transportation. Ligia and I were rolling in laughter on our couch as we watched this. Judy’s got the ugliest wig, and they both have one of their front teeth blacked out. Come to think of it, it reminds me of Cary Grant’s wig in I Was a Male War Bride (1949). It does my heart good to see a number like this. It’s just wonderful!
Easter Parade is a wonderful movie, made memorable by the amazing coreography, music, and the chemistry between the actors who play in it – all true masters of their craft.
(This review has also been published at BlogCritics.)
The TV show “Mister Ed” is my perennial favorite. My wife and I love it, and we watch it regularly. I was thrilled to discover that Mr. Young had written a book about the history of the show – and also included a short autobiography. The book proved to be a wonderful read. I couldn’t put it down until I finished it! Mr. Young revealed himself to be the same nice person in real life as in the TV show. I highly recommend buying this book. If you do, get it directly from Mr. Young’s website, where you can get an autographed copy!
Ligia and I have recently downsized our living room desk. We used to have a big, bulky desk, and now we’ve got a secretary desk. It’s very beautiful, but it also has much less space than the previous desk, and no integrated cable management whatsoever. What to do? With about $8 of stuff from Home Depot (including plastic ties), I’ve modified the desk to allow us to manage our computer cables in a practical way. The end result and the steps are described below, with photos (click on the thumbnails to enlarge). It took about 45 minutes, but it’s worth it!
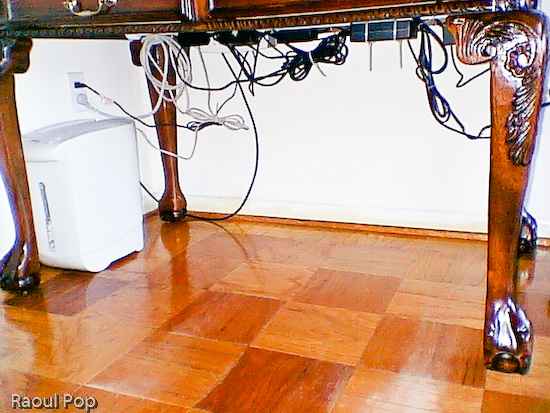
This is how our desk looks after the modifications. Notice how there are no annoying cables and wires on the floor. We can move the desk if needed, and we can easily vacuum underneath. It’s a joy!
So, what did I need to be able to do? First, I needed to fit the following pieces of hardware on that desk:
iMac G5 plus keyboard/mouse
Two stackable backup hard drives
Our PVR (we love it!)
The mixing board for our podcasts
Lamp
Various other paperwork and things
Printer (I know it sits beside the desk, but I include it since the cables still have to be managed under the desk)
First, I needed to drill a hole for the iMac cable. I debated its location for a while, but decided on the left hand side, for various reasons:
There’s a bookshelf behind the computer
There are drawers which couldn’t have opened because of the wire
If I put it in an easily accessible location, I can use that to route other cables up, like the one for my cellphone charger.
Here is a photo of that cable hole, which I drilled using a readily available drillbit. I stained it at its inside edge so it would match the color of the desk.
The next step was to cut a piece of white painted pipe (which I bought for something like $2) to the width of the desk, and mount it to the inner sides with two plastic pieces that cost me about $2 each. I used some wood screws I already had. Then I took some assorted cable ties which I’d bought in bulk, and secured the cables to the bar, as shown in the photo below. You can probably get a package that’ll suffice for a job like this for under $2.
Notice how I mounted the surge protector to the inner side of the desk. Again, I used wood screws that I left half-screwed. The surge protector had holes just for this purpose on its back, and it was a matter of measuring the space between them and putting the screws in the wood at the right length. It hooked right on.
I secured the cables to the pipe with the plastic ties after folding the cables nicely, so they wouldn’t dangle needlessly. Notice I left a bit of slack for those cables I’d need to pull. There are few things more annoying that setting everything up perfectly then discovering you need to move a piece but can’t because the cable’s too tight.
A couple of additional things: I also needed to put a paper shredder underneath the desk. I was able to accommodate it just fine. I also routed the coaxial cable along the wall, and to the PVR with the aid of a little cable tie that I screwed into the wall with a drywall screw.
Here’s the end result. Notice that none of those cables are trailing on the floor. I can’t stress the convenience of such a setup enough. It’s a real pleasure to work at that desk now, and it’s also very easy to keep the floor clean.
Updated 9/21/12: Since I wrote this article, I also made a video where I go through a typical wet shave with a DE safety razor.
You may also enjoy this post, where I talk about how my shaving habits have evolved over time, or this post, where I talk about the current range of shaving products.
Now back to the original article…
For First-Time Shavers or Those With Sensitive Skin
I’ve wanted to write an article about shaving for some time, but didn’t get around to it until now. In a society where shaving products can be found virtually everywhere, there is a surprising paucity of resources about just how one should shave. I recognize shaving is a very personal and thus, a subjective experience, but someone ought to iterate some useful advice gathered from their experience. For me, I know the advice I give in this article would have been a real gold mine, and would have saved me from needless and countless pain and irritation. I think shaving ought to be an enjoyable experience. After all, most men have to do it about every day, and when you do something that often, it shouldn’t be a source of pain. With these thoughts in mind, let’s proceed.
Shaving Utensils
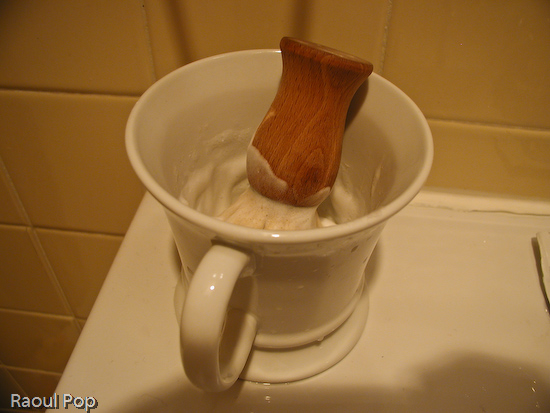
I prefer to use the old-time shaving soap and a shaving mug, but you don’t have to. I enjoy whipping up the lather every morning. It’s my little shaving ritual, and it helps me get ready to shave. If you’re interested, get a good brush, preferably one made of badger hair.
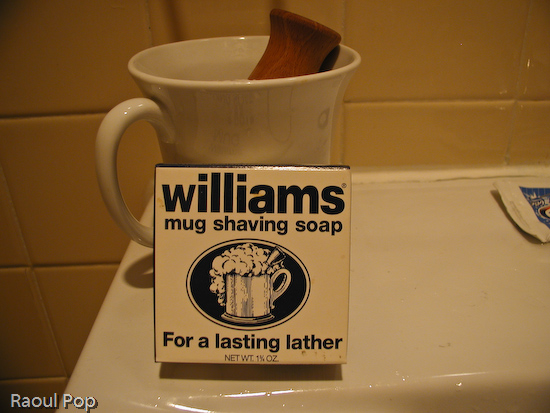
I use Williams Mug Shaving Soap. I tried the Colgate brand a while ago and it’s alright, too. Warm up the mug by running it under hot water, then moisten the soap and the brush with hot water as well. Rub the brush over the soap in a circular motion until you build up a good amount of foam. It should be solid foam that can stand on its own, not the soft bubbly type you get from regular soap when you wash your hands.
If you’re going to use shaving lotions or gels, then I recommend picking one that’s gentle to the skin and has moisturizers. Avoid the lotions that make your skin tingle, they’ll irritate your face if it’s sensitive, and the shave may hurt more. I don’t have any specific recommendations, since I seldom use them.
To shave, I use a Gillette Mach 3 razor. I realize Gillette will come out with newer models as time goes on, so don’t think you have to stick with this model. Find what works for you. Personally, I find the Mach 3 razor strikes a good balance between a close shave and a concern for those with sensitive skin. The only problem I’ve found is that if I don’t gently angle up the blades as I shave my moustache, it’ll leave some hairs at the base of my nose, so you may want to watch that if you use this product.
I also find the single-blade razor useful for troubleshooting purposes. What I mean is that I use that once in a while to see where my shaving technique needs improvement. The areas where I cut myself or irritate my skin needlessly is where I’m probably not using correct technique. I’ll discuss shaving technique in just a bit.
If you are experiencing a high level of irritation during your shaves, you might want to start working on your technique by using one of the BumpGuard razors. They’re marketed toward African-Americans, who are more prone to develop bumps from ingrown hairs, but they work great for those with general irritation as well. I actually keep a couple in my bathroom cabinet all the time, and use them once in a while to give my face a break from the Gillette razor.
I don’t recommend the use of electric razors, although I’ve used them for years. They irritated my face, in particular the Norelco razors, which pull on the hair as they shave it. I suppose that works for some men, but for me, it was sheer pain. I used a waterproof single-foil Panasonic razor for some time, with okay results, and then I purchased a dual-foil Braun razor (fairly expensive). It gave me poorer shaving results than the Panasonic, which was half the price of the Braun. At any rate, I experienced varying levels of irritation no matter which electric razor I used, and my neck would tingle and feel painful to the touch all day long.
Now, what about aftershave? I use something very simple: Witch Hazel. It works great for me, and I can get a large bottle for the same price as an after-shave lotion. It works great year-round, but I also use a moisturizer during the winter months, because my face gets dry. You may be in the same boat.
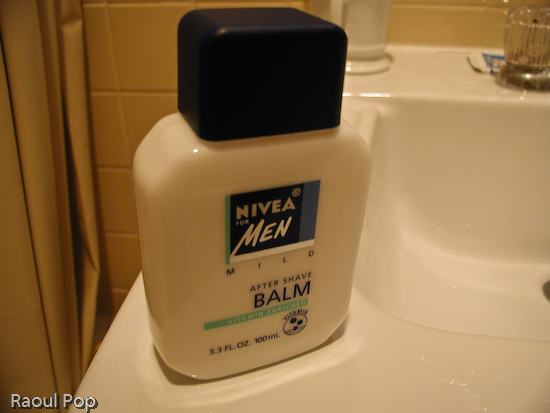
I also use the new (or fairly new, anyway) Nivea Men After Shave Balm. It’s pretty good. If you really want to moisturize your face though, I recommend the plain Nivea Creme (not pictured). It’s thick and harder to apply, but boy, does it moisturize! It virtually winter-proofs your face.
Shaving Technique
Here’s where things get dicey, if not done right. They talk about proof in the pudding… well, the proof is going to be on your face. It will show you if you’ve done things right or not. I really believe that! Let me give you a little background so you can see why.
I thought I was incurably sensitive to shaving, and that I would always have to deal with serious irritation and even bleeding every single time I shaved. This wasn’t bleeding from cuts, although I had those once in a while, too. This was generalized bleeding at the site of irritation. Little drops of blood would start appearing on large areas of my neck or on the sides of my jaws, areas which were particularly sensitive. I struggled with this for years. I saw family doctors and dermatologists, and about the only advice I could get out of them was to shave less often (not much of an option when you’re trying to maintain a neat appearance) or to try the BumpGuard razors.
The last bit was definitely good advice, and it started me down the right path. I went out and purchased some, and couldn’t believe the difference it made the first time I used them. I had no generalized bleeding, although I did have some little cuts, and significantly less irritation! The shave wasn’t as smooth, but the lack of bleeding more than made up for that. I realized I was onto something, and maybe there was hope for me. If you’re in the same boat, read on to see what I did.
I started looking all over the Internet, and found numerous sources that talked about some of the following useful things, but to my knowledge, none had a complete set. I’ve compiled a list of what I found here:
Moisten your facial hair with warm to hot water before shaving. Don’t just wet your face with warm water, take handfuls of water and splatter them on your face. Your stubble should be soft to the touch when it’s properly moistened. If it helps you do it right, use a facial towel that you’ve held under hot water. Keep that on your face and neck for about 30 seconds. Even better, take a shower and shave afterwards.
Use a new blade, not an old, dull blade. If you’re using disposable razors, a cartridge will last you about a week for optimum cutting, give or take a few days, depending on your facial hair and technique. That’s not a lot of time, so have plenty of cartridges on hand.
Shave with the hair, not against it. This is key, especially on the neck or underneath the jaw, where hair doesn’t run straight down, but to the sides or even upwards (at least it does so on my face.)
Rinse with cold water. Don’t use ice-cold water, but use room-temperature water, and rinse off the soap thoroughly. If you leave some traces of soap on the face, it’ll itch and irritate your face. Ice-cold water will dry your face, and it’s also an un-needed shock.
Use a good after-shave. The key here is to use something. I used rubbing alcohol in the past, with good results. My grandfather uses that all the time, and his face looks great after shaving. I now use witch hazel, it’s a little gentler than the rubbing alcohol. In cold seasons, use a moisturizing lotion as well. See section entitled “Shaving Utensils” above for more details on this.
This is all good advice, and I encourage you to follow it. The thing is, I did most of these things, or at least I thought I did, and I still had serious problems shaving. So, what solved it for me? To the list above, I would add the following pieces, and this is what I’ve found to make the difference:
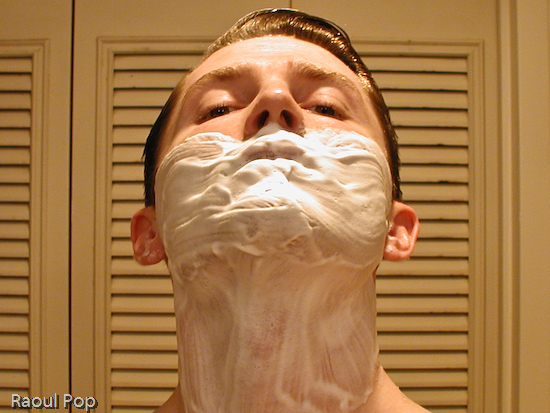
Apply the shaving lotion properly. Build a good amount of foam on your face. If you’re using soap, rub that brush in circular motions across your face until the foam is solid to the touch, like whipped cream. See the photo to the left for an example. Leave joking aside for a second and look at the way I’ve applied the soap. You want to make sure you’re properly covering your face. If you’re using a shaving lotion or gel, don’t assume that just because you’ve quickly applied it to your face you’re good to go. Really rub it on until the gel turns into solid foam. Even nowadays, I find that when I don’t build up the foam to a proper consistency, I’ll get irritated.
Let the blade do the cutting. Don’t apply extra pressure with your hand. Apply only enough pressure to move the blade across your face, not more. If the blade is new and sharp enough, it’ll do the job just fine. If you get into the habit of applying more pressure, you will – I repeat, you will – irritate your face, and induce bleeding. I was guilty of this myself.
Use small, fairly quick strokes, not large, long and slow ones. This is really important. It’s when you use the long strokes that you inadvertently cut your hair against the grain, or induce cuts in the skin, or shave off some skin beside the hair, causing irritation. If you use small, measured strokes, it works out just right. You don’t get irritated, and you can control the blade better. I know they always show these models on TV shaving the entire length of their neck with one stroke, but that’s only for show. It’s misleading. Don’t go by it! Trust me and use small, measured strokes. You’ll see the difference.
Rinse the blade often so it’s clear of foam and hair. This may seem like a minor detail, but it will pay off. If the blade is clean, you don’t have to guess to know how close it is to the skin. You know how much pressure you need to apply. If there are hairs trapped between the blades, you will drag those hairs across your skin as you move the blade, increasing your chances for irritation.
Replenish the foam by re-applying it in those areas where it’s dry or thinner. There’s no shame in re-applying foam to your face. You won’t fail Shaving 101 if you can’t finish shaving before the foam dries off, and it will dry off in just a few minutes. Don’t feel bad, it’s normal. Just wet the brush again, work up some foam, and re-apply. If you don’t, and you shave over thin or dry foam, you will certainly get irritation. It’s a given!
Alright! If you’re following these steps correctly, you should get a nice, clean shave, like the one pictured below. If you still have problems, you need to go back over the pieces of advice I’ve given you. If at any time you start experiencing irritation or bleeding while shaving, it’s very likely that your technique has deteriorated. You might want to give your face a break by using a BumpGuard razor for a few days, and it wouldn’t hurt to use a single-blade razor so you can pinpoint the zones where you’re not shaving properly. Wherever you get cuts and irritation, that’s where you’ve got to improve.

 “Easter Parade” is a veritable showcase of talent: Fred Astaire, Judy Garland, Irving Berlin, Ann Miller… need I say more?
 (1994, St. Martin’s Press, New York)