How To

My own sort of HDR

I’ve been intrigued by HDR (High Dynamic Range) post-processing for some time. At its best, it renders incredible images. At its worst, average, and even good, it renders completely unrealistic, overprocessed, unwatchable crud. Even some of the best images made with HDR methods seem weird. They’re not right — somehow too strange for my eyes. But, I did want to try some of it out myself and see what I’d get. The challenge for me was to keep the photo realistic and watchable. I wanted to enhance the dynamic range and color of my photos in an HDR sort of way. I also didn’t want to sit there with a tripod taking 3-5 exposures of the same scene. As much fun as that sounds, I don’t always carry a tripod with me.

By way of a disclaimer, I have not researched the production of HDR-processed images thoroughly. I have, however, seen a boatload of HDR images on both Flickr and Zooomr. I did read the tutorial that Trey Ratcliff posted on his Stuck in Customs blog. Of course, we all know Trey from Flickr, where he posts some fantastic HDR images on a daily basis. So, given my disclaimer, realize I don’t say I’m the first to have done this. I’m just saying this is how I worked things out for myself. If indeed I’m the first to do this, cool! If not, kudos to whoever did it before. I’d also like to encourage you to experiment on your own and see how things work out for you. Change my method, build on it, and make something even better. While I’m on the subject, I’m not even sure I should call this processing method HDR. It’s more like WCR (wide color range). What I’m really doing is enriching the color range already present in the photo while introducing new color tones.

When I started, I experimented with Photoshop’s built-in Merge to HDR feature. Using Photoshop, after a few non-starts that I deleted out of shame, I got something halfway usable. Have a look below.

Brook and rocks

Here’s how I processed the photo above. I shot three exposures of that scene in burst & bracket mode, handheld (no tripod), in RAW format. Then, I darkened the low exposure, lightened the light exposure, and exported all three to full-res JPGs. Used Merge to HDR in Photoshop, got a 32-bit image, adjusted the exposure and gamma, converted to 16-bit, adjusted exposure, gamma, colors, levels, highlights, then smart sharpened and saved as 8-bit JPG. It came out okay — not weird, at least not too much, anyway, but still not to my satisfaction. I should mention I also used a sub-feature of the Merge to HDR option that automatically aligned the images. As I mentioned, I shot handheld, and there were slight differences in position between the three exposures. Photoshop did a pretty good job with the alignment, as you can see above. It wasn’t perfect, but definitely acceptable.

I know there are people out there saying Photoshop doesn’t do as good a job with HDR as Photomatix. It’s possible, although I got decent results. Maybe at some point in the future I’ll give Photomatix a try, but for now, I’m pretty happy with my own method — see below for the details.

But first, what’s the point of HDR anyway? When I answered that question for myself, I started thinking about creating my own (WCR) method. The point as I see it is this: to enhance the dynamic range of my images. That means bringing out the colors, highlights and shadows, making all of the details stand out. Whereas a regular, unprocessed photo looks pretty ho-hum, an HDR-processed photo should look amazing. It should pop out, it should stand out in a row of regular images. It should not look like some teenager got his hands on a camera and Photoshop and came up with something worthy of the computer’s trash bin. As I’ve heard it from others, the standard way to postprocess a scene in HDR is to take 3-5 varying exposures, from low to high. Those exposures can then be combined to create a single image that more faithfully represents the atmosphere and look of that scene.

But, what if you don’t have a tripod with you? Can’t you use a single image? Yes, you can shoot in RAW, which is the equivalent of a digital negative, and good HDR software can use that single exposure to create multiple varying exposures, combine them and create an image that’s almost as good as the one made from multiple original exposures.

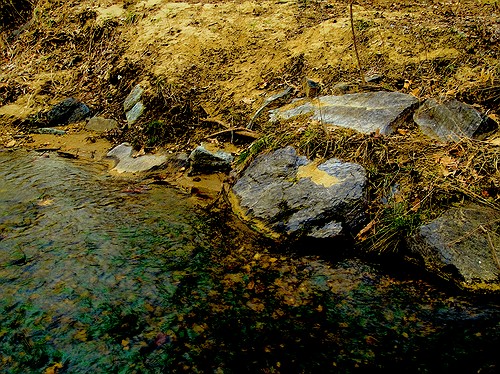
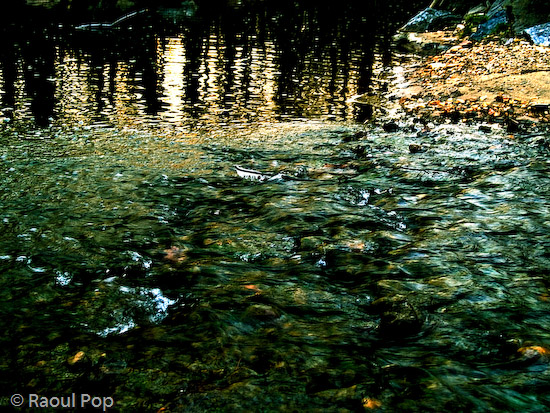
What if you want to make your own HDR/WCR images, in Photoshop, all by yourself? I wanted to do that, and I think I arrived at a result that works for me. Here’s what I did. I took a single exposure of a brook in the forest, which you can see below, unprocessed.

Brook, unprocessed

There’s nothing special about this photo. It’s as the camera gave it to me, in RAW format. The colors are dull and boring. There’s some dynamic range, and the color range is limited. It’s all pretty much made up of tones of brown. I took this single exposure, converted it to full-res JPG (but you don’t have to, you can use the RAW directly,) put it in Photoshop, created three copies of the original layer, called them Low, Medium and High, then adjusted the exposure for Low to low, left the exposure for Medium as it was, and adjusted the exposure for High to high. Then I set all of them to Overlay mode. (The original JPG, preserved in the Background layer, was left to Normal mode and was visible underneath all these layers.) The key word when talking about exposure here is subtle. Make subtle changes, or you’ll ruin the shot.

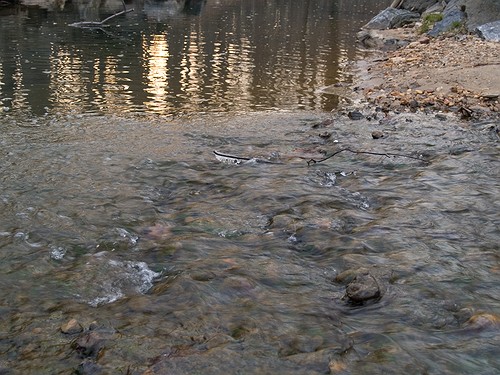
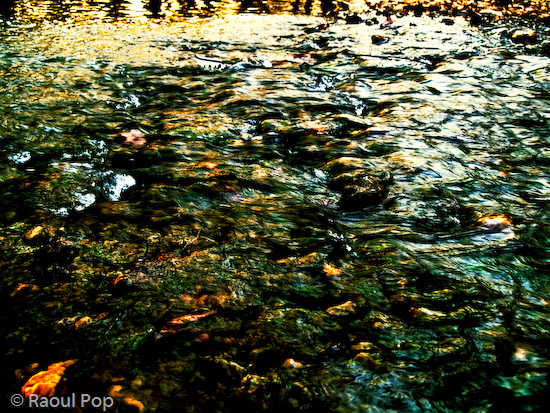
As soon as I adjusted the layers and changed them to Overlay, things looked a lot better. The dynamic range was there, it just needed to be tweaked. So I went in and adjusted the individual exposures for each layer some more to make sure parts of the photo weren’t getting washed out or ended up too dark. Then I threw a couple of adjustment layers on top for levels and colors. Finally, I duplicated the three layers and merged the duplicates, then used the smart sharpen tool. The adjustment layers were now on top of it all, followed by the merged and sharpened layer, and the three exposure-adjusted layers, which were no longer needed, but I kept them in there because I like to do non-destructive editing. Here’s the end result, exported to a JPG.

Brook, processed

This is the sort of post-processing that pleases my eye. The details were preserved, the colors came out looking natural yet rich, and things look good overall. Even though some spots are a little overexposed, I like it and I’m happy with it. Let’s do a quick review. Using my own WCR/HDR-like method, I accomplished the following:

  • Used a single RAW/JPG exposure
  • Didn’t need to use a tripod, could shoot handheld
  • Didn’t need special software, other than Photoshop
  • Achieved the dynamic range I wanted
  • The photo looks natural, at least to my eyes
  • The post-processing was fairly simple and took about 30 minutes

There is one big difference between my WCR method and the usual HDR post-processing. Done right, the latter will help bring detail out of the shadows. Because of that single or multiple exposure done at +2 EV or more, spots that would normally be in the dark in a regular photo can be seen in HDR. Not so with my method. Here the darks become darker. The atmosphere thickens. The highlights become darker as well. The whole shot gains character, as I like to call it. So this is something to keep in mind.

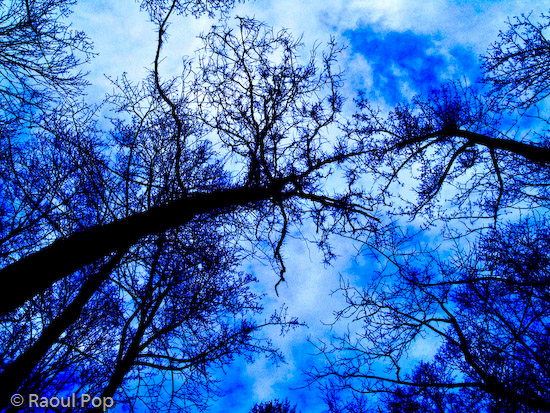
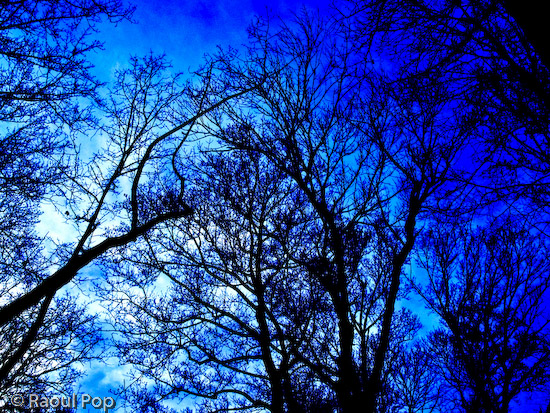
Just to clarify things, the image above was the first result I obtained using my method. There was no redo. I then processed some more images, and got a little better at it. It’s worth experimenting with the Shadow/Highlight options for each individual layer. It helps minimize blown-out spots. It’s also very worthwhile to play with the Filter tool for each layer. This really helps bring out some nice colors. It’s sort of like taking three exposures of the same scene with different color filters. The results can be stunning if done well. You also don’t need to use three overlays. It all depends on the photo. Some photos only need one overlay, while others need four or five. Subtle changes in exposure can help bring out areas that are too dark. You can see some photos below where I used my own advice.

Brook, take two, processed

Meeting of the minds

Parallel lines

There you are

I hope this proves useful to those of you out there interested in this sort of post-processing. It’s my dream to see more natural and colorful photos, regardless of whatever post-processing method is used.

Standard
How To

10 tips for taking better photos

Church

In a recent post about winnowing my own photos, I mentioned briefly that I’m tired of wading through mediocre photos on online sharing sites in order to arrive at the good ones. While that’s true, it’s not nice to criticize without offering a solution. This quick tutorial is my proposed solution. I really hope it helps people take better photos.

This advice is meant for the 80% of people out there who own a camera and pick it up once in a while to take photos at an event or during a trip, without much thought about composition, aperture, shutter speed, lighting and other such things, but merely with the desire to capture the moment. I know from personal experience that many of these same people are disappointed when they get home and download the photos to their computers. Why? Because their photos are out of focus, or too bright, too dark, colors are too light or off, etc. These people end up thinking that’s just the way things are, and they shouldn’t expect better photos. But they’re wrong! By doing a few simple things, the appearance of their photos (and your photos) can improve dramatically.

So what makes me qualified to offer photography advice? I’ve been photographing places, nature and people for more than 15 years. I too was a casual photographer for a large portion of that time, and when I couldn’t stand my own terrible photos any more, I decided it was time to improve. What I know, I learned on my own and from various books and many articles that I’ve read over the years. I practice the advice I give below, and know it works. My photos improved dramatically when I started to shoot digital, because I could shoot a ton of photos and learn much faster what worked and didn’t work.

Here’s what you can do (and this applies in particular to the smaller digital cameras):

  1. Hold the camera steady. I know it’s difficult to do with a tiny little camera, but use both hands. Grab the corners of the camera, or put your palm or side of the hand underneath the camera to support it as you take the shot. If you hold the camera casually, you risk moving it up and down as you press the shutter button. I know you are tempted to take shots with one hand when you use your camera, but if you don’t hold your hand rock-steady, you’ll likely get a blurry shot. (Yes, some of the cameras nowadays have image stabilization, but it’s a good idea not to rely on it entirely. You’ll find its effect is limited.)
  2. Don’t stick your fingers in front of the camera. Your camera has a lens. It uses that lens to look at the world, and capture the images it sees when you tell it. If you stick your finger in front of that lens, or worse, keep it right over the lens, don’t be surprised with the results. And if you’ve been wondering just why your photos always come out blurry, you might want to check how you hold the camera. There might be an autofocus sensor under that finger of yours. That sensor needs to have an unobstructed view of the subject, so it can measure the distance properly and tell the camera how to focus. Some cameras also have a separate light sensor that measures ambient light. When your finger’s on it, it’s in the dark, and so is your camera. Daylight shots will come out completely washed out, because the camera thinks it’s dark and exposes the sensor/film too much.
  3. Clean that lens. I know you like to hold your compact camera in your hand or in your pocket. And if you have kids, they like to play with the camera as well. Have you ever looked at your lens? It’s probably full of muck and fingerprints. Clean it. Use a damp soft cloth, or even better, a lens cleaning kit, which comes with cloth and special solution. It’s inexpensive, and does wonders!
  4. Set your camera’s mode dial to P. That is, if your camera has a mode dial. Don’t set it to A, which you might think stands for Automatic, but actually stands for Aperture Priority, and don’t set it to S or M, which stand for Shutter Priority and Manual, respectively. Set it to P, which stands for Point and Shoot. That way, the camera does its thing and you only need to worry about pressing the shutter button.
  5. Get familiar with your camera’s scene modes. I know most of you are used to just turning the camera on and pressing the shutter button, and you might or might not have wondered what certain icons on your mode dial or in the camera menu meant. Well, if they look like people, or flowers, or mountains, they’re scene modes. They adjust the camera’s settings so you can take better photos in those situations. It’s kinda like shifting into a lower gear when you descend a mountain. You know, you’re used to putting your car in D, and you never think about those other numbers, like 2 and 1, that you also find on your automatic drive. But you find out really fast that if you shift your car into 2 or 1 as you go down a hill, you have to use the brake a lot less. It’s the same with your camera. It’ll work without the scene modes, but it’s a lot easier when you use them. So take out the manual if you can find it, or download it from the camera’s website, and look up the instructions for scene modes. Learn how to switch to Landscape mode when you’re shooting mountains, or into Portrait mode when you take photos of people, and into Macro mode when you photograph flowers or other objects at close ranges. Other cameras have scene modes for cloudy days, for the beach, for snow, etc. Use them, they’ll make your photos much better!
  6. Walk, don’t zoom. When you can, try walking closer to the person or object that you want to photograph. When you use the zoom, any little shake of the camera affects the sharpness of the photo. Oftentimes, the photo will come out blurry if you take a tele shot with a handheld camera. Getting closer to your subject really, really helps! And for goodness’ sake, don’t use the digital zoom feature, it’ll suck the quality right out of your photographs.
  7. Frame the shot. Don’t just take that camera out of your pocket and snap away at everything you see, hoping you’ll get some decent shots. Plan those shots if you want them to be good. It only takes a few seconds to frame the subject on your camera’s screen or viewfinder. Look at the screen. Do you like what you see? If you don’t like it, don’t take the photo, try a different angle/position. If you’re taking a photo of a person, it’s really boring to have them in the center of the shot. Move the camera slightly so they’re off-center. You’ll be surprised at how much better the photo will look. While I’m on the subject, I can’t tell you how tired I am of seeing photos of grinning people in front of buildings or monuments. Have your subjects do something interesting, like look at the building. Take the photo from the side. Or take a candid shot, while they’re looking at something else, with the object of your desire (building, monument, statue) in the background. It’s much more interesting that way. If you’re taking a photo of a well defined subject like a flower, a car or a person, don’t cut them off in ways that make them look strange. It’s usually better to get all of that object in the photo and crop later. As you get more experienced, you can start to experiment, but as they say, you must know your ABC’s before you can read…
  8. Know your camera’s limitations. I don’t mean you should be able to quote the specs back to me, but know the basics. Does it take good shots in the dark? If it does, great. If it doesn’t, don’t expect to get good shots in the dark, particularly as you get farther from your subject(s). Realize that the built-in flash can only do so much, and in the dark, even at twilight, your shots aren’t going to be all that great. They’re either going to be too dark (if you’re far) or too washed out (if you’re too close,) or they’ll be blurry because someone in that shot moved, or your hand moved, etc. How long does it take from the time you press the shutter button to the moment your camera takes the shot? Realize you need to account for the focus time as well, and different cameras have different focus times. With some cameras, there’s a delay of over a second until they take the shot. They have to focus, then they take additional time to activate the shutter and store the shot. You can’t just press the button and expect a great shot unless you have a good DSLR. Know what your camera can do, and realize that you won’t be able to get some shots when you only have a few moments. Also be aware of how many photos you can get on a battery charge, and plan your photo taking around that number. You don’t want to be left with an empty battery when there are plenty of opportunities for great shots all around you.
  9. Do some basic post-processing. No, you don’t need Photoshop for this. You can do it for free with Picasa on Windows and iPhoto on the Mac. They’re both great at letting you do basic tasks such as adjusting exposure, lighting, boosting color, adding sharpness, removing red eyes and cropping. You won’t believe your eyes when you see the difference in your photos! Trust me on this one, take a half hour to learn how to manipulate the controls in Picasa or iPhoto, and you’ll be thanking yourself again and again. So many mediocre photos can be helped by a little post-processing that it’s staggering! Really, I can’t emphasize this enough.
  10. Use my favorite fix for bad photos: the Delete button. This works wonders! You can declutter your photo library in minutes, and end up with decent photos you’ll actually want to show people! You’ll no longer want to avoid looking at your photographs! Have no mercy, just delete that horrid shot. If you followed steps 1-9 and you still couldn’t help a particular photo, put it out of its misery. Delete it for good!

If you want to get a few more tips, read the post I wrote about photographing Walt Disney World.

Hope this helps you, really!

Standard
Thoughts

13 arguments for telecommuting

I thought I’d put together this list of arguments you could use to make the case for telecommuting at your workplace. No, there’s nothing special about the number 13. That’s how many reasons I came up with. If you know of more, please let me know and I’ll be glad to publish them here.

First, I should say I’m all for telecommuting, and I think it’s unfair to make people come into work when most jobs — in particular tech jobs — can be readily converted (with little or no effort) to allow employees to work from their homes.

Reduced office space

Leased office space can be less (significantly less) when employees are allowed to telecommute, since most people won’t need dedicated offices at company headquarters. All that’s needed are offices for the employees that need to be there: phone operators, receptionists, facilities, help desk, and meeting rooms. You’ll need the latter because employees will probably need to come in for meetings or other tasks that need to be performed on-site once a week or every two weeks. In addition, sales folks may need to come in to meet with clients, etc. An unexpected benefit will be that you’ll actually be using the conference rooms a lot more than before. Management will be happy, since the space they’re paying for will be well utilized.

Reduced business utilities

Utilities and other bills, like communications, will be much, much less. With most of the workforce staying at home, and much less office space, electricity usage will be slashed. None of those things that really rack up the bills, like A/C, computers and lights will be anywhere near their previous figures. People will use IM and video conferencing tools (like Skype) to communicate with each other, and will use home phones when needed. You’ll be able to ditch expensive phone system, or scale them down significantly.

Less crowding during rush hour

Businesses that allow their employees to telecommute are doing a greater good. They’re directly contributing to solving today’s serious traffic problems. When employees don’t need to come into work, they stay home and their cars stay in the garage, not on the streets, clogging up avenues and highways, causing traffic delays and accidents. Let’s not also forget the added benefits of burning up less fossil fuels.

Less pollution

When cars stay in the garage, there’s less pollution. I’m not just talking about greenhouse gases, I’m talking about traffic noise as well. Those of you who live near busy streets know this.

Contribute to national security efforts

Businesses that allow employees to telecommute are indirectly contributing to the safety of our country, by reducing our dependence on foreign oil. The less gas employees burn driving to work, the less gas that we’ll need to purchase from countries that finance terrorism. That’s always a good thing. And police and fire trucks will have an easier time driving on our streets during rush hour with less cars on the roads.

Less stress for everyone

I don’t know about you but traffic is very stressful. Sitting in traffic, knowing you can’t go anywhere and you’re stuck there, sandwiched in between other cars, puts one in a very helpless mood. Don’t even get me started on how much time is wasted on commutes, because that’s completely ridiculous and unnecessary. And let’s not forget the people who are actually trying to go shopping or must make it to an event during rush hour. They’re stuck in there too, and they’re not going to work.

Higher job satisfaction

Wasted time makes productive people unhappy. Time and energy gets wasted in traffic. Hence, allowing employees to work from home makes them happy. It’s logical, isn’t it? Besides, I don’t need to analyze things to know that if I could sit at my computer in the morning, right after having breakfast, and get right to work, instead of having to find clothes, get in the car, waste my time on the road, get out of the car and settle in my office, I’d be a lot happier. Why go through all that when I’ve got everything I need right at home?

Less expenses for employees

What do we spend on gas every month? C’mon, add it up! I spend about $100, but I’m one of the luckier ones, because I only have a 25 mile round-trip commute. I’m sure other people spend more. And we’re not even counting the wear and tear on our cars. And how would we value the time we waste in traffic, time that could be spent working productively? I suppose we could calculate our hourly rate, then come up with a total for the time wasted on the road.

Less expenses per employee (business-wise)

Managers, count up the costs to get an employee in a chair at your place. Add in furniture, supplies and equipment (and make sure to include the computer as well). Well, now slash all those costs by about 70%. Happier? An employee that works from home won’t need an office, won’t need a phone, won’t need a desk or a chair or a bookcase or a filing cabinet or even a computer. Okay, there might be some leeway with the computer. You could let them sign out company equipment if you desire, or sponsor the whole or part of the cost of a computer, considering that they’ll use it for work now in addition to their home chores. And you might need to supply them with work-related software as well. But think about it, all of the other costs will go away. When employees come in, they can use terminals set up in the conference rooms, or bring their own laptops. And they’ll use common desks set up near conference rooms to do work that needs to be done at work, not dedicated offices.

Improved management practices

When employees telecommute, work becomes objective and goal-oriented for everyone. It has to, in order for telecommuting to work. Employees get treated as adults instead of babies that need to be micromanaged. Clear monthly and weekly objectives get set, and employees produce status reports or track their objectives online. When tracking is enabled, it’s easy to see who performs and who doesn’t perform. Non-performers can be let go. This is efficient management. Employees are enabled to do what they need to do, and the good ones will go out there and do it.

More family time

Those of you who are married or have significant others, let me ask you this: if you had two hours a day, extra, would you spend them in traffic, or would you spend them with the person you love? That’s an easy answer, right? So okay, you don’t have a spouse. Wouldn’t you rather pursue a hobby or read a book rather than waste your time in traffic?

Safety, safety, safety

People without time constraints are more laid back when they drive. When you work from home, you don’t need to rush into work. This means we’ll have less aggressive drivers on the streets, and our lifestyles will be more relaxed on the whole. Businesses who allow their employees to telecommute are indirectly decreasing the number of accidents and costly traffic tickets.

No more workplace annoyances

This may be more of a pet peeve of mine than anyone else’s, but I’d rather use the bathroom at home than the one at work. I don’t want to go to the bathroom and see (or smell) someone else in there. Why? Because people are disgusting. I want to be able to relax, at home, in my own bathroom, where I’m not in danger of contracting other people’s germs or be subjected to other people’s gross bathroom habits. I’m sure there are plenty of things that annoy you about your own workplace or co-workers, so we probably don’t need to get started down that path. Well, wouldn’t you be happier if you could see less of those annoying people, and only deal with them through email, from time to time? I thought so.

Hope this helps you make the case for telecommuting at your own workplace. Or, that it helps business managers realize the value of this wonderful practice, which is a fantastic way to attract motivated and valuable employees to one’s organization.

Standard
How To

Four habits that prevent headaches

If you suffer from frequent tension headaches, like I do, the following list of habits might help you prevent them. These are things that work for me:

  • We tend to frown when we’re frustrated or stressed. Become aware of it, and stop it. Relax your forehead, and keep it that way, on purpose, even when under stress.
  • Stop clenching your jaws, and stop chewing gum. These are two actions that will cause tension headaches and jaw pain, not to mention jaw clenching permanently damages your teeth.
  • Drink water frequently. We should get about 8-10 glasses of water per day. 6-8 glasses is also okay, but it’s better to get more if possible.
  • Breathe deeply and get lots of fresh air. Our breathing is usually shallow, and we’re not really circulating the air in our lungs. Breathing deeply helps keep our brain fed with lots of oxygen and keeps the headaches away. If you can open the windows at home or at work, open them. If you can’t, because you work in an office building where that’s not possible, make sure you keep your office door open, and keep your A/C on to circulate the air. Or bring a desk fan and keep it on, to help move the air a little bit. Go outside and take short walks during the day. Make sure to breathe deeply. In your car, don’t keep the A/C on recirculate, let it pull the fresh air from outside. Or open the window or sunroof slightly, to let in the fresh air.

I’ve found that if I do these things, I have tension headaches much less frequently, and I don’t need to load up on Ibuprofen or other headache medication, which is always a good thing.

Standard
How To

A quick maintenance operation that will prolong the life of your laptop

I upgraded the RAM in my laptop yesterday, and stumbled onto a really easy maintenance job that will most certainly prolong the life your laptop, and help it run faster, cooler and quieter. It sounds impossible to do all that in one fell swoop, but it’s really easy to do, and it works. I’ll give you a hint: it has to do with your laptop’s cooling.

I realize your laptop is going to be different than mine, so my photos may not help you much when it comes to doing this on your own laptop, but bear with me, the principle is the same, and this simple clean-up job will really help.

What I’m talking about is the laptop’s cooling fan assembly. It’s the fan that cools the processor’s heatsink, and is responsible for keeping the processor below the upper temperature threshold. It’s like your car’s radiator. If it wasn’t working, your car would overheat very fast, wouldn’t it? Same thing here, except your laptop’s “radiator” is prone to getting clogged up with dust – lots of it, too.

After about a year and half of using my laptop mostly on clean tables — not on carpets, or my lap, or on tablecloths, as some of us do [!] — I was very, very surprised to find out how much dust had accumulated on my laptop’s cooling grill. I didn’t even open my laptop in order to inspect it. I just wanted to install some extra RAM, but saw the cooling fan and figured, hey, let me open it up even though it looks clean enough from the outside. Boy, was I in for a shocker! Have a look at this photo to see for yourselves.

Cleaning an Averatec 6240 series laptop

You may not think that layer of dust is much, but have a look at a macro photo I took of a piece of it. I used a moist cotton swab to pull off the dust from the grill. Can you see how thick it was? It’s a wonder any air managed to get through!

Cleaning an Averatec 6240 series laptop

In case you’re wondering how I removed the cover from the cooling fan, it’s simple. There were four small screws holding it in place. They were each about the size of those screws you find in the frames of your eyeglasses, so you can use the small screwdriver from a frame repair kit. (If you’re a geek like me, you probably have your own mini-screwdriver set.) After using moist cotton swabs to thoroughly clean the grill, I blew through the grill from both sides of the laptop to make sure no dust was stuck inside. I was out of air spray, so I just used my lungs — if you do the same, be careful, don’t inhale the dust, it doesn’t taste good… Then I also wiped the fan blades clean with more moist cotton swabs, after which I used a couple of dry ones to wipe the entire assembly. Have a look at the finished product. Looks pretty good, doesn’t it?

Cleaning an Averatec 6240 series laptop

The important thing to remember is that most people can do this at home, and it’s a completely user-serviceable operation. I didn’t have to remove any warranty stickers (although my laptop’s out of warranty anyway). As a matter of fact, I only removed the panel that’s supposed to give me access to the RAM. It’s a big panel, so it really gives me access to a lot more stuff.

Cleaning an Averatec 6240 series laptop

If my laptop managed to get that much dust inside after only a year and a half of normal use (on tables and desks), I can’t imagine how much dust there is in other laptops that get used everywhere, and never get cleaned! To me, it’s a miracle that most survive through their projected 3-year lifetimes, and even last beyond that. I have to wonder how much better they’d run if their owners would take the time to clean them out once in a while. My suggestion is that you schedule time to do this cleaning once a year.After I finished, I noticed a difference right away. My laptop is cooler now, and runs much quieter. Before, the fan ran in overdrive most of the time. Now, it only runs at higher speeds when the processor is crunching through difficult operations, which is the way it should be. It also runs a little faster, and it’s more responsive. This also makes sense, because a cooler processor works better. It’s the same principle behind water-cooled processors, which can be overclocked because their temperatures are kept low.

At any rate, I encourage you to open up your laptops and try this for yourselves. But please, make sure they’re turned off, unplugged from any power source, and the batteries are removed before you even think of opening them up. Also, ground yourselves before you touch the circuits. You don’t want to short anything inside with any static electricity you might generate.

Standard