How To

Get the tiltshift look right from Adobe Lightroom

If you use Adobe Lightroom and want to apply a tiltshift effect to your photos, you can spend hundreds of dollars on expensive Photoshop plugins, or you can do it for free, with an Adobe AIR app called TiltShift.

If you’ve used TiltShift before, you know you can open any photo in it and apply tiltshift effects to it, but did you know you can do this right from Lightroom? Here’s how.

In Lightroom, open up the Export window and add a new Export Preset. See the screenshot below. I called mine TiltShift, so I can easily remember it. Adjust any of the settings, like color space, sizing, sharpening, etc. They don’t really matter, although it’s better to keep the image smaller so TiltShift can work faster with it.

The really important option is in the post-processing section — the very last one in the Export window. There, you’ve got to make sure you tell Lightroom to “Open [your photo] in Other Application…”, then click on the Choose button and browse to find the TiltShift app. This is pretty much it.
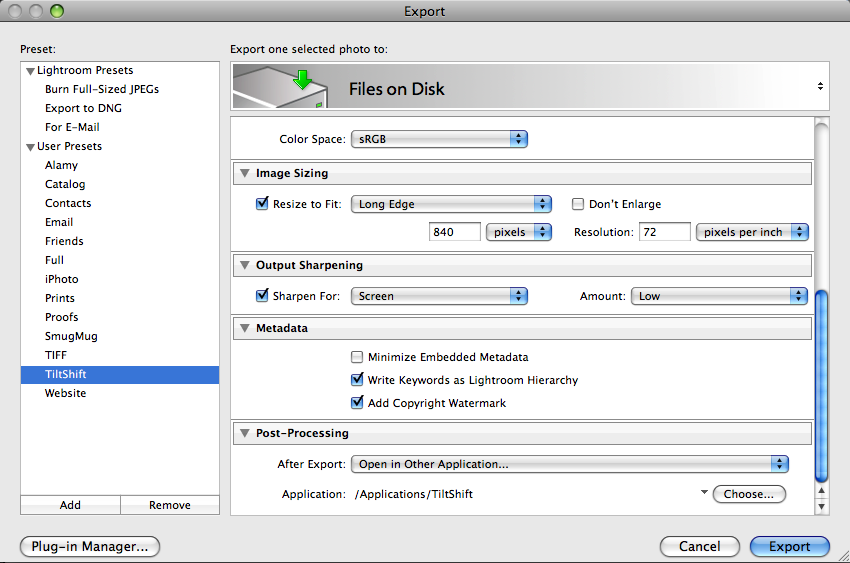
lightroom-tiltshift-setup

Lightroom will automatically pass your image to TiltShift, which will open it and allow you add tiltshift effects to it, to your liking. For example, I initially processed this image of a medieval water pump found on the streets of Medias, Romania, in Lightroom.
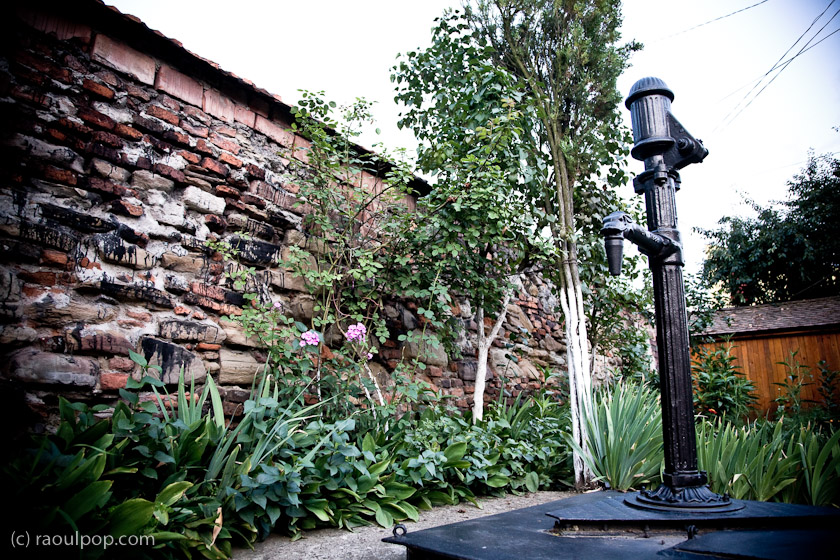
The old water fountain

Then I exported it into TiltShift using the export preset set up as described above, and adjusted the settings there to get the effect I wanted. This is how the controls and the image looked inside TiltShift.
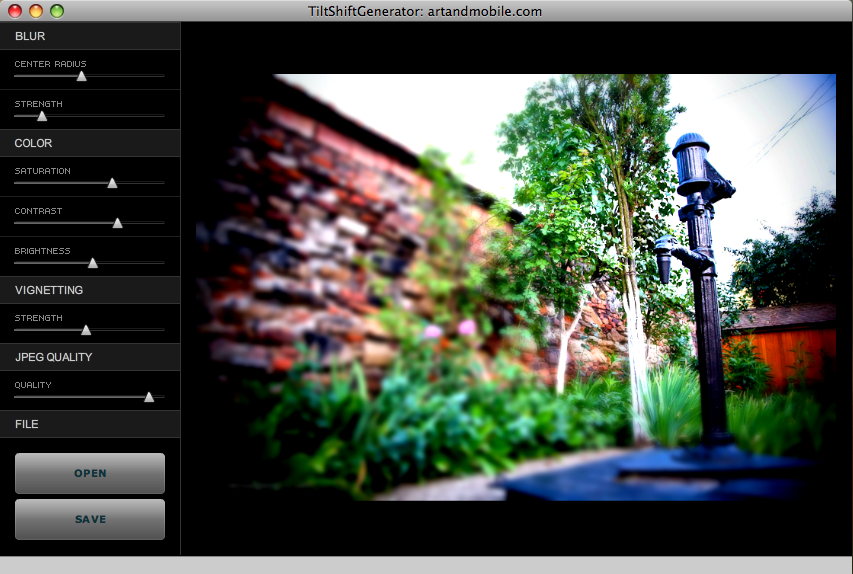
tiltshift-screenshot

Once I did that, I saved the photo and uploaded it here. This is how the final image looks.

water-fountain-tiltshift

It couldn’t be easier, and again, let me remind you TiltShift is a free app.
[TiltShift home page] [Download TiltShift]

Standard
How To

Finally, an update for Apple's Bluetooth problems

Updated 8/26/09: It turns out the firmware update didn’t fix the Bluetooth issues. But OS X 10.5.8, which also came out recently, seems to have mostly fixed the problems. I still get the occasional Bluetooth connection error, but it’s nowhere near as often as before.

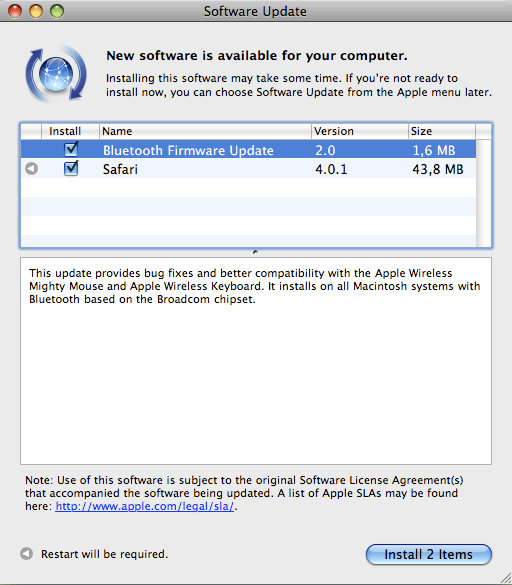
A software update noticed popped up on my MBP today, telling me Bluetooth Firmware Update 2.0 was available for download and install.

bluetooth-update-1

The update explanation says the following:

“This update provides bug fixes and better compatibility with the Apple Wireless Mighty Mouse and Apple Wireless Keyboard. It installs on all Macintosh systems with Bluetooth based on the Broadcom chipset.”

Finally! If you’re unfamiliar with the Bluetooth crashing problems on Mac computers, then you’re one of the few lucky ones. But the rest of us with late generation laptops like the MacBook Pro have had this issue for at least a few months now. This, for example, is just one of the many threads in the Apple Forums dealing with this persistent Bluetooth issue. On June 9, I’d had enough and vented on FriendFeed about it.

Basically, Bluetooth communications stopped working after a Mac was woken up from sleep mode, necessitating either a turn off/on cycle of the Bluetooth hardware, or another quick sleep/wake cycle. I for one didn’t have too many problems with the keyboard and mouse not working, but I did have a serious issue maintaining connectivity with my Nokia N95 via Bluetooth. My MBP kept refusing to connect to it, and I can’t remember how many times I removed and re-added it from my preferred Bluetooth devices. I even thought my N95 was to blame, until I tried turning Bluetooth off/on and realized my MBP could connect to it just fine after that.

From the looks of things, Apple’s been at work on a fix for the problem, and it’s now available for general install. So, by all means, download away and see if it helps you. I for one will be on the lookout for any more Bluetooth issues, to see if this firmware update has truly fixed the bug.

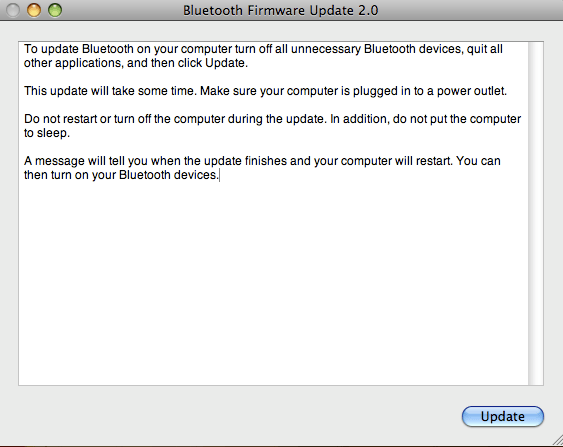
Before I close, I’d like to point out that even though a restart is not announced for the firmware update, you will most certainly need to restart your Mac. Once the Safari update installs, and your Mac restarts, the following dialog box pops up on the screen, informing you that the Bluetooth update will now begin, and your machine will restart once it’s finished. Just FYI.

bluetooth-update-2

Standard
How To

Connect two Drobo units to your computer at the same time?

âž¡ Updated 1/14/19: I have revised my opinion of Drobo devices. After experiencing multiple, serious data loss events on multiple Drobo models, even recent ones, I no longer consider them safe for my data.

One of my readers asked me a little more than a month ago if I could post some screenshots of the Drobo Dashboard with two Drobos connected at the same time. Sure, no problem. It’s easily doable, and the Dashboard software automatically differentiates between each of them and displays the proper stats for each, even if they’re name the same. I haven’t tried it yet, but you could probably connect three Drobos at the same time if you wanted to.

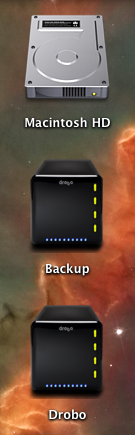
Here’s what the drive icons look like on my MBP’s desktop.

mbp-drive-icons

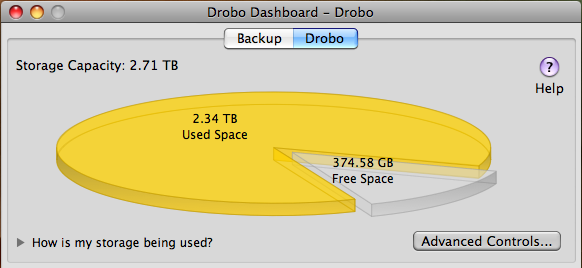
The main screen inside the Drobo Dashboard software will display buttons for each connected Drobo, allowing you to switch between them as needed.

drobo-dashboard-drobo

drobo-dashboard-backup

As you can see, I need to either free up some space on my main Drobo or get some new drives. Using the Drobolator, it turns out I’d need to get two new drives (either 1.5TB or 2TB each) in order to see any increase in the available space.

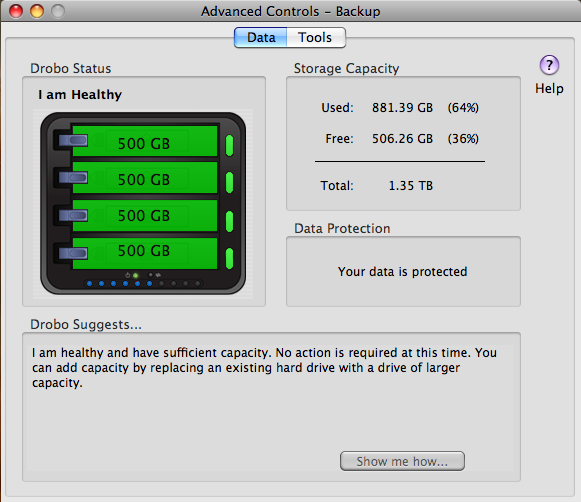
The Advanced Controls screens inside the Drobo Dashboard show the drive layouts inside each Drobo.

advanced-controls-drobo

advanced-controls-backup

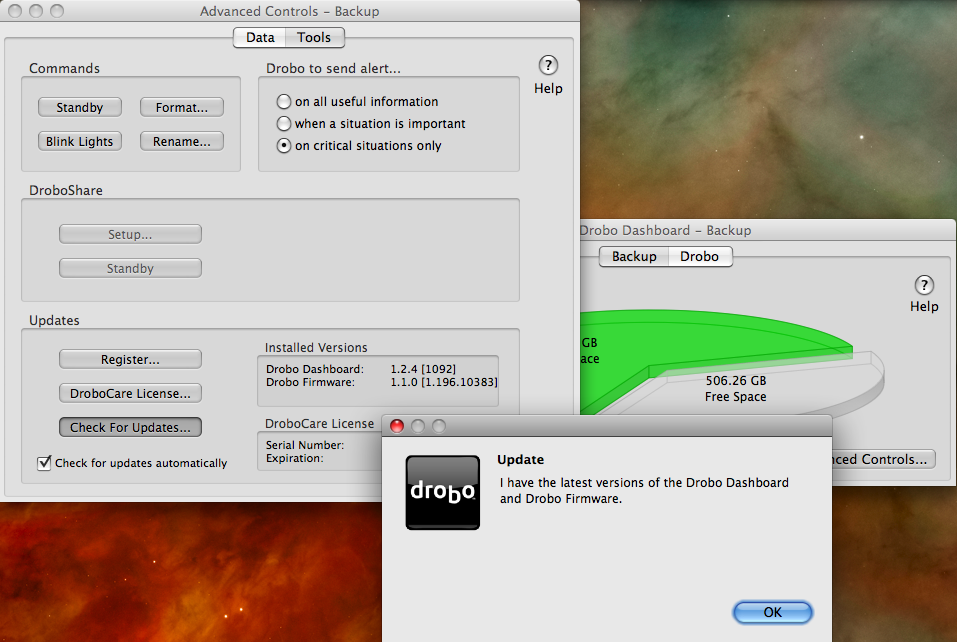
I’d like to point out a possible bug in the Drobo Dashboard software while I’m at this. As you can see on the following screenshot, when I click on the Check for Updates button to see if there’s a firmware upgrade for my Backup Drobo, which is a USB-only unit, I get a message which tells me both the Dashboard and the firmware are up to date, when I know that the firmware is out of date, as you can see from the firmware version itself. I’ve often had to perform manual firmware upgrades to my Drobos, because I keep getting this message in error. I hope this bug can be resolved at some point.

drobo-dashboard-check-for-updates-error

Other than that, the Drobo Dashboard software works as expected, and can work with multiple Drobo units as well. No problems there.

Update: After doing a manual upgrade to firmware version 1.2.4, the automatic check for updates from within the Drobo Dashboard worked, and when my Drobo rebooted, I was prompted to upgrade to 1.3.0. After an initial unsuccesful attempt, I was able to upgrade just fine. One less item on my to-do list. Good.

drobo-dashboard-new-firmware-notice

Standard
How To

Can the WD TV be networkable with firmware upgrade?

The WD TV can be placed on a network via an unofficial firmware upgrade available from B-RAD. The souped-up firmware apparently allows one to plug USB ethernet sticks (I’ve had one of those lying around in my desk drawer for years) into the WD TV and mounts its connected drive(s) onto the network — among other additional features.

I haven’t tried this yet. I found out about it from Tobias Schneble, a reader from Germany who emailed me after seeing my article on upgrading the WD TV to the new official firmware from WDC. Tobias tells me there’s a wiki site where detailed instructions are given.

Updated 4/5/09: I modified the post in accordance with the very helpful comment you see below, provided by the fellow who runs the B-RAD website. It turns out that hacking the WD TV to add it to a network and to enable other extra features is as easy as upgrading it with a normal firmware package. That’s great!

Standard
How To

How to travel with the Drobo

You might think this is a banal topic, but I don’t. I’ve had to take three of my Drobos with me on a recent overseas trip, and I had to make some clear decisions about how I was going to transport each of them.

The first thing I wondered about is whether there’s a carrying case or bag for the Drobo. I’ll talk about this first, then I’ll give you some practical travel advice.

Right, the carrying case — there isn’t any. There’s a grainy pic on TwitPic of some sort of a large plastic case with foam where you could place the Drobo and its hard drives, but that’s too big to take with you most places, particularly when you have lots of other luggage. It won’t work. We need something slim, something that fits right around the Drobo’s rectangular shape, has handles, sort of like a bowling bag, and yet is well-padded to protect the Drobo. Alas, there isn’t any such thing…

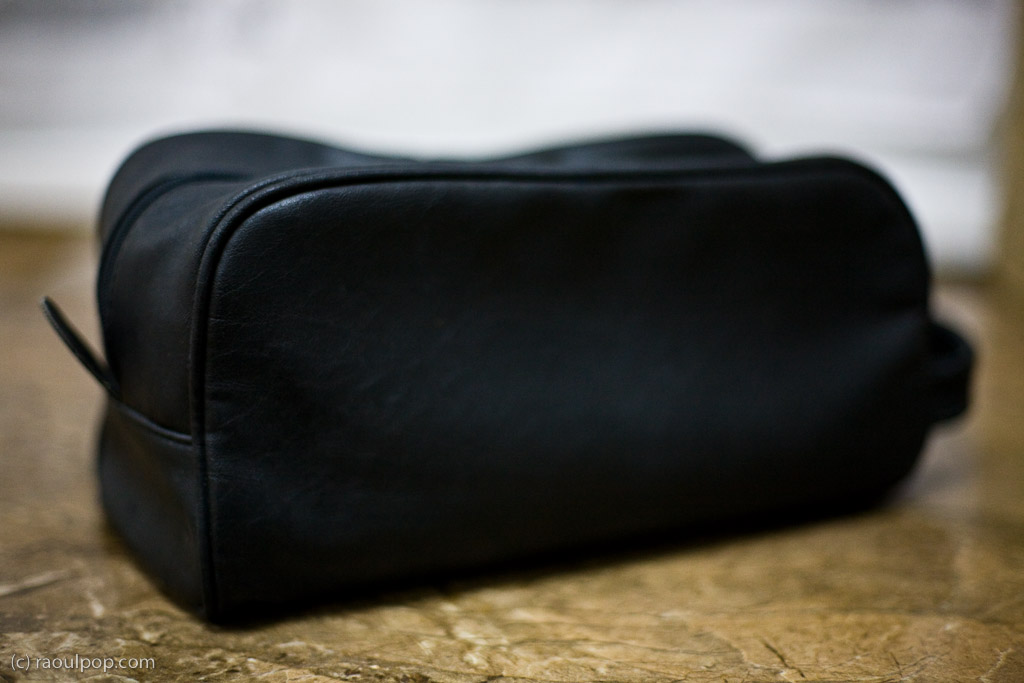
Let me show you a potential design that could work. It’s not something I invented — it’s my travel toiletry bag. Notice its handle is on the front, but I think there ought to be two handles at the top, one on each side, since the Drobo can be fairly heavy with the hard drives inside. The zipper ought to be down the middle of the case, at the top, and the bag ought to have two compartments on each side, or one below, where you can stick the power brick and the USB and Firewire cables.

Potential design for a Drobo carrying case

If Data Robotics or some other company made this sort of a carrying case, we would simply take the Drobo, with its hard drives inside, put it in the bag, and stick the bag in our carry-on luggage. I wouldn’t trust airport personnel enough to check the bag containing the Drobo. Given the way they throw baggage around like it’s bales of hay, they’d likely damage the Drobo and our data.

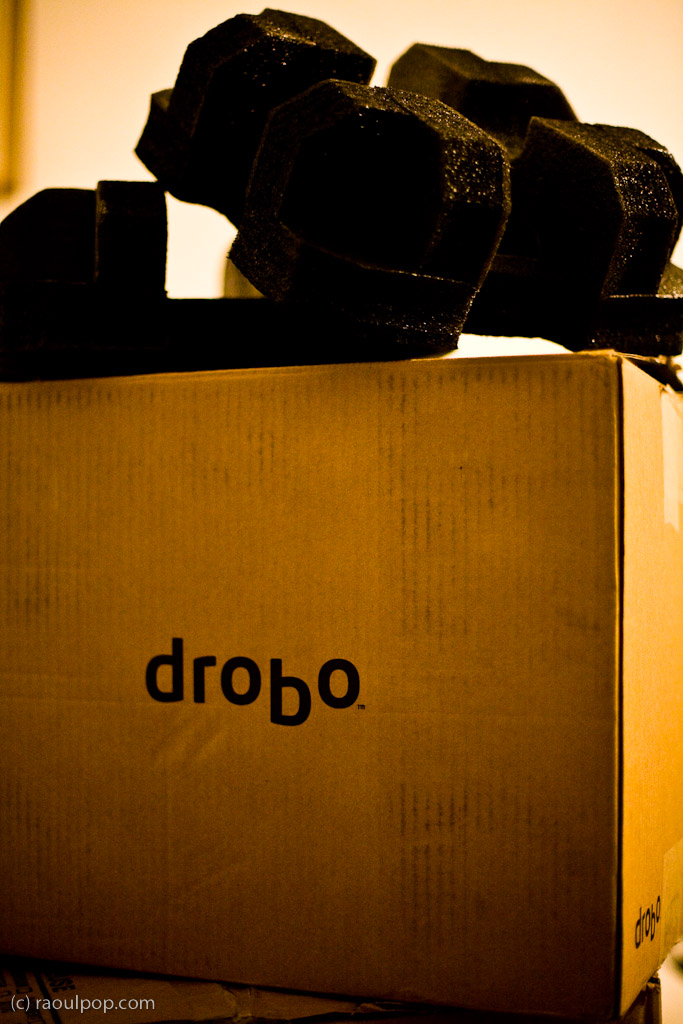
Now let’s get back to reality. There isn’t any carrying case yet. What do we do? What did I do? I was able to send two of my Drobos separately, by ship, and I placed them in their original boxes, which I packed into larger cardboard boxes with other items. They arrived safely, thank goodness. I love those Drobo boxes, they hold up so well! I kept all of them and used them often for storage or transport.

Original Drobo box

As for my third Drobo, the Firewire Drobo, my current primary storage unit, that had to come with me on the plane. I kept the hard drives inside it, packed it in woolen sweaters and other soft clothes, and put it in one of the carry-on bags. Yes, in case you’re wondering, I had to pull it out of the bag for airport security and show it to them. They kept wondering what it was and what it does, and couldn’t believe it was basically an external hard drive. Expect the same treatment from them, at least until they see more Drobos. As for the Drobo’s original box, I didn’t want to lose that, so I flattened it and placed it in one of the checked pieces of luggage along with the foam holders and the box that contains the wires, power brick and software CD. I’m glad to tell you that it arrived safely with me, and it’s connected to my MacBook Pro as I write this.

One last bit of advice. If you travel by car, and there isn’t yet any Drobo carrying case/bag, make room in your trunk for the Drobo’s original box. Pack it inside, and you’ll know that short of an accident, your Drobo will be well protected.

Standard